

Hardware components | ||||||
 |
| × | 1 | |||
 |
| × | 1 | |||
| × | 1 | ||||
 |
| × | 1 | |||
 |
| × | 1 | |||
| × | 1 | ||||
 |
| × | 1 | |||
| × | 1 | ||||
This demonstration features the uLCD-220RD-Pi, a display module pack for the Raspberry Pi. The uLCD-220RD-Pi is made up of a uLCD-220RD 1.38″ round TFT LCD display module, a 4D Serial Pi Adaptor, and a 5 way interface cable, for quick and easy connection to a Raspberry Pi.
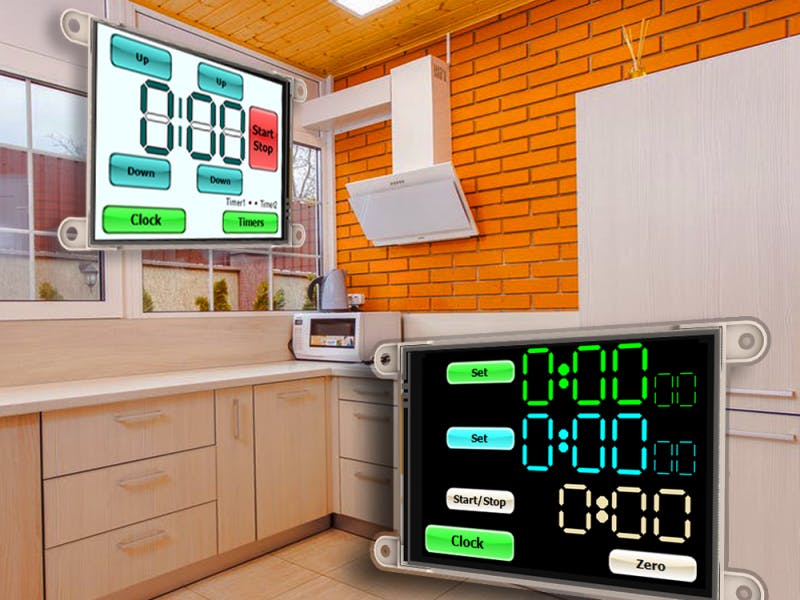
In this demo the Raspberry Pi acts as a host which controls the gen4-uLCD-35DT. The gen4 HMI module was programmed with different forms and widgets, which are then controlled depending on the commands sent by the Raspberry Pi host and vice versa.
This program is tested on Raspberry Pi 2 with Pixel image. It can also run on other Raspberry Pi variants. But, if you are using Raspberry Pi 3, make sure that you first visit this link: https://www.raspberrypi.org/forums/viewtopic.php?f=63&t=151454 to configure the UART of Raspberry Pi 3.
This demo was tested on a Raspberry Pi 2 running Raspbian with PIXEL. It can also run on other Raspberry Pi variants. However, if you are using the Raspberry Pi 3, make sure to visit this link first to properly configure the UART port: https://www.raspberrypi.org/forums/viewtopic.php?f=63&t=151454
Setup the uLCD-220RDThe widgets on the uLCD-220RD were created using the ViSi-Genie environment in Workshop4. ViSi-Genie is an environment that allows users to create GUIs (Graphical User Interface) by drag-and-drop method. The ViSi-Genie project file for this demo can be found inside the attached zip file – “ViSi-Genie-RaspPi-Demo-220RD.zip”.
Download and Install Workshop4To get started, download and install the Worskhop4 IDE from the 4D Systems website, then open the attached project.
Open the Attached Project FileExtract the attached zip file to a folder then open the ViSi-Genie project “demo1”, as shown below.
Download the project here.
You can edit the widgets in each form by using the Object Inspector.
After opening the project file, go to the Project menu and make sure that the Comms Speed and Display parameters are correct as shown below.
- Use gen4-interface board and uUSB PA-5 to connect the display to the PC as shown in the image below.
- Or if you have gen4-PA board, connect the display to the PC as shown in the image below. You can also use the gen4-PA board if you want to use its GPIO pins.
Now go to the Comms Menu and select the correct COM port for the uUSB-PA5, then click on the red button, as shown below.
If the uLCD-220RD is properly connected to the PC, the red button should now turn blue and the name of the display module should be displayed, as shown below.
Download the Program to gen4-uLCD-35DT
At this point, mount the uSD card to the PC using a uSD card reader or adaptor. Go to the Home menu and click on the (Build) Copy/Load button, as shown below.
The project should now start the build and compile process.
Worshop4 will prompt for the correct drive for the uSD card. Select the appropriate drive from the drop-down menu.
Workshop4 will then compile the source code and download the program to the flash memory of the display module
Now unmount the uSD card from the PC and mount it to the uSD card slot of the gen4-uLCD-35DT. Winbutton widget should now appear on the display. It is now ready to receive commands from a host.
The Raspberry Pi must now run a program which will communicate with the uLCD-220RD. The source code for the program is attached. To be able to compile the source code on the Raspberry Pi, you need to install first the ViSi-Genie-RaspPi-Library, which can be downloaded from this link: https://github.com/4dsystems/ViSi-Genie-RaspPi-Library
Follow the instructions on how to install the library on that link.
Connect the Raspberry Pi to the uLCD-220RDConnect the 4D-Serial-Pi Adaptor to the Raspberry Pi, then connect the 5-way cable to the 4D-Serial-Pi Adaptor. Lastly, connect the other end of the 5-way cable to the gen4-IB of the gen4 module.
Or you can interface gen4 module and Raspberry Pi with the gen4-PA using the image below.
After installing the library and connecting the hardware, you can now compile the source code and run the program on the Raspberry Pi. Follow the procedure below.
- After Downloading the file, open the terminal and go to the folder which contains this file: Kitchen-Timer-Code
- Unzip the file using this command:
pi@raspberry: ~ $ sudo unzip Kitchen-Timer-Code.zip
- Navigate to the folder where the contents of “Kitchen-Timer-Code.zip” were extracted to.
pi@raspberry: ~ $ cd Kitchen-Timer-Code pi@raspberry: ~ $ cd kitchenPi
- In LX Terminal type the command to compile:
pi@raspberry: ~$ sudo make
- Run the program using this command:
pi@raspberry: ~$ ./kitchenPi
The gen4 display module should now start displaying the different widgets, according to the serial commands received from the Raspberry Pi host.
For more information, see the application note: ViSi-Genie Connecting a 4D Display to the Raspberry Pi


Comments
Please log in or sign up to comment.