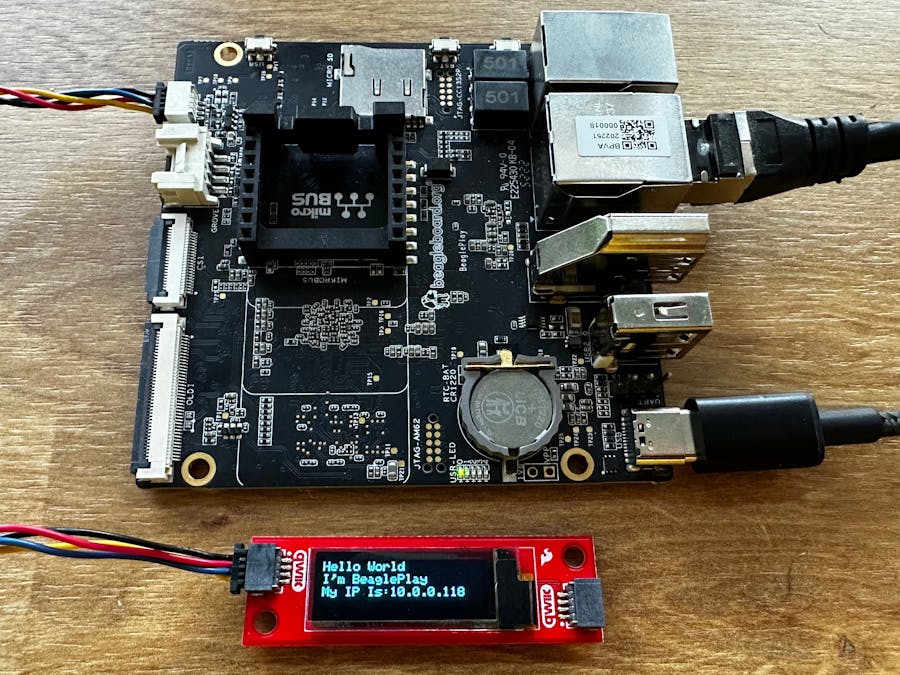
Let's see a simple way to use an I2C QWIIC OLED from Sparkfun with only minor modifications to the source code. (They will probably have this working by default in the future)
The Sparkfun Qwiic OLED Display Library Comes in 3 Parts:
- QWIIC_I2C_Py - We will need to modify this
- QWIIC-OLED-Base
- QWIIC-OLED-Display
The reason we need to modify Qwiic_I2C_Py is that by default, the library expects only one I2C Bus to be present for something like a Raspberry Pi, but our Beagle has many! Specifically, we want to use I2C-5 which is the bus connected to the QWIIC header.
Let's connect things up as follows:
First - A Qwiic Primer on I2C Buses in Linux
For reference, you can check what bus a device is connected to by scanning it.
Lets see what buses are available, we do this by typing:
ls /dev/ | grep "i2c"The output will look something like this:
We can now scan each bus as follows:
i2cdetect -y -r 0The 0 corresponds to i2c-0. We can then replace 0 with each bus until we find the OLED, in this case, we know we are looking for a device at address 0x3C.
Note that when we see a UU, this indicates that there is a device there, but that it is currently being used by another linux process. This is most likely another I2C device that the Beagle uses, such as the EEPROM. You can safely ignore this, but it's helpful to know what you're looking at.
Moving on, let's see Bus 5 (Hint, I2C-5 is the QWIIC connector):
First - let's install my fork of the Sparkfun Qwiic_I2C_Py Library:
git clone https://github.com/virtualRadish/Qwiic_I2C_Py_LC

cd Qwiic_I2C_Py_LC/

sudo python setup.py install
Second & Third - let's grab the other two:
sudo pip install sparkfun-qwiic-oled-base
sudo pip install sparkfun-qwiic-oled-display
Let's do a Hello World:
Create a file and let's call it "HelloWorld.py"
nano HelloWorld.py
Now copy paste the text bellow, then press CTRL+X and ENTER to save.
from __future__ import print_function
import qwiic_oled_display
import sys
import time
def runExample():
    #  These three lines of code are all you need to initialize the
    #  OLED and print the splash screen.
    #  Before you can start using the OLED, call begin() to init
    #  all of the pins and configure the OLED.
    print("\nSparkFun OLED Display - Hello World Example\n")
    #  Create instance with parameters for Qwiic OLED Display
    myOLED = qwiic_oled_display.QwiicOledDisplay(0x3C)
    if not myOLED.connected:
        print("The Qwiic OLED Display isn't connected to the system. Please check your connection", \
            file=sys.stderr)
        return
    myOLED.begin()

#  clear(ALL) will clear out the OLED's graphic memory.
    myOLED.clear(myOLED.ALL) #  Clear the display's memory (gets rid of artifacts)
#  To actually draw anything on the display, you must call the display() function.
    myOLED.display()  #  Display buffer contents
    time.sleep(1)
#  clear(PAGE) will clear the SBC display buffer.
    myOLED.clear(myOLED.PAGE)  #  Clear the display's buffer
#  Display buffer contents
    myOLED.display()
    time.sleep(1)
#  Print "Hello World"
#  ---------------------------------------------------------------------------
#  Add text
    myOLED.print("Hello World!")
    myOLED.set_cursor(0, 10) # Set cursor to top-left
    myOLED.print("I'm BeaglePlay!")
#  Display buffer contents
    myOLED.display()

if __name__ == '__main__':
    try:
        runExample()
    except (KeyboardInterrupt, SystemExit) as exErr:
        print("\nEnding OLED Hello Example")
        sys.exit(0)
Run it by typing:
python HelloWorld.py
How about displaying our current IP Address?
Shout out out to this StackOverflow one-liner which gets our IP Address cleanly so we can display it as a string:
ipAddr = ((([ip for ip in socket.gethostbyname_ex(socket.gethostname())[2] if not ip.startswith("127.")] or [[(s.connect(("8.8.8.8", 53)), s.getsockname()[0], s.close()) for s in [socket.socket(socket.AF_INET, socket.SOCK_DGRAM)]][0]
[1]]) + ["no IP found"])[0])from __future__ import print_function
import qwiic_oled_display
import sys
import time
import socket
def runExample():
IPAddr=(([ip for ip in socket.gethostbyname_ex(socket.gethostname())[2] if not ip.startswith("127.")] or [[(s.connect(("8.8.8.8", 53)), s.getsockname()[0], s.close()) for s in [socket.socket(socket.AF_INET, socket.SOCK_DGRAM)]][0][1]]) + ["no IP found"])[0]
# These three lines of code are all you need to initialize the
# OLED and print the splash screen.
# Before you can start using the OLED, call begin() to init
# all of the pins and configure the OLED.
print("\nSparkFun OLED Display - Hello World Example\n")
# Create instance with parameters for Qwiic OLED Display
myOLED = qwiic_oled_display.QwiicOledDisplay(0x3C)
if not myOLED.connected:
print("The Qwiic OLED Display isn't connected to the system. Please check your connection", \
file=sys.stderr)
return
myOLED.begin()
# clear(ALL) will clear out the OLED's graphic memory.
myOLED.clear(myOLED.ALL) # Clear the display's memory (gets rid of artifacts)
# To actually draw anything on the display, you must call the display() function.
myOLED.display() # Display buffer contents
time.sleep(1)
# clear(PAGE) will clear the SBC display buffer.
myOLED.clear(myOLED.PAGE) # Clear the display's buffer
# Display buffer contents
myOLED.display()
time.sleep(1)
# Print "Hello World"
# ---------------------------------------------------------------------------
# Add text
myOLED.print("Hello World!")
myOLED.set_cursor(0, 10) # Set cursor to top-left
myOLED.print("I'm BeaglePlay!")
myOLED.set_cursor(0, 25) # Set cursor to top-left
myOLED.print("My IP Is:")
myOLED.print(IPAddr)
# Display buffer contents
myOLED.display()
if __name__ == '__main__':
try:
runExample()
except (KeyboardInterrupt, SystemExit) as exErr:
print("\nEnding OLED Hello Example")
sys.exit(0)And there you go, you've written to your OLED display using Python and BeaglePlay.


_ox0H4uABdL.png?auto=compress%2Cformat&w=48&h=48&fit=fill&bg=ffffff)


_3u05Tpwasz.png?auto=compress%2Cformat&w=40&h=40&fit=fillmax&bg=fff&dpr=2)
Comments
Please log in or sign up to comment.