In this project, we will be building an air quality monitoring system based on ESP8266 NodeMCU for checking particulate matter (PM) as well as humidity and temperature.
Additionally, the sensor will be connected to a civilian air quality monitoring network powered by Robonomics software, where any user can share and check the air quality situation in their region.
What is PM10 and PM2.5?PM10 is a particle of a substance with a diameter of 10 microns or less, PM2.5 is a particle with a diameter of 2.5 microns or less. They constantly float in the air and do not settle due to their small size (for comparison, the thickness of a human hair is 100 microns). These particles can occur for a variety of reasons, including industrial processes involving bulk materials handling or mineral combustion and processing. They are also emitted after forest fires and dust storms. In addition, they can come from conventional transport when burning fuel or from wear and tear on tires and road surfaces. Car tires are crushed into fine crumbs and the wind blows them from the roads all over the city.
Why Do We Need to Measure Them?PM10 and PM2.5 are the most dangerous because their size allows them to penetrate people’s lungs, while larger particles tend to linger in the nose or throat. Larger PM10 particles irritate the airways, nose, throat, and eyes. Particles smaller than 2.5 microns can penetrate deep into the lungs and even enter the bloodstream. The effects of these particles on the human body can be devastating:
- poisoning by harmful substances;
- allergic reactions;
- bacterial and fungal infections;
- cancer;
- mucous membrane irritation;
- exacerbation of respiratory symptoms.
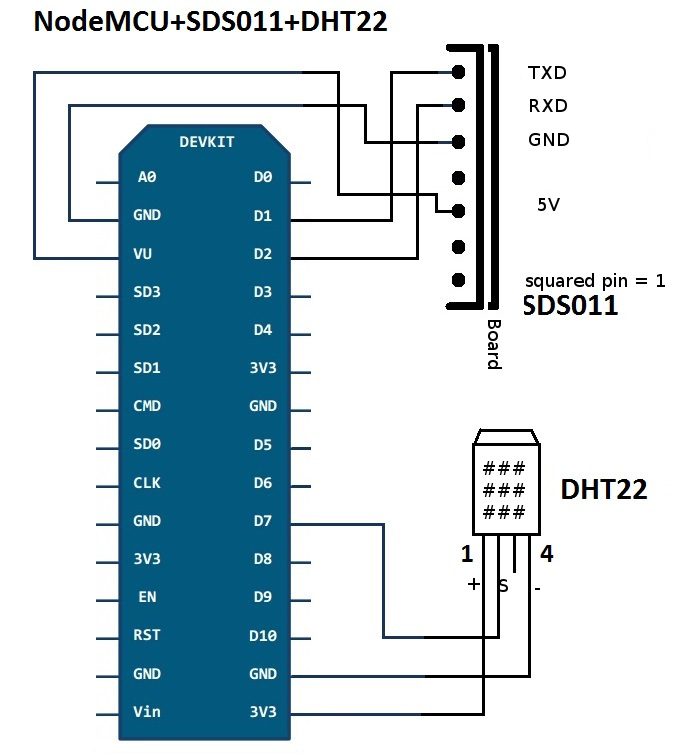
The diagram for connecting sensors to the ESP8266 is shown in the attachment.
Additionally, you will need a power supply. It is recommended to use the 12V/2A power supply with a DC-DC converter to 5V to provide enough sufficient for ESP and the SDS sensor.
To protect the platform form any physical impact, place it in a mounting box.
A video of assembling all the components together is available here:
SoftwareAs firmware we will use the Robonomics firmware, an extended version of the Sensor.Community firmware. Extended firmware adds new sensors and changes the data sending scheme.
To upload firmware to ESP, we will the open source flasher provided by Robonomics team called airrohr-flasher. The latest release is available on Github.
1. Start the flasher. Its interface is shown in Fig. 1.
2. Select the USB port to which you connect the sensor and the firmware language. Then press the Upload button and wait until the progress bar fills up.
3. Next, disconnect and connect back ESP. It's important to correctly upload configuration.
4. The firmware could work with many sensors. In our case choose SDS011 and DHT22 sensors. And Save configuration.
5. The platform should reboot (if not, reboot it manually) and create a Wi-Fi hotspot named "RobonomicsSensor-X". Connect to it, open web browser and go to the configuration page, available at 192.168.4.1.
6. Choose your Wi-Fi network and enter a password. Also, provide a GPS location of sensor to see it on the community map. Additionally, you can select the region where the sensor will be placed. Once preparation is complete, Save the configuration.
The sensor will restart and connect to provided wi-fi network. After that you can find it's IP address and see information from sensor.
Community MapThe main idea that the Robonomics team proposes is to create an open community sensor map to track air quality in different regions. Using Robonomics cloud, data from sensors is securely aggregated and then published to a map.
Once your sensor connects to the Wi-Fi network, it will send anonymized data to the decentralized cloud and then the community map retrieves data. To find your sensor data, go to the community map and find the location of your sensor.


Comments
Please log in or sign up to comment.