


Hardware components | ||||||
 |
| × | 1 | |||
| × | 1 | ||||
 |
| × | 2 | |||
| × | 1 | ||||
| × | 1 | ||||
| × | 1 | ||||
Software apps and online services | ||||||
| ||||||
| ||||||
 |
| |||||
| ||||||
| ||||||
More and more people are searching for a NAS (Network Attached Storage) to store large amount of data, at the office or even for themself. So we created our own NAS that is easily reproducable, adding a layer of protection through sensor that isn't normally found in mainstream NAS.
Here's a video we did to promote the project in a sarcastic way, be warn the video is in french.
LoRa Usage :In our project, the LoRa protocol played a pivotal role in ensuring the reliable transmission of sensor data to The Things Network (TTN), which was then processed and presented on a custom dashboard.
- Wide Coverage: LoRa stands out for its ability to cover vast distances, far surpassing traditional Wi-Fi or cellular networks. This was useful for us to monitor the whereabout of the NAS in case it get stealed.
- Low Power Consumption: Devices powered by LoRa technology are known for their low power consumption, which is essential for deploying sensors in locations where power sources are scarce or non-existent. This feature enabled us to plan to add a power switch in case of power cutoff but still get all the data from our sensor.
- Resistance to Interference: The robustness of LoRa against interference and jamming is another reason we chose this technology. In environments where signals are prone to disruption, LoRa’s unique modulation technique ensures that our data packets reach TTN reliably, thus maintaining the integrity and continuity of data collection.
- Cost-Effectiveness: Implementing LoRa-based solutions is relatively cost-effective compared to other connectivity options that require substantial infrastructure or recurring subscription fees. This aspect allowed us to allocate resources more efficiently across other parts of the project.
The Things Network (TTN) stands as a testament to collaborative innovation, offering an open-source LoRaWAN network tailored for the expansive realm of the Internet of Things (IoT). With a global reach spanning over 90 countries, TTN boasts a vibrant community exceeding 40, 000 contributors, organized into more than 400 communities. This network comprises over 4, 000 gateways strategically deployed by individuals, educational institutions, businesses, and municipalities alike.
UniLaSalle Amiens, among the esteemed entities contributing to this ecosystem, has fortified its presence with a dedicated gateway. Leveraging the capabilities of TTN, our endeavors have been elevated, enabling seamless communication via LoRa and precise monitoring of data transmissions traversing through our gateway.
Through meticulous registration of our devices on The Things Network, coupled with tailored customization of Encoder and Decoder functions, we have aligned the platform to our project's unique requirements.
function decodeUplink(input) {
  return {
    data: {
      Tilt: input.bytes[0],
      Latitude : decodeFloat(input,4),
      Longitude : decodeFloat(input,8),
      WhoAccessed : input.bytes[12],
      HasBuzzerActivated : input.bytes[16],
    },
    warnings: [],
    errors: []
  };
}

function decodeFloat(input, nmb){

  var data = [input.bytes[0+nmb],input.bytes[1+nmb],input.bytes[2+nmb],input.bytes[3+nmb]];

  var buf = new ArrayBuffer(4);
  // Create a data view of it
  var view = new DataView(buf);

  // set bytes
  data.forEach(function (b, i) {
    view.setUint8(i, b);
  });

  // Read the bits as a float; note that by doing this, we're implicitly
  // converting it from a 32-bit float into JavaScript's native 64-bit double
  var num = view.getFloat32(0);
  // Done
  return num;
}
We are using Paho python library to connect our code to the mqtt of TTN.
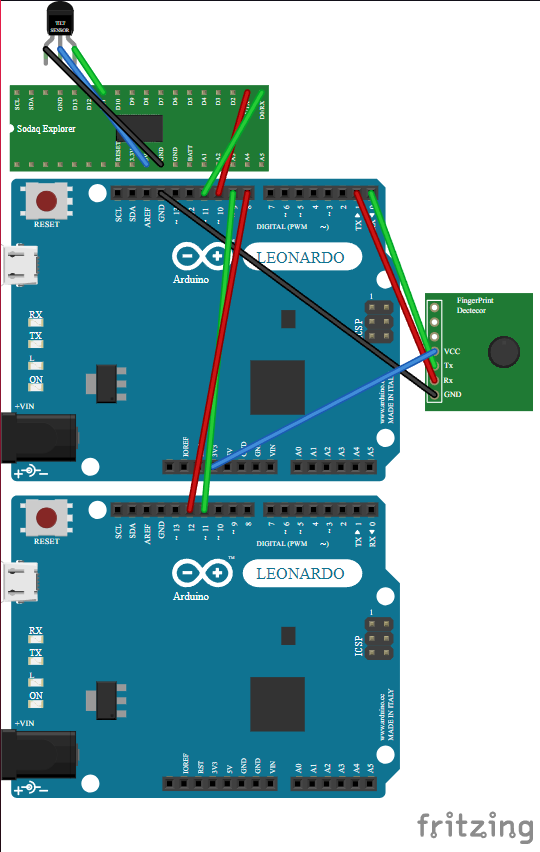
Hardware Configuration :1. Sodaq Explorer :The Sodaq Explorer is used for it's LoRa capability to send all the data collected with all of our sensor. It collect data with it's Serial port for the GPS and Fingerprint Sensor, it also collect data through it's pin 11 for the Tilt Sensor.
As the Sodaq Explorer isn't an Arduino board, it's not natively supported by Arduino IDE. To add it you need to go to File -> Preferences -> Additional boards manager URLs. The URL needed is the following :
http://downloads.sodaq.net/package_sodaq_samd_index.jsonEvery code to run our project is in the Code part at the end of the page.
2. Arduino Leonardo :The Arduino Leonardo was used to both receive and transmit data. It reveiced data with it's Serial Port from the Fingerprint Sensor, and with it's Software Serial for the GPS data. It then sent all the data to the Sodaq Exploer with a Software Serial to be sent to TNN with LoRa.
3. Arduino Leonardo with GPS Shield :For this project we used a GPS shield to collect our position so that we are able to update in real time the dashboard. Because of the limitation of LoRa technologie, we were able to send information once every five minutes but it's more than enough for our need as it should not move at all.
The Shield send the GPS data to the Leonardo through it's Serial port, then we send back the position to the other Arduino Leonardo to be treated then sent to the Sodaq Explorer.
The shield we had also had a LoRa module in it but we didn't need to use it.
4. Laser Cutting :For the project, we did a box that is able to close to store the NAS in.
The schematics is at the end of the page, but you can also generate your own with the URL above.
The assembling of the box is really easy, you only need to assemble the box and the lid separately. You also need to use a metal pin as an axle for the hinges. For exemple us we used a simple screw and it did the job wonderfully.
We used the Fingerprint Sensor to open the box that was locked with an electromagnet and a metal piece attached to the lid.
Software Configuration :1. Installing OpenMediaVault :Run the following command on Raspberry pi to have last version of the rep
sudo apt update && sudo apt upgradeDownload the latest version of OpenMediaVault (OMV) from the official github script :
wget -O - https://github.com/OpenMediaVault-Plugin-Developers/installScript/raw/master/install | sudo bashFollow the on-screen instructions to complete the installation process.
When the installation was finish, go to the OpenMediaVault web interface by using the raspberry IP.
The default Login and password, don't forget to change it.
- Login : admin
- Password: openmediavault
Install Docker on Windows or Linux or Mac:
https://docs.docker.com/get-docker/
After the installation running the following command to setup the postgres database:
docker run --name postgresql -e POSTGRES_USER=chen -e POSTGRES_PASSWORD=rioc -e POSTGRES_DB=mydb -p 5432:5432 -v D:\mydb:/var/lib/postgresql/data -d postgresdocker run: This command is used to create and start a new Docker container.
--name postgresql: This option assigns the name "postgresql" to the container.-e POSTGRES_USER=chen: This sets the environment variablePOSTGRES_USERto "chen", which will be the username for accessing the PostgreSQL database.-e POSTGRES_PASSWORD=rioc: This sets the environment variablePOSTGRES_PASSWORDto "rioc", which will be the password for the specified user.-e POSTGRES_DB=mydb: This sets the environment variablePOSTGRES_DBto "mydb", which will be the name of the database created inside the PostgreSQL instance.-p 5432:5432: This maps port 5432 of the host machine to port 5432 of the container. Port 5432 is the default port for PostgreSQL, allowing connections to the database from outside the container.-v D:\mydb:/var/lib/postgresql/data: This mounts the local directoryD:\mydbto the container directory/var/lib/postgresql/data. This allows the data directory of the PostgreSQL container to be persisted on the host machine atD:\mydb, ensuring that data remains even if the container is stopped or deleted.-d postgres: This specifies the Docker image to use for creating the container. In this case, it uses the official PostgreSQL image from the Docker Hub.
With this database we will use a basic python code to connect our Dashboard with the database.
import psycopg2
from psycopg2 import sql, Error


# Function to establish a connection to the PostgreSQL database
def connect_to_db(dbname, user, password, host, port):
    try:
        conn = psycopg2.connect(
            dbname=dbname,
            user=user,
            password=password,
            host=host,
            port=port
        )
        print("Connected to the database.")
        return conn
    except Error as e:
        print(f"Error connecting to the database: {e}")
After connected we can use SQL command to fetch data in the database.
3. Enabling SNMP :sudo apt-get install snmpdConfigure SNMP by editing the /etc/snmp/snmpd.conf file.
Ensure that necessary settings such as community string and access control are properly configured.
"includeAllDisks 10% for all partitions and disks"
It's a command I add to the file to get storage information with SNMP.
Restart the SNMP daemon to apply changes:
sudo systemctl restart snmpdI use puresnmp python library to communicate with my raspberry pi SNMP.
import asyncio
from puresnmp import Client, V2C, PyWrapper

# Replace the following values with your own
host = "10.100.3.6"  # The IP address of the Pi
community = "public"  # The SNMP community string

async def fetch_snmp_data(oid):
    client = PyWrapper(Client(host, V2C(community)))
    output = await client.get(oid)
    return output

async def get_system_info():
    oids = [
        "1.3.6.1.2.1.1.1.0",  # System description
        "1.3.6.1.2.1.1.3.0",  # System uptime
        "1.3.6.1.2.1.25.1.2.0",  # System date
    ]
    results = {}
    for oid in oids:
        results[oid] = await fetch_snmp_data(oid)
return results- Develop the Python dashboard code using Dash and Plotly. This includes defining layout, callbacks, and data visualization components.
- Connect the dashboard to the PostgreSQL database to fetch and display sensor data.
- Connect the dashboard to the raspberry pi by using SNMP protocol.
The Home page of the dashboard
The Sensor Dashboard and other information get from database
The NAS parts with all essential information
Conclusion :In conclusion, the development of our NAS project has been a culmination of our engineering education, allowing us to apply a wide range of skills and technologies. This endeavor provided us with the opportunity to create a fully functional system capable of bidirectional communication, data storage, SNMP communication, Dashboard and using a NAS. Through the challenges encountered and solutions devised, we have not only honed our technical abilities but also gained valuable insights into project management and problem-solving.
Acknowledgments :We extend our sincere gratitude to all those who contributed to the success of this project.
First and foremost, we would like to express our appreciation to our mentors, Mr. Pomportes, Mr. Dailly, and Mr. Caron, for their invaluable guidance and support throughout the project's development. Their expertise and dedication were instrumental in overcoming obstacles and achieving our goals.
Special thanks to Adrien for his assistance in various technical aspects, including laser cutting and electronic problem, which significantly contributed to the functionality and reliability of our project.
Here's a link to our school if you are interseted :And another link to our formation a the school :https://www.unilasalle.fr/parcours-reseaux-informatiques-et-objets-connectes


Comments
Please log in or sign up to comment.