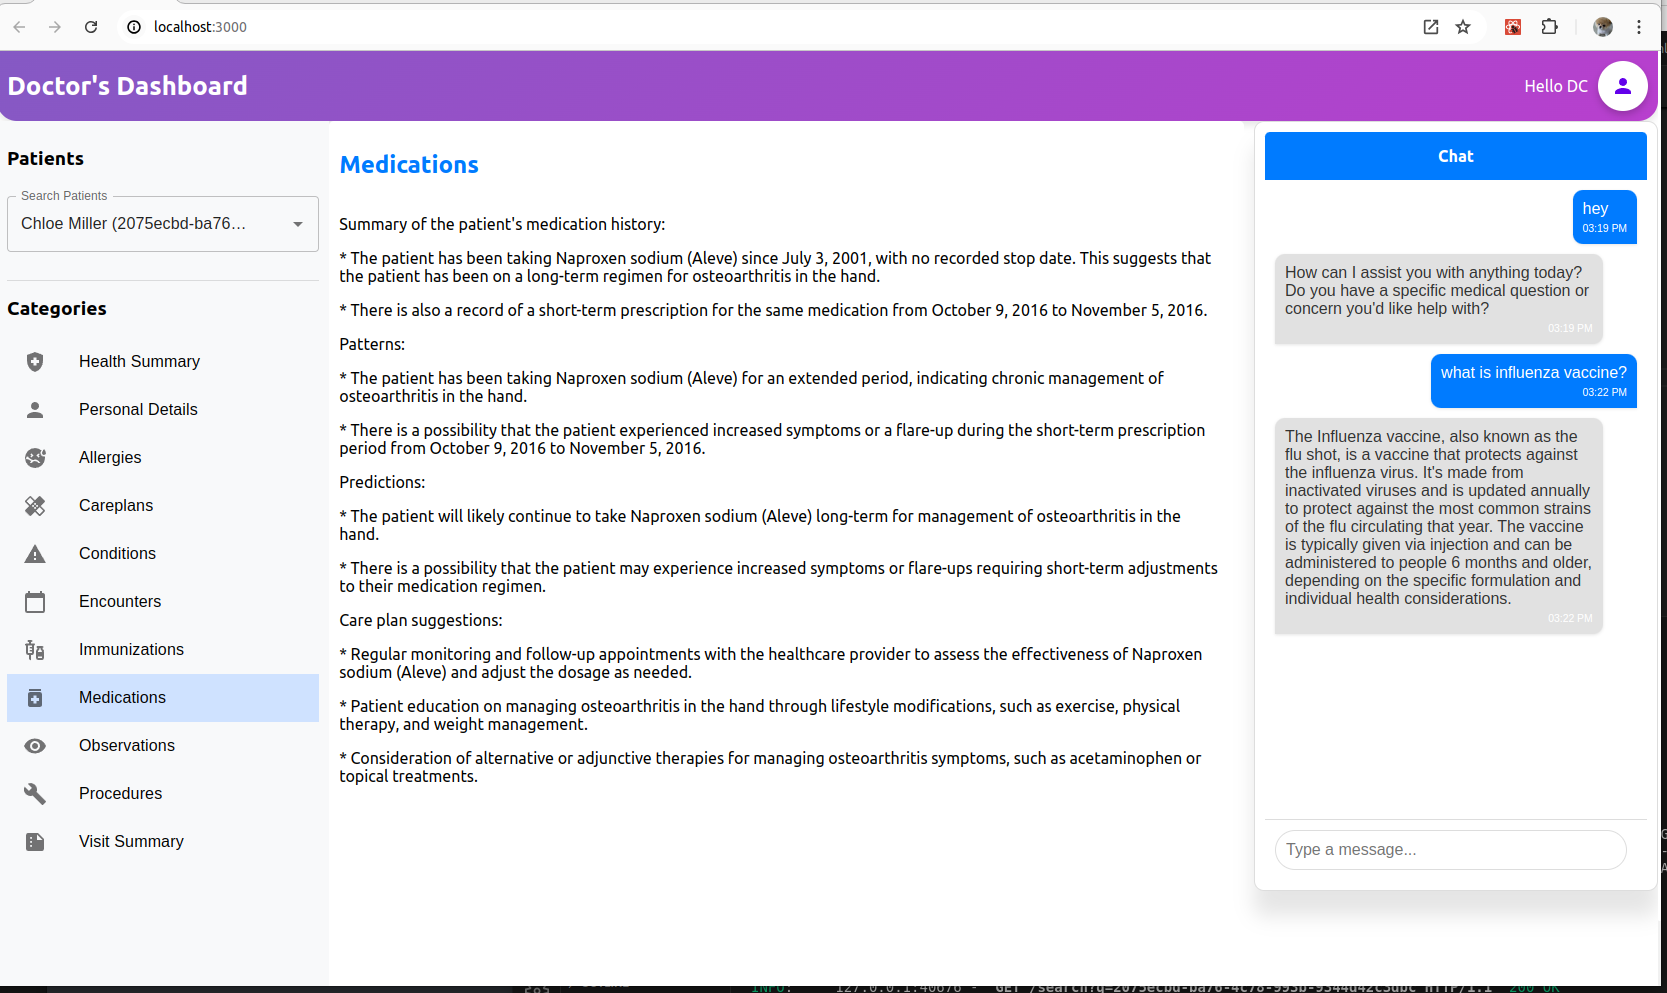
A.MD (A Doctor of Medicine), is a patient summary application which efficiently handles 1.59 million synthetic uniquepatient records. This application aims to provide summaries of recent visits, pattern analysis, prediction and care plan suggestions to doctor for informed decision making. Additionally, it has Health care chat interface where healthcare providers can able to query about anything in health care domain. Leveraging The AMD Radeon PRO W7900 GPU with ROCm, the application supports locally served large language models, making sure in robust performance regardless of handling huge data and protecting patient privacy.
IntroductionThe main motivation behind the development of the patient summary application is to show how easy it is to integrate EHRs with LLMs to create precise summaries for the healthcare provider.
This application handle vast amounts of health care data with ease and simplicity utilizing elastic and RAG. By using these techniques, the application can effectively infer the latest Llama 3.1 models (8B and 70B parameters). The AMD Radeon PRO W7900 GPU with 48GB memory is the heart of the application, and ROCm technology enhances ability to load larger models, enabling faster inference and accurate summaries.
Why AMD GPUs for Healthcare Application?Because they are really pretty to look at.
1. Efficiency and performance : The W7900 with 48 GB offers exceptional performance serves high throughput and low latency, ideal for real-time data processing like patient summaries.
2. Rocm software stack : ROCm (Radeon Open Compute) 6.1.3 enhances the performance and capabilities of AMD GPUs for AI which significantly improves the ability to run LLMs efficiently.
3. Cost Effectiveness : The substantial memory capacity features allow handling extensive healthcare data without the need for expensive cloud resources.
4. Data Privacy: Running AI models locally ensures sensitive patient data remains within the healthcare facility. It complies with healthcare regulations and protects patient information.
5. Industry-Grade : Radeon PRO W7900 GPUs are designed for professional and industrial use. Built on the advanced RDNA 3 architecture, provides > 2x AI performance per compute unit, making them ideal for demanding applications.
Follow the document for installation it uses 6.1.2 Rocm version. The following steps are for 6.1.3 version
Update and Install Required Packages
sudo apt update
sudo apt install "linux-headers-$(uname -r)" "linux-modules-extra-$(uname -r)"
sudo usermod -a -G render,video $LOGNAME
Install AMD GPU Package
wget https://repo.radeon.com/amdgpu-install/6.1.3/ubuntu/jammy/amdgpu-install_6.1.60103-1_all.deb
chmod 777 ./amdgpu-install_6.1.60103-1_all.deb
sudo apt install ./amdgpu-install_6.1.60103-1_all.deb
Install ROCm
sudo apt update
sudo apt install amdgpu-dkms rocm
Configure ROCm Use Case
sudo amdgpu-install --list-usecase
sudo amdgpu-install --usecase=rocm
Test with rocm-smi
Torchtune offers support for ROCm which ran in my local without any errors
Clone TorchtuneRepo
git clone https://github.com/pytorch/torchtune.git
cd torchtune
Setup virtual env
python3 -m venv venv
source venv/bin/activate
Install PyTorch with ROCm
pip3 install --pre torch torchvision torchaudio --index-url https://download.pytorch.org/whl/nightly/rocm6.1/Install WandB
pip3 install wandb
wandb login
Build and Install Torchtune
pip3 install build
python3 -m build
pip3 install dist/*.whl
Run Finetuning
tune run lora_finetune_single_device --config llama3/8B_lora_single_device \
metric_logger.component=torchtune.utils.metric_logging.WandBLogger \
metric_logger.project=llama-tune \
profiler.enabled=TrueThe project consists of user-friendly UI but has a complex backend. A brief overview of architecture before delving into details
Preprocessing the Data
- SyntheticFHIR files totals 161.2 GB of patient data, covering 1.59 million unique patients. Performed various preprocessing steps to get the data in desired format.
React UI
- Provides an interface for doctors to interact with the application. Enables searching for patients, viewing their latest visit summaries, summaries for various categories, and chatting with the chat agent.
WebSockets Stream
- Facilitates two-way communication between the UI and the backend.
Backend
- Built on Python using FastAPI. Handles API requests from the UI and manages WebSocket interactions for real-time connections.
Retriever
- Quickly retrieves patient information, including recent visits and specific category history. Stores and indexes 1.59 million patient records in Elasticsearch for efficient data retrieval, summarization, and analysis.
Augment
- Uses prompt templates as boilerplates for different queries. Augments response data and sends the whole query to the LLM for summary generation.
Docker Containers
- Ollama ROCm Version: Serves LLMs via API for local LLMs.
- Elasticsearch: Contains all patient information, including history, enabling fast and efficient searches.
Weights and Biases
- Logs GPU metrics form rocm-smi while processing the request. Monitors token generation, performance and optimal GPU utilization
Entire project Video Demo is provided in the end of document
Data Gathering
After exploring various resources, none provided with large amount of data which I need for my application. Finally found Synthea which provides large simulated patient data in HL7® FHIR® (Fast Healthcare Interoperability Resources 1 ) format.
Preprocessing:
The FHIR files downloaded from synthea totaling 161 GB with whooping 1.5 million patients
Lets take close look at how FHIR file look like, lots of fields, ids, urls mostly unnecessary information for our application standpoint
clean data is needed to generate relevant data, so needed cleaning of FHIR unwanted fields, then saved into csv format. Entire patients data is divided in to 12 chunks each chunk have the 9 different categories. To get entire patient data with related categories all at one place is a very slow process hence further processing is necessary.
['allergies', 'careplans', 'conditions', 'encounters', 'immunizations', 'medications', 'observations', 'patients', 'procedures']PreviousRevisions of preprocessing:
Various revisions were performed before finalizing to current specific format
Version 1:
Initially started with tables, attempting to render each patient's information and search other tables for related data.
This approach took ~ 20-30 seconds to return results, which is not suitable for real-time applications
Find this work in version_1 folder in doctorapp
prompt += "\nMedications:\n"
    for medication in patient_data['medications']:
         prompt += f"- Code:{medication['CODE']} Description: {medication['DESCRIPTION']} (Start: {medication['START']}, Stop: {medication['STOP']}, Reason Code: {medication['REASONCODE']} Reason: {medication['REASONDESCRIPTION']})\n"
version 2: Tried a different approach to retrieve patient information, but the results were not accurate.
Since the data was also stored in tables, it was difficult to access records to create embeddings.
Review this work in the version_2 folder in the doctorapp
Final Version
For quick retrieval of the patient information its idea to group the each patients info by category and keep them in single indexed ID. Due to large amount of data multi processing to be used to finish importing patient data.
full code is provided in github https://github.com/divyachandana/doctorapp/blob/main/data_preprocess/export_all_data.py
with ThreadPoolExecutor(max_workers=20) as executor:
    future_to_patient_id = {executor.submit(transform_data, pid): pid for pid in patient_ids}
    transformed_data = []
    for future in as_completed(future_to_patient_id):
        ..............
Nearly took 21 hours to import all the patient information in elastic search
Batch processed in 46.81 seconds
Cumulative total time: 76075.25 seconds
Total processing time: 76075.25 seconds
patients meta information can retrieve with following url
http://localhost:9200/patients_meta/_search?prettypatients full information can retrieve with following url
http://localhost:9200/patients/_searchFast API is used in this application and serves via uvicorn. Integration of LLM server Ollama is straight forward to fast api's either API endpoint or Websockets
Ollama LLM server
Follow the below steps to install ollama server in local using docker container which compatible with rocm
docker run -d --device /dev/kfd --device /dev/dri -v ollama:/root/.ollama -p 11434:11434 --name ollama ollama/ollama:rocm
docker exec -it ollama ollama pull llama3.1:70b-instruct-q4_0- -device /dev/kfd:(kernel fusion driver) Adds the host gpu device /dev/kfd to the container.
- -device /dev/dri:(Direct Rendering Infrastructure) Adds the host gpu device /dev/dri to the container.
- v ollama:/root/.ollama: Mounts the volume ollama to /root/.ollama inside the container.
- p 11434:11434: Maps port 11434 on the host to port 11434 on the container.
You should see the output this way when running below endpoint in browser
http://localhost:11434/Ollama is running
Next step is to configure ollama in fast api for summary generation
This below ollama url will be used for text generation
http://localhost:11434/api/generatestream True means the generated tokens will be sent to the client immediately without having to wait for completion. This is handled in the UI using WebSockets, which continuously maintains connection, updates UI with each stream of tokens received from the backend.
async def generate_summary(prompt):
url = "http://localhost:11434/api/generate"
payload = {
       "model": "llama3.1:70b-instruct-q4_0",
        "prompt": prompt,
        "stream": True,
}
Configuring ollama in fast api for chat
This url will be used for chatting with llm
http://localhost:11434/api/chat
async def generate_response(prompt):
url = "http://localhost:11434/api/chat"
payload = {
    "model": "llama3.1",
    "messages": [
        {
            "role": "system",
                    "content": "You are a helpful medical assistant. Your responses should be accurate, brief, and related to healthcare and medical topics."
           },
        {
            "role": "user",
            "content": f"{prompt}"
            }
        ],
        "stream": True,
        }
Elastic search
Docker setup for elastic search
run the below commands in the cmd prompt
export ELASTIC_PASSWORD="elastic"
docker network create elastic-net

docker run -d --name elasticsearch --network elastic-net \
  -p 127.0.0.1:9200:9200 \
  -e ELASTIC_PASSWORD=$ELASTIC_PASSWORD \
  -e "discovery.type=single-node" \
  -e "xpack.security.http.ssl.enabled=false" \
  -e "xpack.license.self_generated.type=trial" \
  docker.elastic.co/elasticsearch/elasticsearch:8.14.3
Access elastic here in the browser
http://localhost:9200
username : elastic
password: elastic
Configure Elasticsearch to handle different requests by modifying the queries accordingly. full code given here https://github.com/divyachandana/doctorapp/blob/main/elastic_search.py
from elasticsearch import Elasticsearch
es = Elasticsearch("http://localhost:920es = Elasticsearch(
        ['http://localhost:9200'],
          basic_auth=('elastic', os.getenv('ELASTIC_PASSWORD'))
        )

def query_elasticsearch(patient_id, category):
    return es.search(.....)

def patient_meta(query, size):
    return es.search(.....)
Configure elastic in fast api
Once Elasticsearch is initialized and queries are written, its very simple to just import the query functions and pass the patient ID and category names.
from elastic_search import query_elasticsearch, recent_info, patient_metaDuring querying in Elasticsearch, it is important to cleanse the data by excluding unwanted fields and privacy concern fields.
This step is just to make sure we wont send the unwanted data to the LLMs therefore to avoid any irrelevant summary
"excludes": [
    "patient_info.DEATHDATE", "patient.ID","patient_info.SSN", "patient_info.PASSPORT", "patient_info.RACE",
        "allergies.PATIENT", "allergies.ENCOUNTER", "careplans.ID", "careplans.PATIENT", "careplans.ENCOUNTER",
    "conditions.PATIENT",...............]
},
"query": {
"term": {"_id": patient_id}
}
Configure websocket connections to handle stream of Data for visual representation
@app.websocket("/ws_generate_summary")
async def websocket_generate_summary(websocket: WebSocket):
    await websocket.accept()
    try:
        while True:
       data = await websocket.receive_text()
       ..........
       async for chunk in generate_summary(prompt):
               await websocket.send_text(chunk)
Prompt Templates
Augmenting quality data to the prompt and having a well-constructed prompt definitely improves the quality of the summary.
We gathered viewpoints from a few doctors,HealthCare Tech experts (they dont want me to put their name out or give credit for the help :-( they are concerned about privacy) and added them as features in the application, and also with the feedback given by them continuously refactoring the prompts based on the generated summaries.
full templates given here https://github.com/divyachandana/doctorapp/blob/main/prompt.py
def summarise_recent_health_info(json_data):
        return f"Provide a summary of the patient's recent health information     firs    t. Then, identify patterns, make predictions, and suggest care plans. Data:\n\n{json_data}"

def summarise_patient_info(json_data):
    return f"Provide a summary of the patient's general information. Data:\n\n{json_data}"

def summarise_patient_allergies(json_data):
    return f"Provide a summary of the patient's allergy information first. Then, identify patterns, make predictions, and suggest care plans. Data:\n\n{json_data}"
Made backend setup very easy regardless of complexity of serving multiple components. Follow the steps in this video and refer to the documentation
React UI setup
Follow the readme file for installing the applicaiton https://github.com/divyachandana/patient_summary_ui
there are lot of files in ui I will walk through a important concept how chat connects to websockets while working
For chat the websocket for backend is ws://localhost:8000/ws once connection establishes then event handler logs the message to the output. This way it ensures real-time updates and a continuous flow of data, providing a seamless chat experience
const connectWebSocket = () => {
    websocketRef.current = new WebSocket('ws://localhost:8000/ws');
    websocketRef.current.onopen = () => {
    console.log('WebSocket connection established');
    if (reconnectTimeoutRef.current) {
        clearTimeout(reconnectTimeoutRef.current);
        reconnectTimeoutRef.current = null;
    }
};
websocketRef.current.onmessage = (event) => {
    const message = event.data;
    console.log('Received message chunk:', message);
    setMessages(prevMessages => {
    const lastMessage = prevMessages.length > 0 ? prevMessages[prevMessages.length - 1] : null;
    if (lastMessage && lastMessage.type === 'received' && !lastMessage.complete) {
// Update the last message's text by appending the new chunk
    const updatedText = lastMessage.text + message;
    return [...prevMessages.slice(0, -1), { ...lastMessage, text: updatedText }];
}
// Add the new message chunk as a new message
    return [...prevMessages, { text: message, type: 'received', timestamp: get    TimeStamp(), complete: false }];
    });
};Wandb Librairy have some inbuilt mertics which logs as soon as we run the backen application, tracts local resources utilization, traffic, memory etc..,
I have customized some metrics and made use of the information which we are getting from ollama api. Once the query finishes it responds with lots of important information about the generated content.
# Log final metrics if the response is complete
if 'done' in chunk_data and chunk_data['done']:
    eval = (chunk_data['eval_duration'] / 1e9)
    tokens_per_second = chunk_data['eval_count'] / eval # eval_duration is in nanoseconds
gpu_utilization, gpu_temp, vram_usage, fan_speed, power_cap, mem_usage = get_gpu_metrics()
# Log final metrics to Weights & Biases
final_log_data = {
    "tokens_per_second": tokens_per_second,
    "gpu_utilization": gpu_utilization,
    "gpu_temp": gpu_temp,
    "vram_usage": vram_usage,
    "fan_speed": fan_speed,
    "power_cap": power_cap,
    "mem_usage": mem_usage,
    "total_duration_seconds": chunk_data['total_duration']/ 1e9,
    "load_duration_seconds": chunk_data['load_duration']/ 1e9,
    "prompt_eval_count": chunk_data['prompt_eval_count'],
    "prompt_eval_duration_seconds": chunk_data['prompt_eval_duration']/ 1e9,
    "eval_count": chunk_data['eval_count'],
    "eval_duration_seconds": chunk_data['eval_duration']/ 1e9
    }
In order to get the GPU metrics with ease, I have made use of subprocess, which retrieves GPU details from rocm-smi and then parses the data.
full code details to gather gpu metrics from rocm-smi is providede in this code https://github.com/divyachandana/doctorapp/blob/main/gpu_metrics.py
result = subprocess.run(['rocm-smi'], capture_output=True, text=True)
output = result.stdout
# Clean the output to remove escape sequences and unnecessary lines
cleaned_output = re.sub(r'\x1B[@-_][0-?]*[ -/]*[@-~]', '', output)
lines = cleaned_output.splitlines()
for line in lines:
..........
        temp = float(temp.replace("°C", ""))
        power = float(power.replace("W", ""))
        fan = float(fan.replace("%", ""))
        pwr_cap = float(pwr_cap.replace("W", "")) if pwr_cap != "Unsupported"             else None
        vram = int(vram.replace("%", ""))
        gpu = int(gpu.replace("%", ""))
        mem_usage = int(mem_usage.replace("%", ""))
    return gpu, temp, vram, fan, pwr_cap, mem_usage
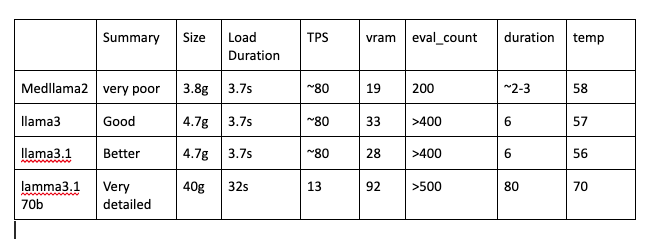
The metrics below compares different model's various such as metrics latency, model load times, tokens per second, gpu consumption. I have used Medtronic, medllama2, llama3, llama, 3.1, lamma3.1 70b
Here are the detail metrics for various custom values goes from backend to bandb webpage. I have made comparisons with 4 different llms with their performance and with their summary outputs.
When comparing with different models summary outputs with the same patient category data each model gives different variations
This comparison includes human feed back from summary and numerical metrics
Based on the metrics from llama3.1 8b and llama 3.1 70b its is necessary to evaluate which one to use if you see below outputs 8b model captures the necessary information providing good output in less time and loads quickly where as llama3.1 70 also captures necessary information and the output is very in detail with precision but the down part for this model is loading time and responding time is too slow.
In conclusion, the A.MD (A Doctor of Medicine) summary application effectively integrates to synthetic EHR data to generate precise and detailed summaries. Leveraging the use of AMD gpu the application shows exceptional performance in handling Large patient datasets and running LLMs, providing high throughput and low latency. Furthermore, the ability to run LLMs locally ensure the protection of data privacy & compliance with healthcare regulations, negating the need for cloud and risk of data breaches.
References


_U1Oeth0ABa.jpg)


Comments
Please log in or sign up to comment.