


Hardware components | ||||||
_ztBMuBhMHo.jpg?auto=compress%2Cformat&w=48&h=48&fit=fill&bg=ffffff) |
| × | 1 | |||
| × | 1 | ||||
 |
| × | 1 | |||
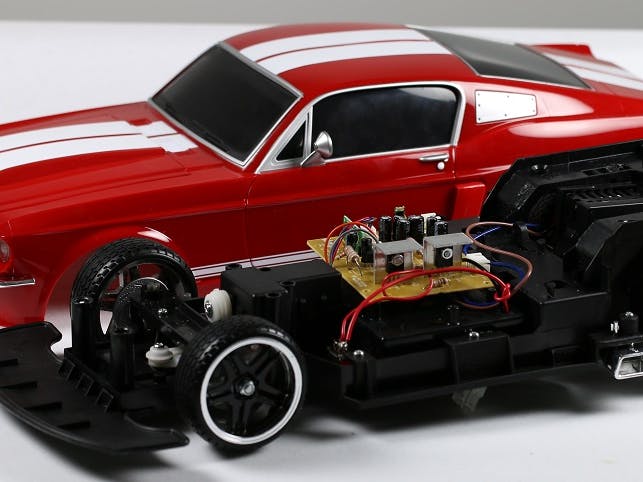
In this project we will create a version of the Bluetooth RC Car with Remote Arduino that can be build without an external motor shield. This project is specific to the Maisto Tech RC Car (1967 Mustang). Since this project is proprietary for this specific car's PCB, you may want to refer to the motor shield solution if you are using a different RC car.
In this project, we will modify an RC car to allow it to be controlled using Windows Remote Arduino via a Bluetooth connection! With Remote Arduino, it is possible to build a Universal Windows Application which will direct the car in any direction. We used a Lumia phone running Windows 10 to control the car with the built-in accelerometer!
You can download the "samples" repository here. This sample is "remote-controlled-car" inside the Win10 folder. Make sure to clone the repository recursively so that you also obtain a copy of the library (more info in the readme)!
If you'd prefer to create your own project, follow the project set up guide here
You can find the Windows Remote Arduino repository here
Hardware
See the pictures below for an image-based overview of the set up process.
- Unscrew the bottom frame from the rest of the car.
- Remove the wire connectors from the circuit board and unscrew the circuit board from the bottom frame of the car.
- You should now have access to the base of the circuit board. You now have to solder 4 wires (preferable of different colors to avoid confusion) in the locations shown in the image below.
- The wires on the left go to pins 9 and 10 of the Arduino and the wires on the right go to pins 11 and 12. With reference to the images below, the connections will be as follows
- Red wire - Pin 8
- Brown wire - Pin 9
- White wire - Pin 10
- Green wire - Pin 11
- Now you can connect the front motor connector back to the circuit board.
- Next we need to get power to the Arduino. For this, first solder an additional power wire near the switch. Next, cut the ground wire going to the circuit board and hook up a barrel jack to the new power wire and the cut ground wire. This jack connects to the Arduino. Finally, take the ground wire from the circuit board and connect it to one of the 2 ground pins on the Arduino.
- Last, hook up the Bluetooth device to the Arduino by connecting a wire from TX on the Arduino to RX on the Bluetooth device and vice-versa. Also connect it to power and ground!
That is the last of the hardware setup steps! You can now screw the circuit board back on. You may also want to secure the Arduino don with zip ties in the area above the rear motor.
Software
Download the sample repository here. You'll find "remote-controlled-car" inside the W10 directory. This sample uses a Windows 10 phone's accelerometer to drive the car!
Currently, the sample is set up to launch ControlPage automatically when you connect to the car via Bluetooth. Since the controls are different for the different boards, you'll want to make sure you are using the Maisto Control Page. You'll want to locate the following line of MainPage.xaml.cs and change "ControlPage" to "ControlPageMaisto" so that it will launch the correct control page.
Line 106:
Frame.Navigate( typeof( ControlPage ) );
If you are using a different pin configuration to control the motor shield, you'll want to locate and change the pin values for the following variables inside ControlPageMaisto.xaml.cs:
-
FORWARD_CONTROL_PIN = 8; REVERSE_CONTROL_PIN = 9;LEFT_CONTROL_PIN = 10;RIGHT_CONTROL_PIN = 11;
Or just modify the source to use the default (zero-argument) constructor ofBluetoothSerial which will attempt to connect to each Bluetooth device you are paired to until it is successful with one.
If you'd prefer to create your own project, follow the project set up guide here.
As usual with Windows Remote Arduino, you only need to program your Arduino device to run "StandardFirmata" (you can find this in the "Firmata" folder in the included libraries. Just make sure to change the baud rate in the sketch to match your device. The BlueSmirf runs at 115200 by default. There are more detailed instructions here.


_3u05Tpwasz.png?auto=compress%2Cformat&w=40&h=40&fit=fillmax&bg=fff&dpr=2)
Comments
Please log in or sign up to comment.