


Hardware components | ||||||
| × | 1 | ||||
| × | 1 | ||||
| × | 1 | ||||
| × | 1 | ||||
| × | 1 | ||||
| × | 1 | ||||
Software apps and online services | ||||||
 |
| |||||
Hand tools and fabrication machines | ||||||
| ||||||
What if I told you that with Arduino you could easily build an Arcade Stick to play your favorite games on the MISTer FPGA? Well, after all, it's just a matter of building an encoder. An encoder is nothing more than an electronic device that has a number x of inputs and a number n of outputs with x ≤ 2^n. In other words, it is an electronic component that presents in Output a value dependent on its Input input. Obviously, in the case in which multiple inputs are activated simultaneously (imagine the combo keys of fighting games - Editor's note), the encoder adopts a series of "priorities" in such a way as to activate the output avoiding unwanted values.
There is an incredible variety of these devices on the market and, one of the most followed paths, is that of the so-called "Joypad hack", that is, getting the controller of a certain console, removing the PCB and soldering the wires to be sent to the lever and buttons on the tracks of the relative commands.
The one in the photo below is a classic example of a joypad hack.
Typically these are gamepads of little value or with a damaged body, to which we try to give a second life with this type of practice. This is a perfectly functional practice, but which is generally used to make arcade sticks to be used with that specific console. For example, if you have a Super Famicom and want to make an Arcade Stick without buying the original, you just need to recover the PCB of a Super Famicom joypad and use it as the "beating heart".
However, we are makers and we like Arduino. But more than anything, we want to make a device that has good compatibility with different platforms. What we will make today is called DaemonBite-Arcade-Encoder, and it is also compatible with the MISTer FPGA, a platform that allows you to simulate the hardware architecture of a huge number of gaming platforms. If you don't know what an FPGA is, I suggest you read the dedicated article written by Simone.
Here's what you need to make the Arcade Stick
- A wooden box measuring at least 40x30 (cm.). If you don't have one, go to a DIY store and have some boards cut. The height should be at least 5 cm. You could as well print the box with a 3D printer.
- Joystick
- Buttons
- Wires
- Arduino Pro Micro board
- Arduino IDE
- USB cable
The advice for starting is always the same: measure twice, cut once.
The upper board where you will insert the buttons and the lever must not be too thick. Do not go beyond 3 mm, otherwise you will have to change the type of buttons and add an extension to the lever shaft. The "sanwa style" kits have buttons with two attachment wings that require support panels that have a certain thickness. Otherwise, you need to go for buttons with "screw" fixing. Please, choose carefully what to adopt, because all the pieces of the puzzle will necessarily have to go into their place. Don't worry, I will put everything you need in the useful links at the bottom of the article.
The first thing to trace on the upper panel is the template from which the holes for the lever and buttons will then be obtained. Simply print it without any resizing to have it the correct size. The measurements of the holes for the lever and 30 mm buttons are, respectively, 21 mm 29.5 mm. Help yourself with hole cutters, if you don't have them you can drill many small holes along the circumference and then finish everything off with a file. Once you've done this, you've done over 50% of the work.
At this point, you're missing at least four more holes for the so-called "service buttons". That is, START, STOP, SERVICE1 and SERVICE2. Depending on the console used, in fact, having 4 service buttons allows you to map four more functions without having to give up any of the 8 buttons on the board that you traced before. Since these buttons are not essential for gaming performance, you can also use any four buttons. Measure them with the caliper and drill the four holes. Come on, you're almost there!
If everything went as planned, at the end of assembling the boards you should have a result similar to this:
Now that we have the structure, we need to mount the lever and buttons, then prepare for the wiring. Don't forget to drill the hole for the cable to come out. If you're a fan of aesthetics, you can use a USB input from the panel. It's up to you, it's not essential, but in terms of beauty there is absolutely no comparison.
Before mounting the Arduino Pro Micro inside the Arcade Stick structure, we must first program it. Follow this link and, after pressing the green button, click on "Download Zip". At this point, you have all the files needed to proceed with the configuration. Open Arduino Ide and, after connecting Arduino Pro MIcro, call the DaemonBiteArcadeEncoder.ino listing and upload the sketch to the board. Now we have the control system, but we still need to make the connections inside the Arcade Stick.
In this regard, you can decide whether to solder the headers to the board to connect the individual wires using dupont cables or proceed to solder wire by wire. I generally adopt both solutions, depending on the type of stick I am going to build. In the photo below you have both solutions:
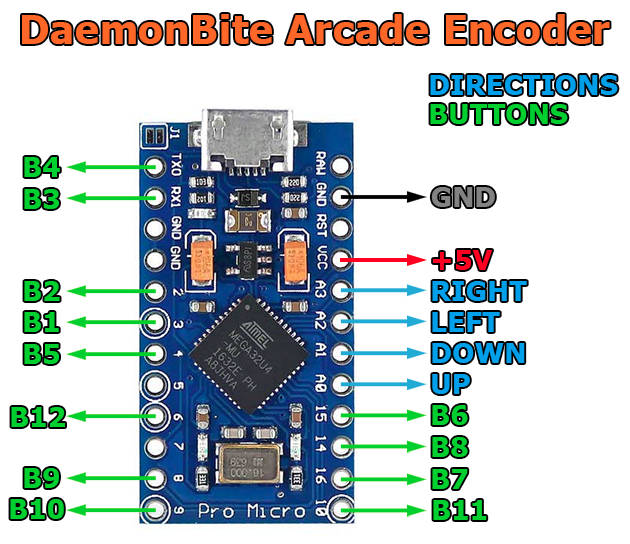
Here is the connection diagram:
The advice I give you is to bring a ground wire that starts from the joystick lever and passes through all the buttons you have inserted on the body of the arcade. In this way, you can go directly with just one wire to the board, connecting each ground to the GND pin of the board. This is the button assignment scheme in case you want to use it for the PlayStation 3. If you want, on the +5V pin, you can connect some LEDs. In the useful links I have put the short USB cable that goes from the Arduino Pro Micro to the USB port on the panel. If instead you want to pass the wire directly from the board to the MISTer FPGA (or any other compatible device - Editor's note) remember to choose the version of at least one meter. If instead you want to "exaggerate" and have a USB cable made that reflects the colors you have chosen for your Arcade Stick, take a look at the KHOR website. He is a friend of ours and makes custom cables compatible with Arduino!
Of course, you can use it to play with all the different cores of the consoles present on your MISTer FPGA, you just need to make a different assignment of the keys each time.
And, as mentioned at the beginning of the article, there can be infinite possibilities to create an Arcade Stick. With this project, we wanted to explore - once again - the infinite possibilities given by Arduino.

Comments