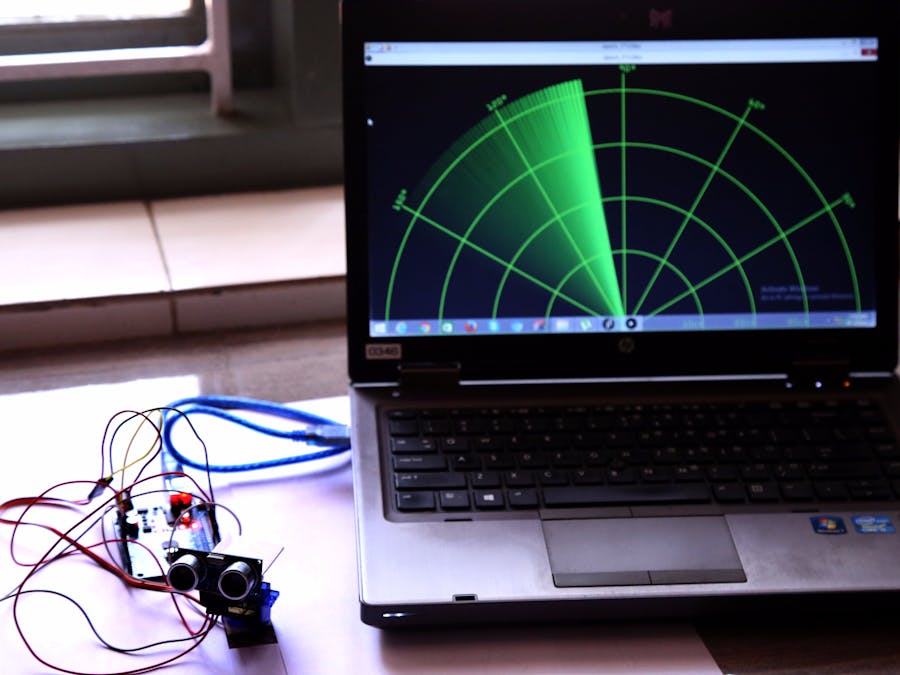
I have developed a visual experience of radar by processing IDE with ultrasonic sensor and servo. I opted the brain of my project to be Arduino Uno.
Project Description- First I made a cardboard stand for connecting the Ultrasonic sensor to the Servo motor. I just screwed it on the servo motor as shown above
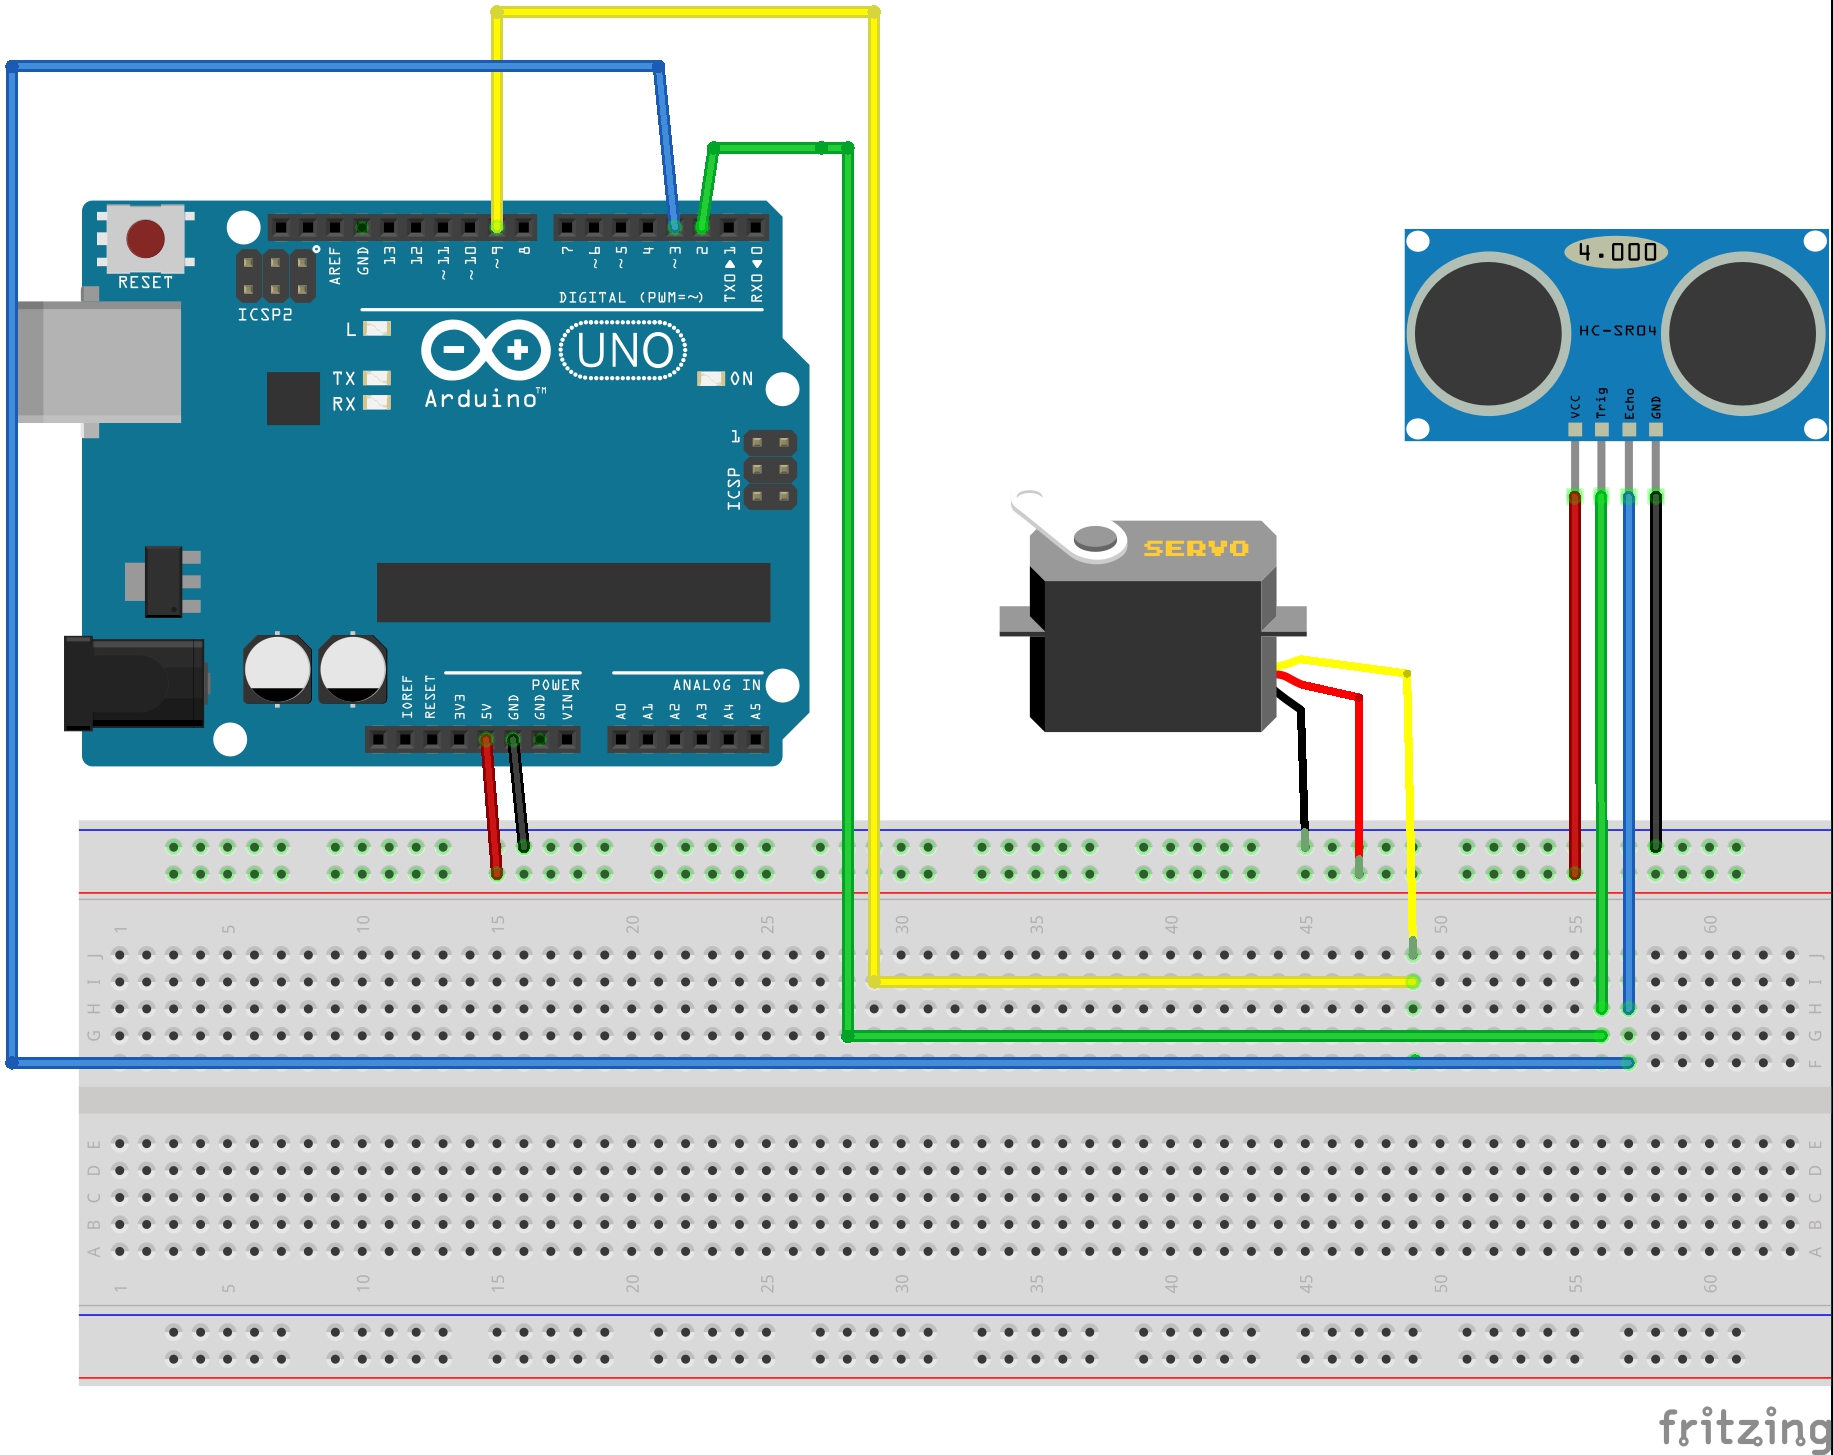
- Make the connections as shown in the schematics
- Upload the code to the Arduino
- Check the serial monitor whether the ultrasonic sensor is working or not (first one shows the servo rotating degree and the next one shows the distance measured by the ultrasonic sensors).
- Close the Arduino IDE
- Download the Processing IDE: https://processing.org/download/
- Extract the zip file and install the software by clicking on the processing.exe file
- Paste the code given below into the Processing IDE
/*   Arduino Radar Project
*
*   Updated version. Fits any screen resolution!
*   Just change the values in the size() function,
*   with your screen resolution.
*
*  by Dragon nekhil
*  www.HowToMechatronics.com
*
*/
import processing.serial.*; // imports library for serial communication
import java.awt.event.KeyEvent; // imports library for reading the data from the serial port
import java.io.IOException;
Serial myPort; // defines Object Serial
// defubes variables
String angle="";
String distance="";
String data="";
String noObject;
float pixsDistance;
int iAngle, iDistance;
int index1=0;
int index2=0;
PFont orcFont;
void setup() {
size (1366, 768); // ***CHANGE THIS TO YOUR SCREEN RESOLUTION***
smooth();
myPort = new Serial(this,"COM7", 9600); // starts the serial communication
myPort.bufferUntil('.'); // reads the data from the serial port up to the character '.'. So actually it reads this: angle,distance.
orcFont = loadFont("OCRAExtended-30.vlw");
}
void draw() {
fill(98,245,31);
textFont(orcFont);
// simulating motion blur and slow fade of the moving line
noStroke();
fill(0,4);
rect(0, 0, width, height-height*0.065);
fill(98,245,31); // green color
// calls the functions for drawing the radar
drawRadar();
drawLine();
drawObject();
drawText();
}
void serialEvent (Serial myPort) { // starts reading data from the Serial Port
// reads the data from the Serial Port up to the character '.' and puts it into the String variable "data".
data = myPort.readStringUntil('.');
data = data.substring(0,data.length()-1);
index1 = data.indexOf(","); // find the character ',' and puts it into the variable "index1"
angle= data.substring(0, index1); // read the data from position "0" to position of the variable index1 or thats the value of the angle the Arduino Board sent into the Serial Port
distance= data.substring(index1+1, data.length()); // read the data from position "index1" to the end of the data pr thats the value of the distance
// converts the String variables into Integer
iAngle = int(angle);
iDistance = int(distance);
}
void drawRadar() {
pushMatrix();
translate(width/2,height-height*0.074); // moves the starting coordinats to new location
noFill();
strokeWeight(2);
stroke(98,245,31);
// draws the arc lines
arc(0,0,(width-width*0.0625),(width-width*0.0625),PI,TWO_PI);
arc(0,0,(width-width*0.27),(width-width*0.27),PI,TWO_PI);
arc(0,0,(width-width*0.479),(width-width*0.479),PI,TWO_PI);
arc(0,0,(width-width*0.687),(width-width*0.687),PI,TWO_PI);
// draws the angle lines
line(-width/2,0,width/2,0);
line(0,0,(-width/2)*cos(radians(30)),(-width/2)*sin(radians(30)));
line(0,0,(-width/2)*cos(radians(60)),(-width/2)*sin(radians(60)));
line(0,0,(-width/2)*cos(radians(90)),(-width/2)*sin(radians(90)));
line(0,0,(-width/2)*cos(radians(120)),(-width/2)*sin(radians(120)));
line(0,0,(-width/2)*cos(radians(150)),(-width/2)*sin(radians(150)));
line((-width/2)*cos(radians(30)),0,width/2,0);
popMatrix();
}
void drawObject() {
pushMatrix();
translate(width/2,height-height*0.074); // moves the starting coordinats to new location
strokeWeight(9);
stroke(255,10,10); // red color
pixsDistance = iDistance*((height-height*0.1666)*0.025); // covers the distance from the sensor from cm to pixels
// limiting the range to 40 cms
if(iDistance<40){
 // draws the object according to the angle and the distance
line(pixsDistance*cos(radians(iAngle)),-pixsDistance*sin(radians(iAngle)),(width-width*0.505)*cos(radians(iAngle)),-(width-width*0.505)*sin(radians(iAngle)));
}
popMatrix();
}
void drawLine() {
pushMatrix();
strokeWeight(9);
stroke(30,250,60);
translate(width/2,height-height*0.074); // moves the starting coordinats to new location
line(0,0,(height-height*0.12)*cos(radians(iAngle)),-(height-height*0.12)*sin(radians(iAngle))); // draws the line according to the angle
popMatrix();
}
void drawText() { // draws the texts on the screen
pushMatrix();
if(iDistance>40) {
noObject = "Out of Range";
}
else {
noObject = "In Range";
}
fill(0,0,0);
noStroke();
rect(0, height-height*0.0648, width, height);
fill(98,245,31);
textSize(25);
text("10cm",width-width*0.3854,height-height*0.0833);
text("20cm",width-width*0.281,height-height*0.0833);
text("30cm",width-width*0.177,height-height*0.0833);
text("40cm",width-width*0.0729,height-height*0.0833);
textSize(40);
text("Object: " + noObject, width-width*0.875, height-height*0.0277);
text("Angle: " + iAngle +" °", width-width*0.48, height-height*0.0277);
text("Distance: ", width-width*0.26, height-height*0.0277);
if(iDistance<40) {
text("        " + iDistance +" cm", width-width*0.225, height-height*0.0277);
}
textSize(25);
fill(98,245,60);
translate((width-width*0.4994)+width/2*cos(radians(30)),(height-height*0.0907)-width/2*sin(radians(30)));
rotate(-radians(-60));
text("30°",0,0);
resetMatrix();
translate((width-width*0.503)+width/2*cos(radians(60)),(height-height*0.0888)-width/2*sin(radians(60)));
rotate(-radians(-30));
text("60°",0,0);
resetMatrix();
translate((width-width*0.507)+width/2*cos(radians(90)),(height-height*0.0833)-width/2*sin(radians(90)));
rotate(radians(0));
text("90°",0,0);
resetMatrix();
translate(width-width*0.513+width/2*cos(radians(120)),(height-height*0.07129)-width/2*sin(radians(120)));
rotate(radians(-30));
text("120°",0,0);
resetMatrix();
translate((width-width*0.5104)+width/2*cos(radians(150)),(height-height*0.0574)-width/2*sin(radians(150)));
rotate(radians(-60));
text("150°",0,0);
popMatrix();
}
- Select the tools ->create font in the processing IDE and set the filename as OCRAExtended-48 and size as 30 and click ok.
- Set the port in which arduino is connected in the above processing code
myPort = new Serial(this,"COM7", 9600); // starts the serial communication
- Run the code
- If it doesn't fit to the screen like this, change the below program segment according to the screen resolution of your computer.
size (1366, 768); // ***CHANGE THIS TO YOUR SCREEN RESOLUTION***
- The work is over. Let's check it
- The working is shown below
- If an obstacle is placed in front of the ultrasonic sensor it will be shown like this
- Do it yourself guys.
The Processing Development Environment (PDE) makes it easy to write Processing programs. Programs are written in the Text Editor and started by pressing the Run button. In Processing, a computer program is called a sketch. Sketches are stored in the Sketchbook, which is a folder on your computer.
Sketches can draw two- and three-dimensional graphics. The default renderer is for drawing two-dimensional graphics. The P3D renderer makes it possible to draw three-dimensional graphics, which includes controlling the camera, lighting, and materials. The P2D renderer is a fast, but less accurate renderer for drawing two-dimensional graphics. Both the P2D and P3D renderers are accelerated if your computer has an OpenGL compatible graphics card.
The capabilities of Processing are extended with Libraries and Tools. Libraries make it possible for sketches to do things beyond the core Processing code. There are hundreds of libraries contributed by the Processing community that can be added to your sketches to enable new things like playing sounds, doing computer vision, and working with advanced 3D geometry. Tools extend the PDE to help make creating sketches easier by providing interfaces for tasks like selecting colors.
Processing has different programming modes to make it possible to deploy sketches on different platforms and program in different ways. The Java mode is the default. Other programming modes may be downloaded by selecting "Add Mode..." from the menu in the upper-right corner of the PDE.


_ztBMuBhMHo.jpg?auto=compress%2Cformat&w=48&h=48&fit=fill&bg=ffffff)


Comments