


In this guide, we'll walk you through adding a motion sensor to your existing ESP32 Lora Meshtastic Node. This guide will work also for any ESP32-based board like Heltec V3 Lora, TTGo, or T-Beam with some modifications.
HardwareNow let's get started with the hardware you need:
- 1x HC-SR501 Motion Sensor - AliExpress Price: 0.66 USD
- 3x Female to Female Pin Connector AliExpress Price: 0.42USD
📢When ordering from AliExpress, consider consolidating your purchases from a single seller to maximize savings. For instance, if you're purchasing an antenna from seller X, check if they also offer an IPEX to SMA-K cable. By sourcing all your items from one seller, you can significantly reduce shipping costs.
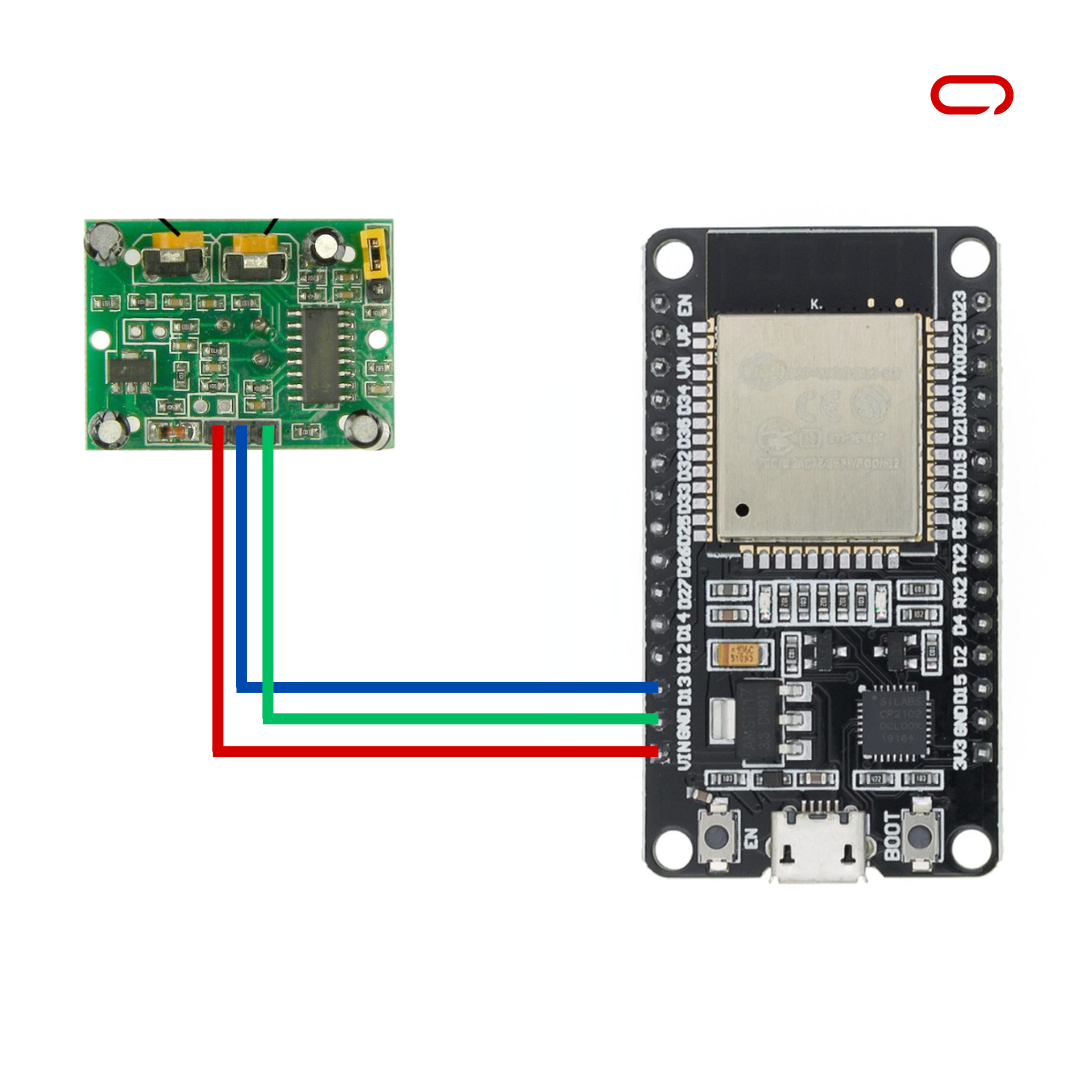
AssemblyThe hardware is all ready and set now to the wiring. For this, we will follow the following Schematics.
HC-SR501 Motion Sensor - DIY ESP32 Meshtastic Node- +Power -> VIN (5V…20V)
- HIGH/LOW Output-> PIN 13
- GND -> GND
💡The HC-SR501 Motion Sensor Module Will Not Work With a Battery, It Works Only With a USB, since it uses 5V for the Heltec Boards
💡If you're using a different ESP32-based board like Heltec V3 Lora, TTGo, or T-Beam, simply select an available GPIO pin that accepts digital signals, supports pull-up or pull-down resistors, and isn't already in use. Then, follow the guide using the chosen pin, disregarding the specific pin number mentioned in the instructions
💡Capacitors are good practice for decoupling one part of a circuit from another
💡It's Important To Note That The Order Of The Connections Might Vary. Follow The Labels And Io Ports On Your Specific Components And The Provided Schematics To Ensure Accurate Wiring. Paying Attention To These Details Ensures That You Establish The Correct Connections And Avoid Potential Issues or Damaging Your Components
Once all the wiring is completed. Double-check your connections and ensure they match the suggested layout before proceeding to the next steps.
Meshtastic SettingsOn the Sensor Device- Open Meshtastic App (IOS for this guide)
- Go to the Settings page
- In the module configuration section go to Detection Sensor
- Toggle the switch to enable Enable
- Give the sensor a name
- Set GPIO PIN to monitor to PIN 13
- Lastly, press Save
💡Detection Trigger High is off for this module since it pulls low when motion is detected and high on idle. If you are using a different sensor or your sensor behaves otherwise switch it one
On the Client Device- Open Meshtastic App (IOS for this guide)
- Go to the Settings page
- In the module configuration section go to Detection Sensor
- Toggle the switch to enable Enable
- Right under the toggle select Client this time.
- Lastly, press Save
Once this is set up, you'll receive messages on the public channel whenever the sensor is triggered. It's worth noting that if your sensor is expected to be triggered frequently, consider setting a limit in the settings. Saturating the network could potentially lead to issues with sending and receiving data. Check out or Channel Utilization post for more information
Understanding and Optimizing Channel Utilization in Meshtastic Devices
In conclusion, this comprehensive guide ensures seamless integration of a motion sensor into your ESP32 Lora or any other ESP32-based board like Heltec V3 Lora, TTGo, or T-Beam Meshtastic Node, extending its capabilities. The instructions provided are for ESP32, yet you can also apply to any other ESP32-based with minor adjustments. Remember to be mindful of network usage to optimize data transmission. This guide not only enhances your device with a motion sensor but also opens up possibilities for incorporating other sensors. Explore the potential of your Meshtastic Node by experimenting with diverse sensors and configurations, broadening the scope of applications for your mesh network. Happy tinkering and discovering new horizons!

Comments
Please log in or sign up to comment.