AI-powered medicine inventory control with predictive analysis. Based on the Sparkfun Artemis board.
Always use technology to improve the world, if you are a black hat or gray hat hacker please abstain at this point......... or at least leave your like to make me feel less guilty XP.
DISCLAIMER: This application is used for demonstrative and illustrative purposes only and does not constitute an offering that has gone through regulatory review. It is not intended to serve as a medical application. There is no representation as to the accuracy of the output of this application and it is presented without warranty.
Introduction:Inside hospitals, pharmacies and clinics we can find lots of inventories, but one of the most important is the one in charge of storing drugs or medicine. Inside the hospital, the consumption of medicine and drugs in relation with control of inventory is one of the most important and difficult tasks to perform. Nevertheless there are hospitals with very robust and technologically advanced systems, even outdated systems for filling out paper applications.(1) However, until today, we find seldom solutions for this problem that integrate and use ML and AI models.
On this premise we decided to create an inventory control system that learns through AI models the medication entry patterns, in order to be able to make predictions about which medications could be ordered in the following orders and the urgency. The records will enter through RFID on the medication provided.
A couple of solutions we can find in the market are:
Link: https: //www.clearstreamrfid.com/pricing.htm $2500 dollars.
This product is only an RFID reading hardware for inventory control, which is a bit more suitable for department stores. Note that it uses no AI.
Link: https://id-integration.com/rfid-starter-kits-for-asset-tracking $ 499 - $ 4999
Provides hardware and even integrations with software, but of course none with an AI implementation.
Our solution will be very different, because we will be able to carry out AI implementations through medication registries, which will have an RFID stamp. These will be fundamental for saving orders on medications, avoiding lack of medications or overstocking and continuously improving the system of Hospitals, clinics and pharmacy inventories.
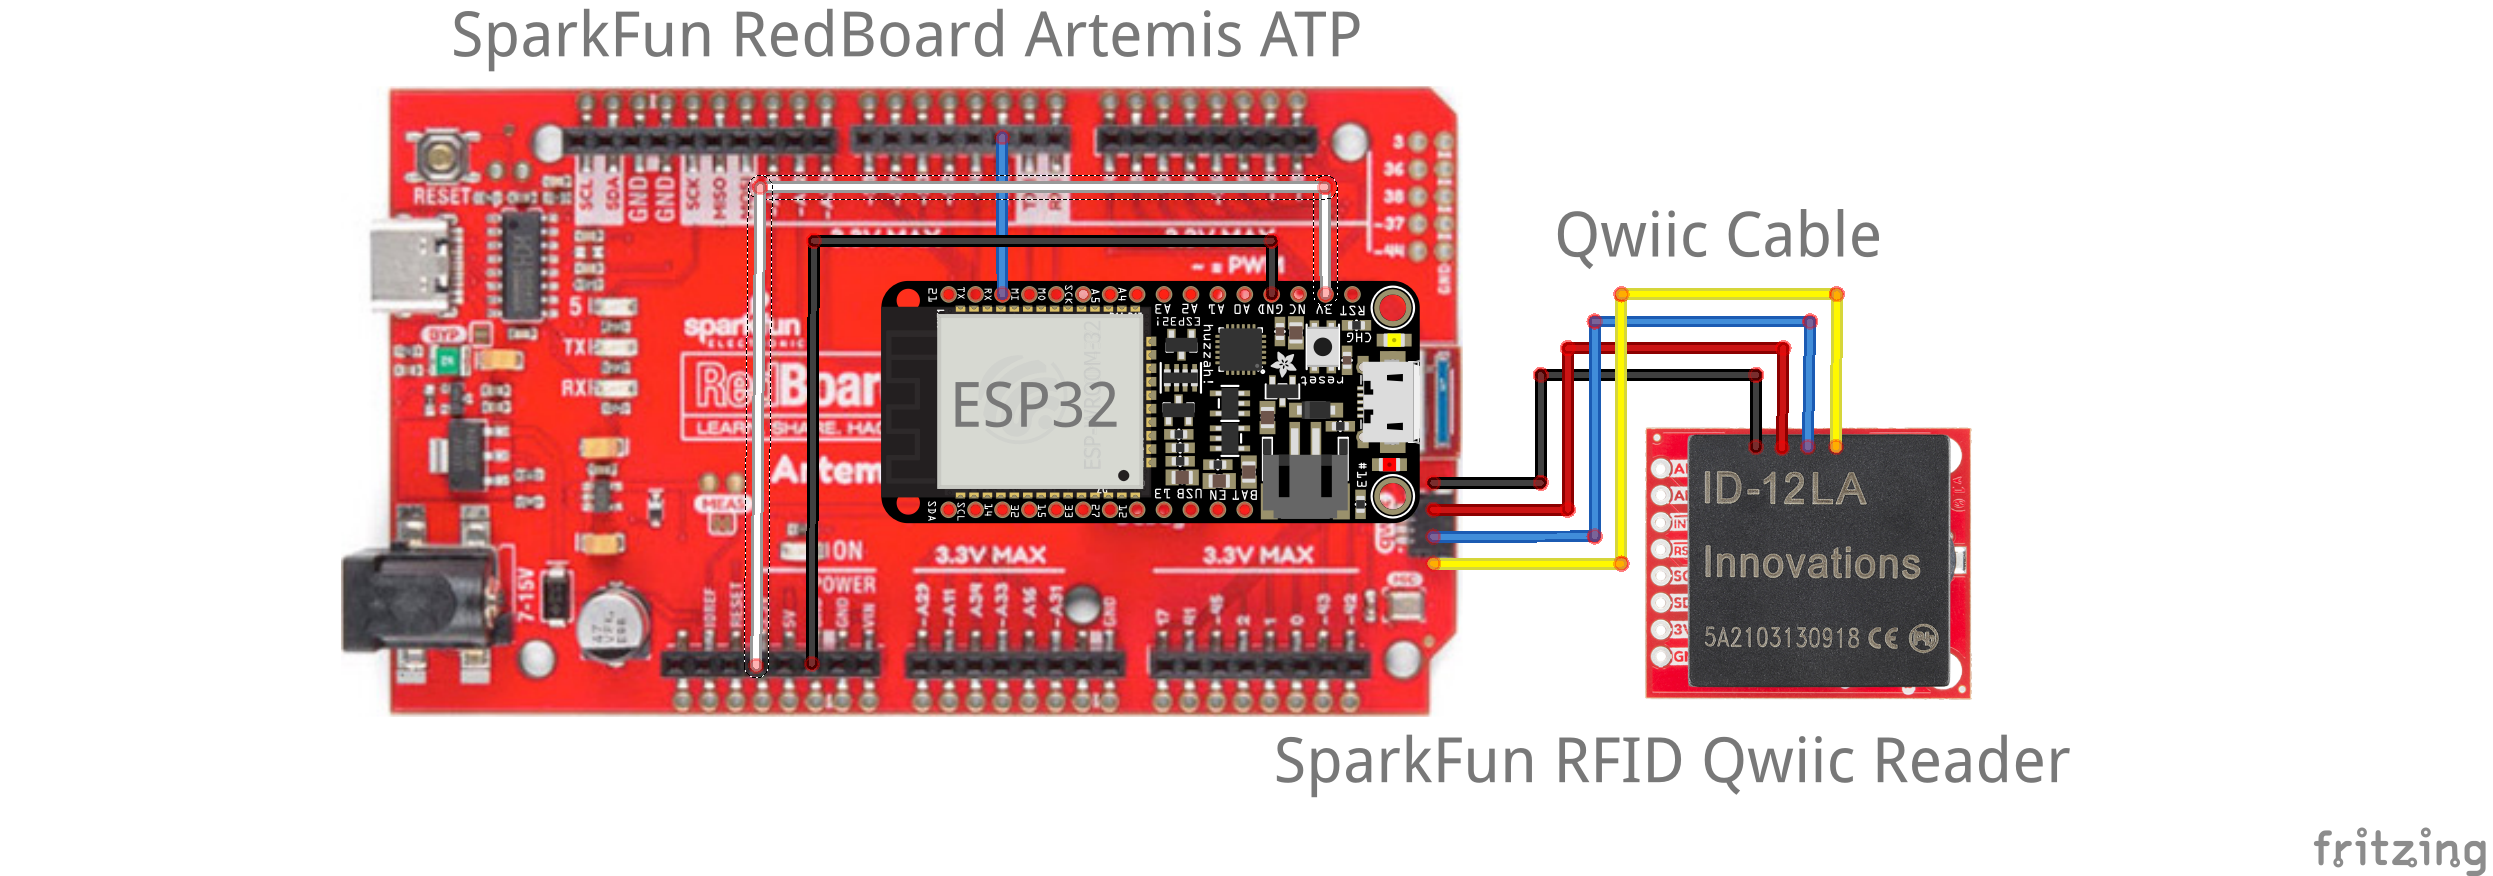
Connection Diagram:This is the connection diagram of the system:
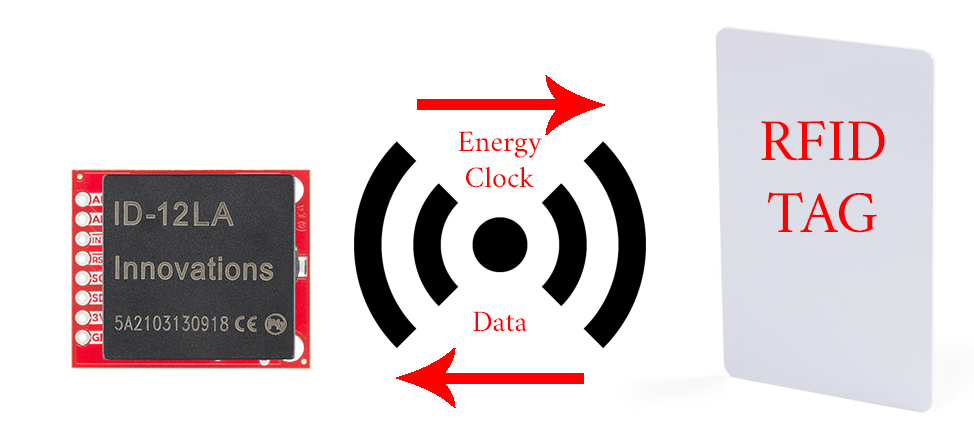
RFID (radio frequency identification) is a form of wireless communication that incorporates the use of electromagnetic or electrostatic coupling in the radio frequency portion of the electromagnetic spectrum to uniquely identify an object, animal or person. Use cases for RFID technology include healthcare, manufacturing, inventory management, shipping, retail sales and home use.
This scheme is applicable to any RFID reader in the market but it is more efficient to use it for our project.
In this case we use this technology for medical inventory.
Google Colab Project:To make our project as compatible as possible with any computer or even a mobile phone, we design it to run in Google Colab. Colaboratory is a Google research project created to help disseminate machine learning education and research. It's a Jupyter notebook environment that requires no setup to use and runs entirely in the cloud.
The first step in creating a model for microcontrollers will be to use the latest version of TensorFlow.
We import the following libraries for the code to function properly.
Then we check the TF version we have.
We import the dataset
Obtaining the data and turning it into a Pandas dataframe.
This is a dataframe of the entry and exit of medications in a hospital in one year, with each row meaning one day of the year.
- Mo1 = Output Medicine 1
- Mo2 = Output Medicine 2
- Mo3 = Output Medicine 3
- Mo4 = Output Medicine 4
- Mo5 = Output Medicine 5
- Mi1 = Input Medicine 1
- Mi2 = Input Medicine 2
- Mi3 = Input Medicine 3
- Mi4 = Input Medicine 4
- Mi5 = Input Medicine 5
- U = Urgency
We check the data to see that we have incoming and outgoing stock. As usual we can see that the hospital, having a bad inventory system, has an over-stock. With more incoming and outgoing medications, however we have to be able to fix that through our AI.
We take the first 5 input data as the output stock and the next 6 as the 5 input medications and their urgency.
We measure urgency on a scale of 0 - 5.
We create our model based on an input of 5 neurons and an output of 6.
We train our model by performing 1000 cycles with training data, this value can vary to obtain different results, but modifying it can cause an underfit or overfit of the model.
We perform the precision and loss graphs of the model to verify that it works correctly, these graphs are a standard in AI models, I always recommend to perform them in all its models.
We randomly select an entry and we evaluate it with our normal model and our model converted to TF lite, as we can see the model behaves very similar to the complete TF model.
As a last step we will convert the model into a vector that can be read by the mircrocontroller, do not close the window because we will have to input this code into the microcontroller.
See the model executedin its Jupyter notebook with explanations in full at:
Here ends the part related to the AI model, the next section is the configuration of your machine to compile and flash the program on the board.
CloudMQTT Setup:Create an account in Cloud MQTT.
Copy the credentials of "Server", "User", "Password" and "Port".
To add board support, start Arduino and open the Preferences window (File > Preferences).
Now copy and paste the following URL into the 'Additional Boards Manager URLs' input field:
https://raw.githubusercontent.com/sparkfun/Arduino_Boards/master/IDE_Board_Manager/package_sparkfun_index.jsonNote: if you do not have ESP32 installed as a board, also add the following url separating them with a comma **, **:
https://dl.espressif.com/dl/package_esp32_index.jsonOpen the Boards Manager window by selecting Tools > Board, scroll to the top of the board list, and select Boards Manager.
Type "sparkfun" (without quotes) into the "filter your search" field, you will see options to install SparkFun's Apollo3 and AVR board files. Click in the desired box, and click the "Install" button that appears. Once installed, the boards will appear at the bottom of the board list.(Note: I use version 1.0.17 for this tutorial)
Note: If you do not have ESP32 installed, search for "ESP32" and press install button for the “ESP32 by Espressif Systems“
Library Setup:Open Sketch > Include Library > Manage Libraries...
Install the "Arduino_TensorFlowLite library by TensorFlow Authors Version 1.15.0-ALPHA"
In this case we will use arduino programs, that of the ESP32 and that of the RedBoard, both are contained within the Arduino files folder, so you do not have to do anything more than open them just as they are once you have downloaded the project.
Inside the ArduinoIDE we will open the file inside the Arduino Files> RedBoardAI> RedBoardAI.ino folder, once there we will select the RedBoard as the objective of the program in Tools> Board> SparkFun RedBoard Artemis ATP.
Press the compile button to make sure everything works correctly.
We return to our project within Google Colab and copy the model and its size.
Now we will go to the data.cpp file and paste the model into the my_model variable and the size into the my_model_len variable.
The following setup will be done on ESP32, we only have to open the file and replace the credentials with yours.
If everything works fine, you should be able to flash the programs on each of the boards.
Node-Red Setup:Node Red is a tool for NodeJS where we can integrate services easily, without code and, of course, create excellent dashboards.
NodeJS installation guide: https://www.guru99.com/download-install-node-js.html
NodeRED installation guide: https://nodered.org/docs/getting-started/windows
NodeRED installation guide: https://flows.nodered.org/node/node-red-dashboard
The file "flows.json" in the folder "Node-RED Flow", has all the information to import the flow into your NodeRED.
Once that is done we will edit the MQTT node to enter our credentials.
Set Server and Port.
Set User and Password.
If everything works fine press the "Deploy" button and enter the following URL to check the Dashboard.
http://localhost:1880/ui (Note this can vary according to your settings)
See the video:
Files at the bottom of the page!
Project assembly:All the pieces:
Complete system:
We are quite satisfied with how this project came about, and we think that the implementation of AI and Machine learning at the edge is quite novel for this use case. By working in the healthcare industry (both in developed and underdeveloped countries) we have seen which klind of problems are more recurrent. Among those is the rising cost of healthcare and among that we can count the poor inventory systems that we have. They have been exploited for quite a while now generating even more problems and it is an area where AI can shine by reducing costs and granting the users valuable information. For a prototype this project has great potential as it only lacks a little in terms of design both Industrial and Electronics but we are quite amazed in how the Redboard performed and we look forward to keep experinmenting with hardware like this one.
References:(1) http://article.sapub.org/10.5923.j.mm.20130301.01.html
http://citeseerx.ist.psu.edu/viewdoc/download?doi=10.1.1.15.8571&rep=rep1&type=pdf


_3u05Tpwasz.png?auto=compress%2Cformat&w=40&h=40&fit=fillmax&bg=fff&dpr=2)
Comments
Please log in or sign up to comment.