Join the dark side and make your own Light-Up PCB Sith necklace.
If you aren't familiar with the Star Wars multiverse, or live in a galaxy far far away, it's about people fighting with laser swords, in space, using this thing called the force, and wearing robes, the Jedi are the light-side and the Sith are the dark-side. May 4th is Star Wars Day "May the 4th Be With you" and May the 5th is "The Revenge of the Sith". I had planned on making something for May the 4th, but Sith happens, and I only had 2 hours to use my magical powers and machines to make a First Order necklace.
Design Software: Fusion 360 for laser cut files, and Eagle within Fusion 360 for PCB schematic and breadboard.
Laser Cut AcrylicI used my Glowforge Pro 45W laser cutter, if you don't have a laser cutter you can still make your own version of this. I provided the svg files that you could use to print, laser cut or even cnc. I had extra clear, red and black acrylic laying around the house. Laser cutters are extremely fast and all the parts took less than 2 minutes to cut everything.
Assemble the Sith
There are 5 files to laser cut. The inner circle is clear acrylic, this helps diffuse the red LED. You can also use hot glue on the LED to give it a nice Darth maul glow (learned that trick from TwinkleTwinkie's Unicorn SAO from DefCon).
The electronic PCB I made on the Bantam Tools mill will fit inside the red and clear acrylic circle cutouts and the switch will sit right through the window on the back of the black cutout base.
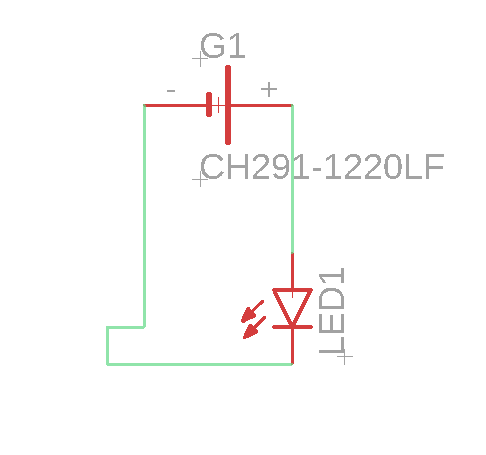
I designed the schematics and PCBs for these boards with Eagle in Fusion 360. I milled the PCBs on my Bantam Tools Desktop PCB Milling Machine. I really wanted to test my Bantam machine using tiny smd leds. I haven't seen many small scale SMD(Surface Mount Device) projects for the Bantam machine and I wanted to test to see if I could successfully mill surface mounts boards for 1206 LEDs.
Choose your own adventure:
- Option 1: Single Sided PCB
- Option 2: Doubled-sided PCB with on/off switch
- Option 3: Order my PCB board from OSH Park
Option 1: Single-Sided Adventure
Simple and easy to create if you have a CNC machine. If not proceed to Option 3.
Option 2: Double-Sided Adventure
Using two sided PCB boards help create small scale and are great for wearable projects. You do need to use an alignment bracket and a double copper layer PCB board.
- TOP BOARD SIDE: Import your.BRD design file and mill out ONLY the traces not the holes or outline.
- BOTTOM BOARD SIDE: After you have milled the TOP BOARD SIDE flip the board over and tape it down with double sided tape. Will will be using the aligning bracket for the bottom board. Mill out bottom layer traces and holes and outline.
Option 3: Order PCB
If you don't have a way to make your own PCBs you can order my design from OSH Park(you will still have to solder the components to the board).
After you design your sketches in Fusion360 you can export any of the sketches to the PCB board outline. I'm using the inner circle so all of the electronics are hidden inside the necklace.
Export your PCB breadboard file in Fusion360 for Bantam Tools Desktop CNC
Make sure when you export your brd file that.BRD is selected
Upload the.BRD file into the Bantam Tools Software.
I milled my PCB designs on my Bantam Tools Desktop CNC mill using the 1/32" Flat End Mill(that is the end mill that comes with the machine, if you want to spend the money you could get 1/64" end mill for even smaller components). Flat end mills can be used to cut copper board and detail engrave work for the via traces for our circuit.
Join the Empire: Last step is to solder the components on our PCB board!
Hot Glue the acrylic pieces together and had a sith hood(don't have a sith hood? don't worry you didn't need those window curtains...join the dark side)!
Force Resistive
*Ya, ya, ya I didn't use a resistor in my PCB design...one could say I'm force resistive. In an ideal galaxy I should have added a 330 OHM 5% 1/4W Resistor to my pcb design. I used what I had in my laying around the DeathStar aka my house.
Resistors are used to limit the current through the LED to the battery. If the voltage for the battery is equal to the voltage drop of the LED you don't need a resistor.
Different color LEDs emit have different voltage drops based on the color.
CR1220 coin cell battery that I used is 3Volts and 37mAh capacity, which means I run the risk of burning out the LED faster not using a resistor.


_t9PF3orMPd.png?auto=compress%2Cformat&w=40&h=40&fit=fillmax&bg=fff&dpr=2)


Comments
Please log in or sign up to comment.