First of all I wanted to do a project that is effective and looking nice, unlike other car projects, mine is based on an actual beautiful car (Shelby Mustang GT). My goal is to change how a good project looks like, no 3D printed pieces of plastic and wires allover the car to make it look like non finished prototype.
So I went to a pawn shop and bought this Mustang that will bring life into my project.
After that, the next step will be to modify the car and strip its components to put ours instead.
Remove the seats, motherboard, but be careful to not to ruin the wires because we will use them in the future to connect everything together.
The car's original motors are usually enough, however, if they're slow you can boost them using a voltage booster or a buck converter, or simply replace them with better ones.
The steering differential is usually fine but if you want to decrease the turning circle of the car you can break the plastic limits inside it and change the tight spring with a rubber band so the the wheels can turn more freely.
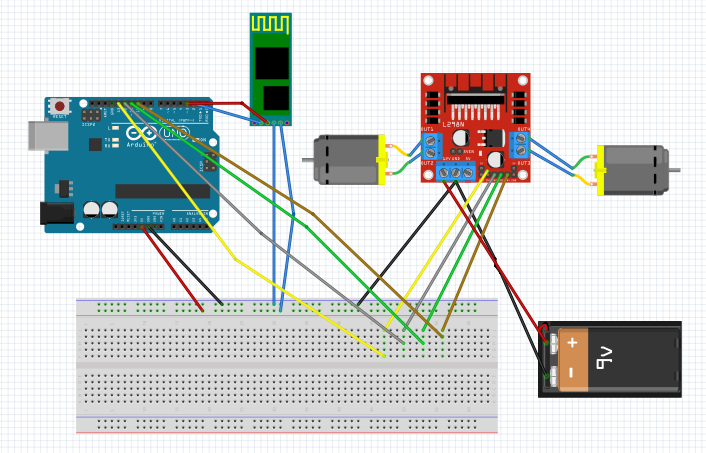
The next step will be to put the Arduino and do the montage shown below in the schematic section.
5V and GND from the Arduino to the breadboard, and then connect the motors to their bridge.
Connect the Int's from the motor driver to the mentioned Arduino pins 10, 11, 12, 13,
Connect the Bluetooth as shown in the schematic, you can use the voltage divider or not, your choice, I did not use and I do not recommend using it.
Simply connect the RX and TX directly to the pins 2 and 3 and VCC and GND.
if you suffer from a bit of communication lag you can try the hardware serial instead, just connect the Bluetooth RX to the Arduino TX and the TX to the RX and change your code.
After that connect all the leds of the car to the Arduino, and connect the original power supply of the car (the batteries below it) or a 9V battery to the Dual H bridge to power them separately with speed n power.
simply positive ones to pins mentioned in the code with 220 ohm resistances to protect the leds and negative to GND.
I taped another small breadboard to manage the leds and other motors, sensors on the top ( this is optional if you want to make your car automated).
put it all together and close it.
In order to control the car, leds and motors via your smartphone, download the "arduino car" from the playstore, or app store.
However, if you want to make your own app to add more functions while using the same code, please use the MIT app inventor to graphically create your own UI and controls. Or u can use any platform to ease the job, like REMOTEXY it will generate the code for you app.
On the other hand, if you are using the "Arduino car" app from the playstore, make sure to change the communication rate from 20 commands per second (one every 50 ms) to the "change in touch", so the Serial buffer wont get saturated and result in some command delay.
you will get this wonderful looking project just by adding a big led at the top


_ztBMuBhMHo.jpg?auto=compress%2Cformat&w=48&h=48&fit=fill&bg=ffffff)


_3u05Tpwasz.png?auto=compress%2Cformat&w=40&h=40&fit=fillmax&bg=fff&dpr=2)
Comments
Please log in or sign up to comment.