This project is based on a project by Project Hub user MicroBob
The project connects a liquid crystal display to the Arduino IoT Cloud. The end result is that you will be able to send messages from the dashboard on the Arduino IoT Cloud to the LCD.
You will need an Arduino board that is IoT Cloud compatible, we are using the Nano 33 IoT for this project.
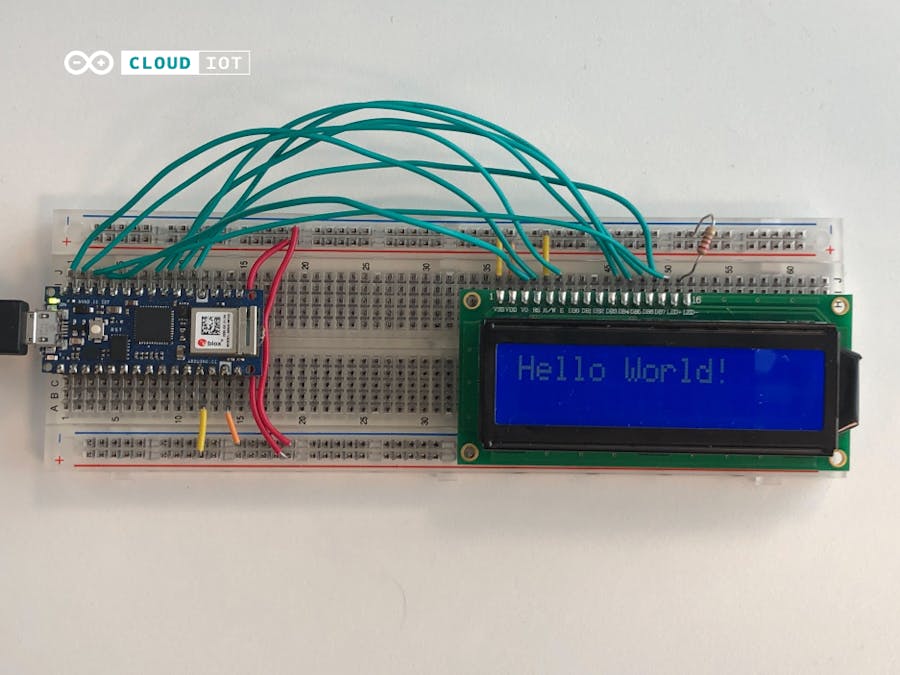
Step 1: WiringYou start by connecting the components to the breadboard. Below you will find a step by step guide of how to connect the wires and the resistor. The LCD has 16 pins, and for this tutorial we will refer to them as pin 1-16, numbering them from left to right, starting from the top corner.
- Place your Arduino board on the breadboard
- Place the LCD on the breadboard
- Place Jumper wires connecting the pins:
- Arduino pin 2 to pin 14 on LCD
- Arduino pin 3 to pin 13 on LCD
- Arduino pin 4 to pin 12 on LCD
- Arduino pin 5 to pin 11 on LCD
- Arduino pin 9 to pin 3 on LCD
- Arduino pin 10 to pin 15 on LCD
- Arduino pin 11 to pin 6 on LCD
- Arduino pin 12 to pin 4 on LCD
- Arduino 5V pin to pin 2 on LCD
- Arduino GND to pin 1 & pin 5 on LCD
- Arduino GND through a 220 ohm resistor to pin 16 on LCD
When complete, your circuit will look like this:
To get started with this step, you will need some very basic knowledge of the Arduino IoT Cloud service. If you have built any previous project using the service, then don’t worry, you know all that you need to know.
If you are new to the Arduino IoT Cloud, then take some time to read through the Getting started page and you will be good to go. There are also a bunch of tutorials available if needed
In the cloud, you need to create a new Thing, and configure your device and network.
You should then add a Variable. Name it “lcdText”. It should be of the Variable Type String, and the Variable Permission should be set to “Read & Write”.
Now, you will need to create a Dashboard to send messages to your Arduino boards. Go to the dashboards section, and build a new Dashboard.
Inside, create a widget of the “Messenger” type. Then you need to link it to your “lcdText” Variable.
For now, it won’t do much, since we haven’t uploaded the sketch to the board yet. You can still write and send messages but they won’t go anywhere.
Step 3: CodeFor this project, we need to include a library to handle most of the heavy lifting with the LCD. Other than that, the main challenge with the code is to treat messages and split them to fit on the 2 lines of the display properly. We will walk you through the process, but if you just want the complete sketch to copy into your IDE, you can find it at the bottom of the page.
You can start off by including the proper library, and pass information about what pins we want to use straight away.
Do that by adding the following lines of code to the beginning of the sketch in Thing -> Code tab.
#include <LiquidCrystal.h> //Import the LCD library
LiquidCrystal lcd(12, 11, 5, 4, 3, 2);
#define contra 9 //Define the pin that controls the contrast of the screen
#define bri 10 //Define the pin the controls the brightness of the screen
Now, we have passed all the information we need to the library, and we’re ready to initialise it. We’ll also set the contrast and brightness of the LCD screen while we’re at it.
Additionally, we will print our first message to the LCD, so that you know it is ready to receive a message from the cloud.
Add these lines inside the setup function, to run once when the board starts up.
    lcd.begin(16, 2); //Tell the LCD that it is a 16x2 LCD
    pinMode(contra, OUTPUT);
    pinMode(bri, OUTPUT);
    digitalWrite(contra, LOW);
    analogWrite(bri, 255);
    lcd.print("Send text!");
The loop function will remain empty. We do not want to keep running code for no reason, so we will instead write the rest of our code in the onLcdTextChange function, that will run once every time the Variable is updated from the Dashboards.
This is also where we split the message in two if it is too long to be displayed on just one line, and check if it is too long to be displayed at all.
We will set up two container variables to hold the spliced message, we will then use conditional statements to determine if we need one or two lines for the message, and a fallback to not display anything at all. If the entire message can fit in one line - Great! Then we’ll just pass it on, if it’s too long, we’ll take substrings out of it and split it in half that way. Add the following lines of code inside the onLcdTextChange function:
    String firstLine;
    String secondLine;
    if(lcdText.length()< 15){
        firstLine = lcdText;
    } else if (lcdText.length() < 29){
        firstLine = lcdText.substring(0, 15);
        secondLine = lcdText.substring(15, 29);
    } else{
        firstLine = "Message too long";
    }
After this is done, we’ll also need to print out the messages on the screen. First, clear the LCD of any text that has been left from the previous message. We print the first line, then we move the (invisible) cursor down to the next line, then print the second line.
    Serial.println(lcdText);
    lcd.clear();
    lcd.setCursor(0,0);
    lcd.print(firstLine);
    lcd.setCursor(0,1);
    lcd.print(secondLine);
The whole code can be found below, at the end of the page.
ConclusionOnce you have uploaded this sketch, you should be able to send messages and read them on the LCD! Enjoy!


Comments
Please log in or sign up to comment.