
Hand tools and fabrication machines | ||||||
 |
| |||||
1. Changing the settings for the skirt (Slic3r)
2. Changing the settings for the skirt (Cura)
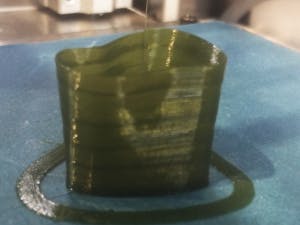
3. Start the print
4. Bad results
6. Adjustments
Read more- Go to File → Preferences menu.
- Choose expert in the mode drop-down menu instead of simple.
- Exit the preference menu.
- Go to the “Skirts and Brim” option in the “print settings” tab to add or deduct the amount of lines the skirt is made of.
Note: There is another function that is called a “brim”. A brim is much like a skirt only difference is that it’s expanded from the bottom of the object. The purpose is to give the object a firmer grip on the print surface to avoid warping edges.
- Go to the “Expert menu”.
- Click on “Open Expert settings” for the skirt adjustments.
- Edit the line count to 4 or more under the "Skirt".
To make thing simple we’ve made this Gcode to work automatically with your Materia 101. You don’t have to use this. You may use any model of your choosing.
- Launch the Gcode that you transferred to the printer's SD-card.
- Observe the skirt (and perhaps the first) layer being printed.
- Abort the print and use your finger (carefully) to feel the skirt surface.
- Remove the skirt with a knife.
!!!! Be careful not to break the tape or cut yourself !!!!
How do you tell if a skirt is bad? These are some symptoms you should keep your eyes open for:
- Too close: There are ridges, bumps on the surface of the skirt. If the nozzle is too close to the print surface, pressure will build up inside the nozzle/hot end. Worst case scenario: the plastic flows the wrong way and blocks the hot end. The bottom of the print could end up being broader than the rest of the print. This is because the bottom layers are squashed onto the print surface and turn out wider than the following layers. This defect will “travel” a few millimeters up from the object's bottom.
- Too far away: The skirt is not spread i.e., it retains a “wire” form on the surface. Worst case scenario: the print could detach and fall off the print surface.
- Uneven: On one side the skirt is well spread (or too thin) and on the other side it is a strand on top of the print surface (not clinging to the surface). One side might come loose and the other might produce a thicker bottom. If one side comes loose the edge might warp and scrape up against the nozzle when it is passing.
- What is a good first layer?
- The "flatness" of the first layer and a correct distance between the nozzle and print surface will grant the next layer a good surface to build upon.
- The adhesion of the first layer is what makes sure that the printed object does not come loose from the print surface.
- Merged extruded lines with even thickness and colour
- If made with translucent filament, the color should be even when you remove the skirt from the surface.
- Change the overall distance between the nozzle and the print surface
- Turn the black plastic dial that is located towards the back of the printer. Turn the wheel clockwise to increase the distance and counterclockwise to decrease it.
- The Leveling routine
- There is a plate leveling routine built into the machine which is an option instead of using the skirt feature. To use this, select the prepare menu and then choose “test plate”. The process of leveling the bed might look like this:
- Print skirt/ Run the level bed routine.
- Adjust overall distance from bed.
- Run level bed routine/print skirt.
- Adjust overall distance according to your results.
Note: You may adjust the bolts in each corner while you are printing the skirt if you are careful.
kengdahl
Posted by  Arduino_Scuola
Arduino_Scuola


Comments