Hi everyone! Welcome back
So here's something extremely cool and intriguing: a tiny Gameboy that fits inside a Candy Tin box and runs doom, no, not really.
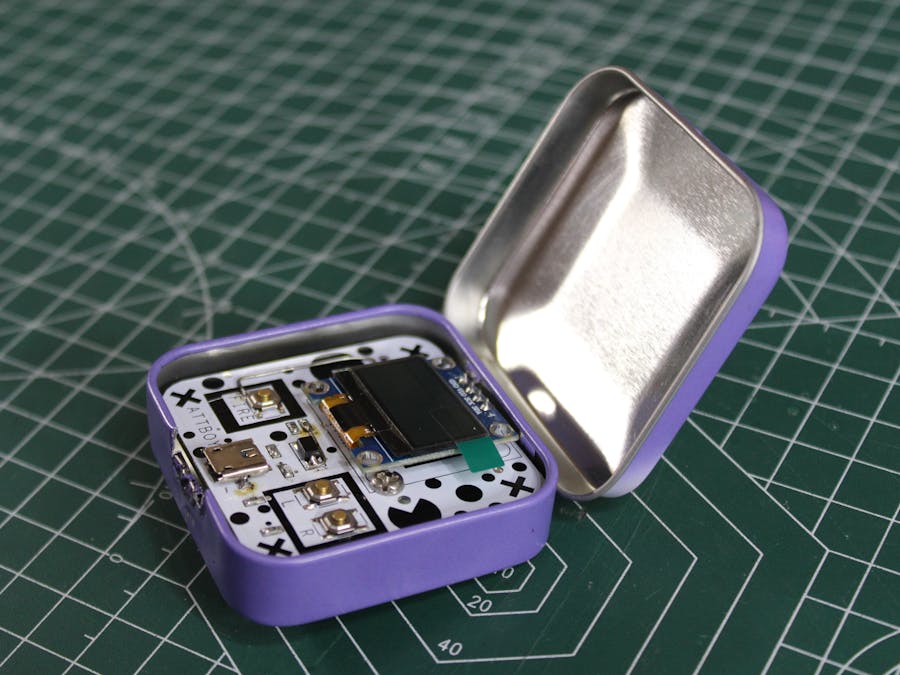
This project is essentially an Altoid game console, however, it comes in a box made by a different candy company and has a different shape than a typical Altoid tin.
Altoid game consoles, also known as "Altoid tin game consoles, " are a unique type of custom game console that has become popular among DIY enthusiasts and gamers.
The concept is simple: take an Altoid tin, a small, pocket-sized mint container, and transform it into a functioning handheld game console. The tin is retrofitted with components such as a microcontroller, buttons, and a screen to create a compact and portable gaming device.
This game system only supports one game, a space invaders-style game. An SSD1306 display is used, while the console's ATTINY85 MCU serves as its brain.
A small 50mm × 50mm PCB that contains the entire project is crammed inside the Candy Box.
In this article, we will explore the process of creating a small, custom game console that you can call your own. Whether you're a seasoned electronics enthusiast or a beginner looking for a new project, this article will guide you through the steps of designing and building a compact and portable gaming device.
Material RequiredThese are the materials used in this built-
- Custom PCB
- Attiny85
- Arduino Nano (for programming the Attiny85)
- SMD Buttons
- 10k Resistors
- 1k Resistor
- USB Micro THT Port
- SSD1306 OLED Display
- DIP8 Socket
- M7 Diode
- PCB Standoff M3
- Screws M3
- Altoid-like Candy Tin
The Candy Tin Box that I purchased from a neighborhood market served as the inspiration for this project's design.
The plan was to use a square box and install a PCB that houses all the electronics inside.
Originally, I planned to create a device similar to the Nintendo Gameboy Advance SP that folds into a little box, with the display on top and the controls on the bottom.
This concept was interesting but difficult to implement, so I set it aside for later and created a single PCB that will house the Attiony85 on the back side and the display on the top side, along with all the SMD components.
Preparing the BoxWe begin by first preparing the box for the Gameboy conversion, which includes making two mounting holes with a sharp punching tool. Although we can use a drill here, I found that the tin was too thin, so the punching tool did the job for me.
Then, using two M3 screws, we secure the two Hex M3 PCB standoffs over the holes so that the PCB can be attached to them.
We measure the distance between two hex PCB standoffs from their centers. This measurement, coupled with the inner length and breadth, which were approximately 51x51mm, will be used in the PCB design process.
PCB DesignWhen it comes to PCB design, I used a design that was adapted from Electronoob's game console project, which you can find here.
https://electronoobs.com/eng_arduino_tut120.php
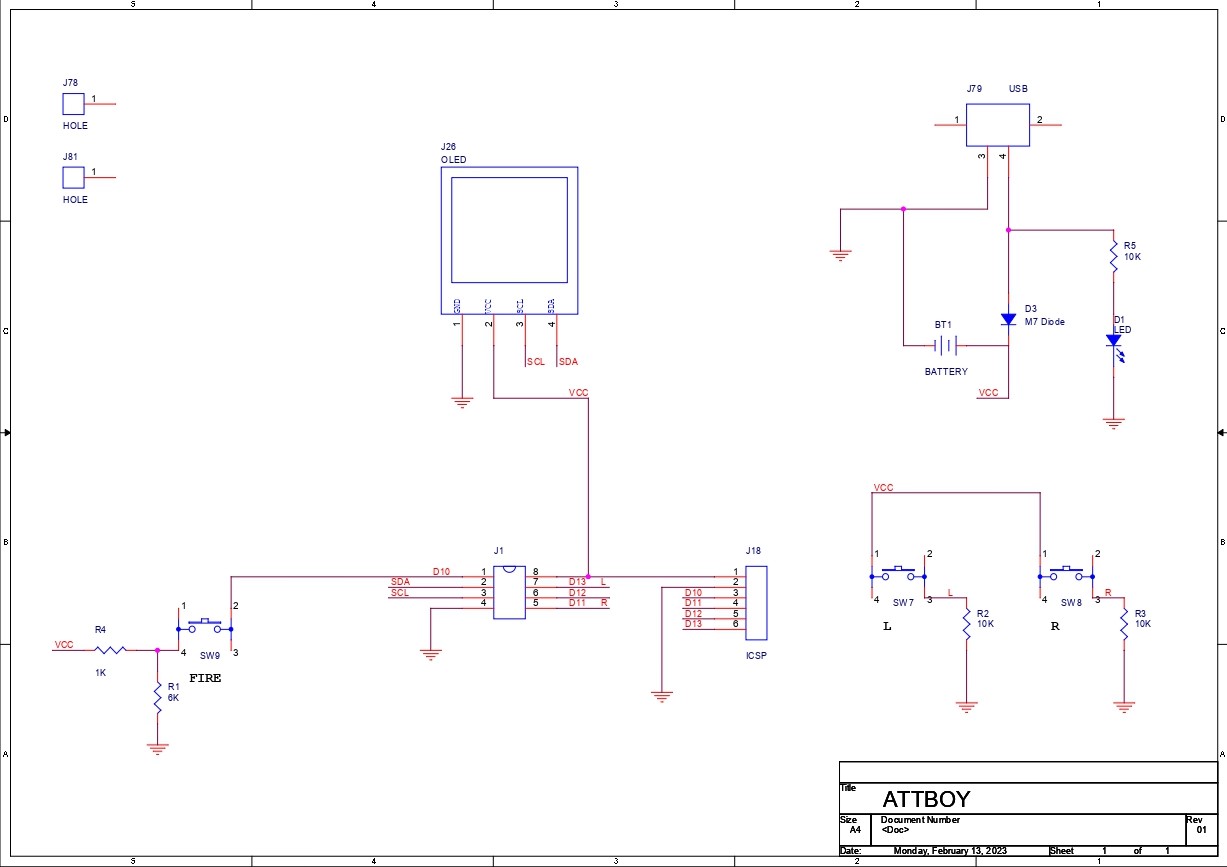
Here, an SSD1306 OLED Display is connected to an Attiny85 through the D3 and D4 pins.
There are three buttons: the Left and Right arrows are controlled by two of them, while the fire button is operated by the third.
A USB port that is also connected to a battery powers the entire system (in this article, we only utilize USB power; the battery isn't used, but it is available as a port for connecting a battery on board).
Using the measurements from before, I prepared the board, finished the schematic, and then arranged each component according to its proper location.
The Gerber data for this board was later sent to PCBWAY for samples.
PCBWAYAfter completing the PCB Design, Gerber data was generated and sent to PCBWAY for samples.
An order was placed for the PCBs with white soldermask and black silkscreen, which look pretty cool in general.
I received PCBs within a week, and they were excellent, as expected.
I love the quality of PCBs made by PCBWAY. There are other manufacturers available, but their service is always on another level.
check out PCBWay service for getting great PCB service at less cost.
Solderpaste Dispensing and Pick & Place Process- Using a solderpaste dispensing system, we initially begin the PCB assembly by applying solder paste one by one to each component pad.
- Using an ESD Tweezer, we then select and position each component in its designated location.
Next, we carefully lifted the whole circuit board and place it on my DIY Mini Hotplate which is also homemade just like this project.
After a little time, when the hotplate reaches the temperature where the solder paste is melting, all of the components will be soldered using this hot reflow process.
THT Process- The DIP8 IC socket and USB Micro Port are the final THT components that are assembled after the Reflow Process.
- We next secure them in place by soldering their pads.
After removing the PCB standoffs from the tin and adding them to the PCB, we proceed to add them to the circuit.
This is why: There are screw holes in the center of the circuit, but they are concealed by the SSD1306 Display. If a display is added, it also hides the screw head, making it impossible to tighten the screws with a screwdriver.
Therefore, we add the display to its position after first tightening the PCB standoffs.
Adding OLED DisplayThe OLED display is then put in its place, its leads are soldered from the bottom, and the leads are then chopped down using a wire cutter. The circuit assembly is now finished.
Result so farHere is the result so far, and the board doesn't look awful. The visual impact of this board is increased by the addition of graphics to the silkscreen layer of the PCB.
Let's look at the programming portion of this project since assembly is complete but the console's brain has not yet been installed in its IC socket.
Programming Attiny85Now here's one of the best examples of how a simple 1$ Chip can run stuff like an Arduino board without using a bunch of componenets and other stuff.
Attiny85 is by far one of the best MCU I used, it's not because of its connectivity or features like BT or wifi (It doesn't have those).
It's a low-power Microchip 8-bit AVR® RISC-based microcontroller that combines 8 KB ISP Flash memory, 512B EEPROM, 512B SRAM, six general-purpose I/O lines, 32 general purpose working registers, one 8-bit timer/counter with compare modes, one 8-bit high-speed timer/counter, USI, internal and external Interrupts, 4-channel 10-bit A/D converter, programmable watchdog timer with internal oscillator, three software selectable power saving modes, and debugWIRE for on-chip debugging. The device achieves a throughput of 20 MIPS at 20 MHz and operates between 2.7-and 5.5 volts.
Attiny85 is great because of how well it can do certain things that an Arduino can perform as well but in a smaller much more user-friendly form factor. we can implement it into any kind of project and it will work smoothly.
I've been using it for the past 5 years and I will still use it in the future because of its reliability and the most important factor- cost!.
As for the Flashing Process, we cannot directly program ATTINY85 through any USB, I mean there's a method for programming the Attiny straight from the USB port but I'm not doing that.
Instead, I'll be using the ISP flashing method which will utilize the SPI Pins of attiny85 to burn the bootloader in it and then Flash.
- We go to Example sketches> Arduino as ISP and upload it into the Arduino Nano board.
- Next, we add a 1uf Capacitor between RST and GND Pin, this will stop Arduino to reset during the flashing process (Add capacitor after uploading the Arduino as ISP Sketch)
- Now go to this link and download the Attiny85 Core files-
https://github.com/SpenceKonde/ATTinyCore
- Next, we wire Attiny85's SPI Pins with Arduino Pins according to the attached wiring diagram.
- we then go to tools and change the MCU and choose Attiny85.
- We select the right port and change the programmer to "Arduino as ISP"
- Next, we click on Burn Bootloader, if the wiring is correct, you will see a "Done burning Bootloader" message.
- At Last, we go to the sketch menu and select "upload using programmer" and the board will get flashed with the sketch which was opened at that moment.
For flashing the MCU, I used my existing AVR Flasher which Is an Arduino Nano that runs Arduino as an ISP sketch.
The Attiny85 MCU is simply inserted into the DIP8 Socket, burned with code, and then removed and connected to the Main Circuit's DIP8 Socket.
Adding and removing the Attiny85 is not practical and could result in breaking or bending its legs, but there is a way we can change that, perhaps in the next version. This process is similar to adding old-school game cartridges to game consoles. The only difference is that the old cartridges were big and much more practical.
GAMEThe Attiny85 is added to the DIP8 Socket, and a 5V source is connected to the gaming console via the USB Micro Port.
Both Space Invaders and the Board appear to be functioning well.
As the net that connects one end of the switch to D5 was not connected in the design, I had to manually adjust the board and add a shorting wire.
Let's proceed to the last step, which is the box construction, now that this works.
Final Assembly- Using a cutter and nose pliers, we first begin by removing a part of the tin box's front face to make space for a USB port.
- Following that, we secure the circuit with two M3 bolts inside the tin box.
Assembly is now completed.
END RESULT
Here is the finished product of this build: a small, portable game system that plays a bootleg version of Space Invaders using components jammed within a tin box. It functions and is exactly what it says it is.
This is it for today, Leave a comment if you guys need any help, and I'll be back with another project soon!
Thanks, PCBWAY for supporting this project, Do check PCBWAY for getting great PCB service for less cost!
Peace


Comments
Please log in or sign up to comment.