


Hardware components | ||||||
 |
| × | 1 | |||
Software apps and online services | ||||||
 |
| |||||
Hand tools and fabrication machines | ||||||
_LWNORVejBN.png?auto=compress%2Cformat&w=48&h=48&fit=fill&bg=ffffff) |
| |||||
Greetings everyone and welcome back, So here's something fun and loud.
PICO Sequencer is a Raspberry Pi Pico 2 synthesizer built from scratch, complete with a customized 5x5 matrix keyboard and a PAM8403 audio amplifier.
The idea was to design a sequencer similar to Teenage Enginering's Pocket Operator, a compact synthesizer-drum machine device that can produce music on the go. They are small, portable, and offer a variety of capabilities, so we decided to create our own version of the device with a Raspberry Pi PICO 2 as the main microcontroller.
Our version has a 5x5 grid with 25 buttons connected to 10 GPIOs of PICO, an audio amplifier that enhances the output sound to drive a speaker.
We created a minimal version using a prototype PCB to connect the PICO to a button matrix and an audio amplifier, flashed the PICO with our custom sketch, and prepared the device.
This article discusses the entire build process for this project, including information and code. So let's get started.
Materials Requiredhere's a short list of components we used in this project:
- Custom matrix PCB
- Push Buttons
- Raspberry Pi PICO 2
- Jumper Wires
- PAM8403 Audio Amplifier
- 5W Speaker
- Prototype PCB
The inspiration for this project comes from the Pocket Operator device series created by teenage engineering; you may recognize them as the creators of the viral Rabbit R1 device that debuted in early 2024.
Pocket Operators are small, ultra-portable music devices created by Teenage Engineering. They are designed to be affordable and offer studio-quality sound, making them perfect for creating music on the go. Each model comes with a variety of features, such as drum machines, synthesizers, sequencers, and built-in microphones.
Several of their popular products include the PO-12 Rhythm, a 16-sound drum machine and synthesizer. The PO-14, PO16, and PO-28 Robots are live synthesizers designed to produce electronic music related to robotics, among other models.
Pocket operators can be used singly or combined to form a "pocket band" with 3.5 mm audio cords. They are also compatible with other musical equipment.
They come with an onboard battery pack, making them genuinely pocket-friendly and easy to carry along.
https://teenage.engineering/products/po
Raspberry Pi PICO 2 SetupTo create our own version, we chose the new Raspberry Pi PICO 2, an enhanced version of the previously available PICO 1, with a new RP2350 RISC-V CPU, which is ideal for a processor-intensive project.
For the inputs, we're using a previously created 5x5 button matrix board, which is a 25-button matrix board with a simple row-and-column framework with buttons organized in five rows and five columns to make a button grid. When you press the button, the circuit between a row and a column is completed, and the PICO 2 detects this.
https://www.hackster.io/Arnov_Sharma_makes/custom-5x5-keypad-70c845
Furthermore, for audio output, we can directly connect a speaker to the PICO GPIO and it will output the speaker without issue, but the sound will be less loud and barely audible, requiring the use of an audio amplifier that can be linked to the PICO and used to amplify the output sound. To do this, we utilize a PAM8403-based audio amplifier, which requires a 5V supply and can easily drive a 5W speaker.
Using these three key components, we begin the wiring process for this project.
Seeed Fusion ServiceFor this project, we are using one of our previously built 5x5 matrix board projects; its PCB Gerber Data was uploaded to Seeed Fusion's website and an order was placed for a white Solder mask with black silkscreen.
PCBs were received in a week, and their quality was super good considering the rate, which was also pretty low.
Seeed Fusion PCBService offers one-stop prototyping for PCB manufacture and PCB assembly, and as a result, they produce superior-quality PCBs and fast turnkey PCBAs within 7 working days.
Seeed Studio Fusion PCB Assembly Servicetakes care of the entire fabrication process, from Seeed Studio Fusion Agile manufacturing and hardware customization to parts sourcing, assembly, and testing services, so you can be sure that they are getting a quality product.
After gauging market interest and verifying a working prototype, Seeed Propagate Service can help you bring the product to market with professional guidance and a strong network of connections.
Keyboard Assembly process- The assembly process begins with placing all 25 switches in their respective pads on the Matrix PCB; we are utilizing 6x6 Tacktile buttons here, and we must ensure that all buttons are correctly added to their pads, as some of the buttons' pins bend when placed in the footprint.
- Next, we solder all of the switch pads on the bottom side of the board with a soldering iron.
- Following that, we place a CON10 male header pin in its place and solder its pads from the top side of the board.
Matrix Board is now assembled.
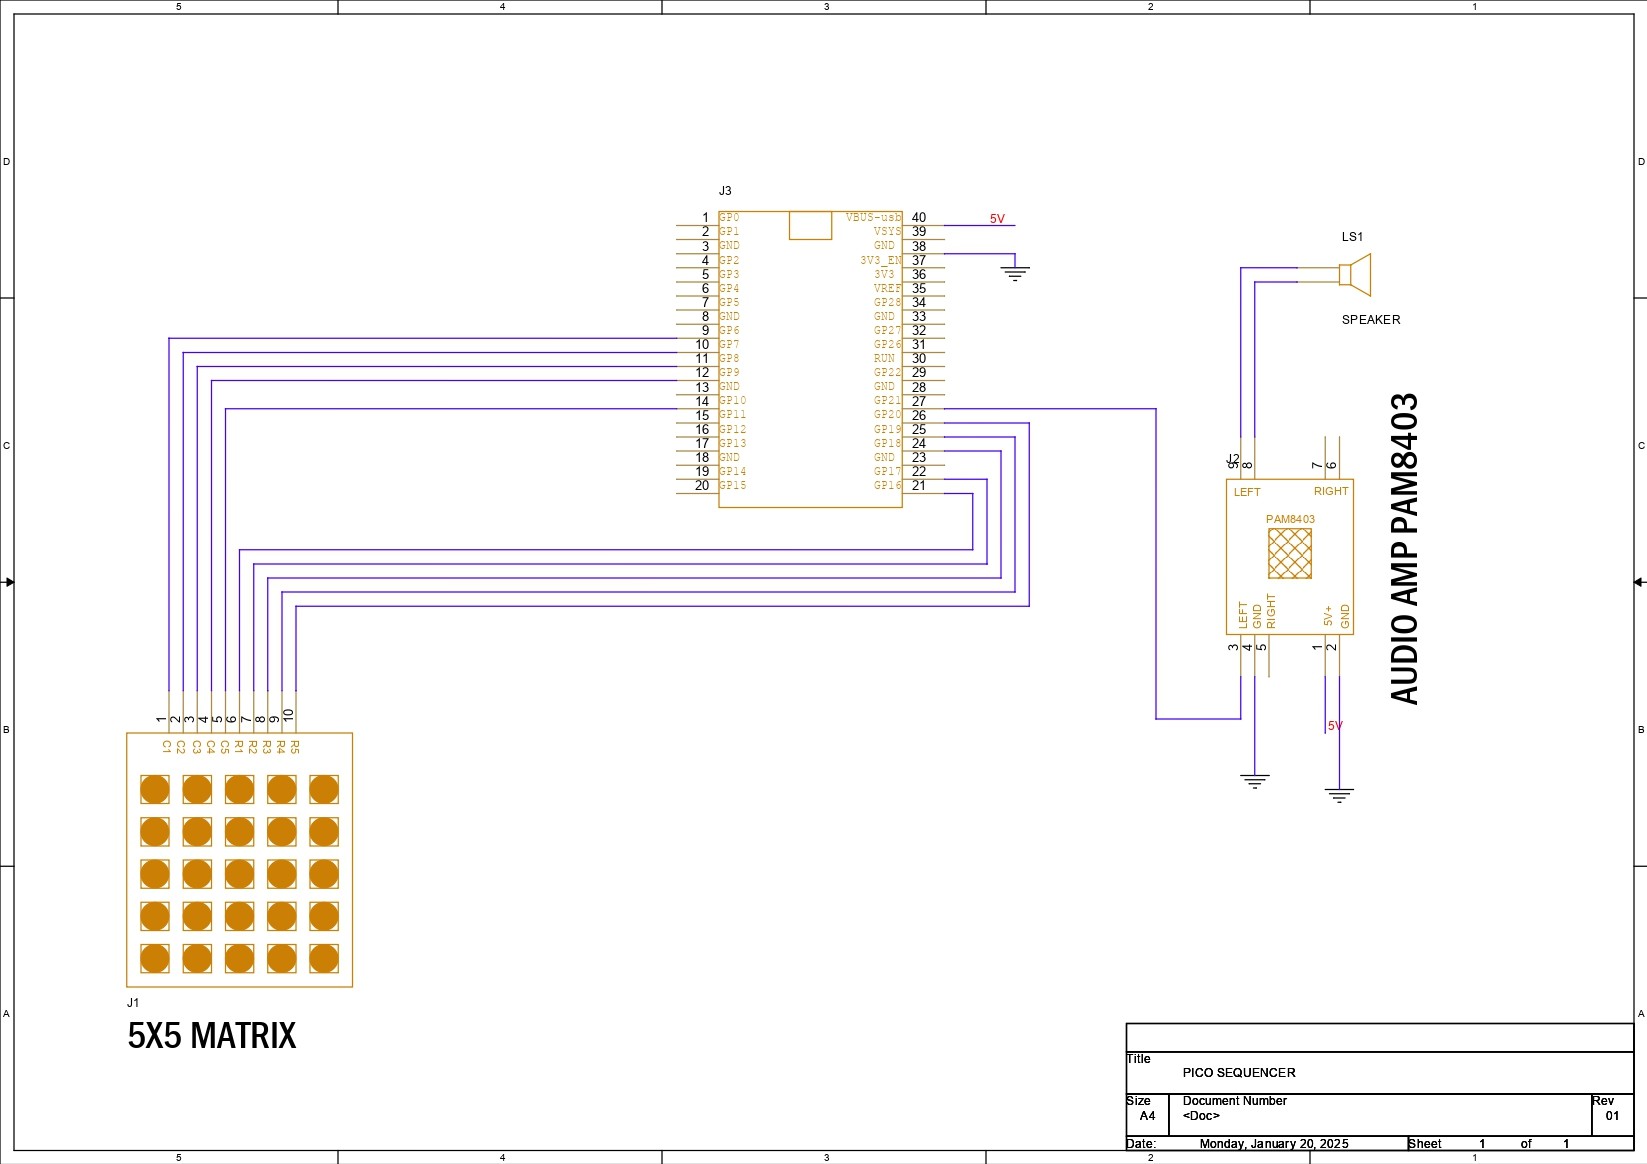
WIRINGIn terms of wiring, we linked the column pins of our matrix keyboard (C1-C5) to GPIO6, GPIO7, GPIO8, GPIO9, and GPIO10. From R1 to R5, the row pins are connected via GPIO16, GPIO17, GPIO18, GPIO19, and GPIO20.
The speaker output pin is GPIO21, which is connected to the audio amplifier's L input. The 5V pin of the audio amplifier is linked to the PICO's VBUS, while GND is connected to GND. The speaker is attached to the audio amplifier's left output.
A simplified schematic is attached if you want to recreate the circuit.
CODEHere's the code we used.
#include <Wire.h>

// Define keypad pins
const int rows = 5;
const int cols = 5;
const int rowPins[rows] = {16, 17, 18, 19, 20}; // Updated row pins
const int colPins[cols] = {6, 7, 8, 9, 10}; // Updated col pins

// Define frequencies for buttons
const int frequencies[5][3] = {
  {110, 123, 146}, // Row 1
  {164, 196, 220}, // Row 2
  {246, 294, 330}, // Row 3
  {349, 392, 440}, // Row 4
  {494, 523, 587}  // Row 5 (last button will be for record)
};

// Pin for speaker
const int speakerPin = 21;

// Recording variables
bool isRecording = false;
unsigned long sequence[100];
int sequenceIndex = 0;

// Button coordinates
const int recordRow = 4;
const int recordCol = 2; // Last button in Row 5
const int delayRow = 4;
const int delayCol = 1; // Second to last button in Row 5

void setup() {
  Serial.begin(115200);

  // Initialize row pins as inputs
  for (int i = 0; i < rows; i++) {
    pinMode(rowPins[i], INPUT_PULLUP);
  }

  // Initialize column pins as outputs
  for (int i = 0; i < cols; i++) {
    pinMode(colPins[i], OUTPUT);
    digitalWrite(colPins[i], HIGH);
  }

  // Initialize speaker pin as output
  pinMode(speakerPin, OUTPUT);
  Serial.println("Setup complete.");
}

void playSound(int freq) {
  tone(speakerPin, freq, 200); // Play sound on pin 21 for 200ms
  Serial.print("Playing sound at frequency: ");
  Serial.println(freq);
}

void playSequence() {
  for (int i = 0; i < sequenceIndex; i++) {
    playSound(sequence[i]);
    if (digitalRead(rowPins[delayRow]) == LOW && digitalRead(colPins[delayCol]) == LOW) {
      delay(750); // Add delay if delay button is pressed (adjust as needed)
    } else {
      delay(250); // Default delay between notes in the sequence
    }
  }
}

void loop() {
  for (int i = 0; i < cols; i++) {
    digitalWrite(colPins[i], LOW); // Activate column i
    for (int j = 0; j < rows; j++) {
      if (digitalRead(rowPins[j]) == LOW) { // Button press detected
        if (i == recordCol && j == recordRow) { // Check if it's the record button
          if (isRecording) {
            isRecording = false;
            Serial.println("Recording stopped. Playing sequence...");
            tone(speakerPin, 880, 500); // Play tone to signal recording stop
            delay(500); // Delay to avoid multiple triggers
            playSequence(); // Play recorded sequence
          } else {
            isRecording = true;
            sequenceIndex = 0;
            Serial.println("Recording started...");
            tone(speakerPin, 440, 500); // Play tone to signal recording start
            delay(500); // Delay to avoid multiple triggers
          }
        } else if (!(i == delayCol && j == delayRow)) { // First 10 buttons for tones, excluding delay button
          playSound(frequencies[j][i]);
          if (isRecording) {
            sequence[sequenceIndex] = frequencies[j][i];
            sequenceIndex++;
            Serial.print("Recording note: ");
            Serial.println(frequencies[j][i]);
          }
        }
        delay(200); // Debounce delay
      }
    }
    digitalWrite(colPins[i], HIGH); // Deactivate column i
  }
}
This test sketch utilises the 5x5 matrix keyboard to generate bass tones, record sequence, and add time delay during playback.
The code iterates through each column, setting it LOW to activate it, and then checks each row for a button press; if a button press is detected, it identifies the button based on its row and column position.
When the record button (located at `recordRow` and `recordCol`) is pressed, it toggles recording mode; if recording mode is active, each button press stores the corresponding frequency in the sequence array, and pressing the record button again stops recording and plays back the recorded sequence.
RESULTThis small build resulted in a functioning Sequencer-Synth capable of recording and playing music, thanks to the Mighty Raspberry Pi PICO 2 and our unique 5x5 button matrix.
By pressing any button, a tone is generated. When the record button is hit, recording mode is activated; if recording mode is active, each button press saves the corresponding frequency to the sequence array, and pushing the record button again stops recording and replays the recorded sequence.
A little YouTube short is added so you can see how nicely this device functions.
There are several improvements. This is only a test device made from spare parts from earlier projects assembled on a prototyping board; the next iteration will have a better formfactor and additional buttons, possibly quiet ones, as we discovered a sound issue while pressing the buttons. We will also include an OLED panel that will show which tone is pressed and what tones are being recorded, as well as a few other functions.
Leave a comment if you need any help regarding this project. This is it for today, folks, and stay tuned for the calculator project update.
Special thanks to Seeed Studio Fusion Service for supporting this project. You guys can check them out if you need great PCB and stencil service for less cost and great quality.
And I'll be back with a new project pretty soon, peace.


Comments
Please log in or sign up to comment.