Introduction
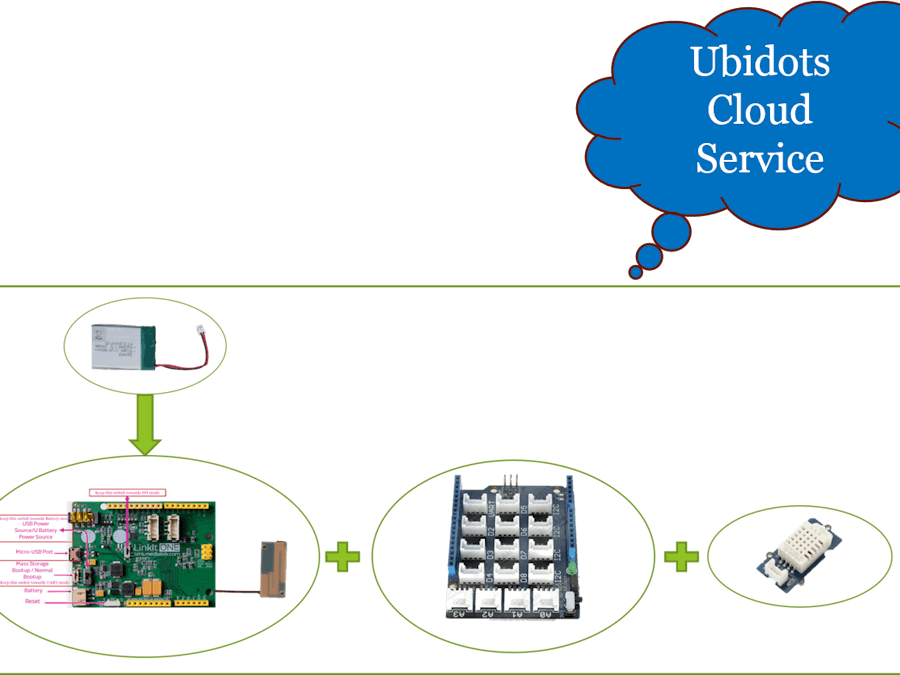
This is an example Internet of Things prototype that utilizes the LinkIt ONE development board to acquire Temperature and Humidity from sensors. Along with this data we are also going to send Battery Level and GPS location data. When the prototype is placed at a particular position smartphone is required to detect its particular latitude and longitude only once. Since the location is not going to change but we should know the location we will send fixed location GPS data from LinkIt One. During installation each device is configured with GPS data (in its code) using Smartphone, that delivers its accurate position. The data is then visualized on Ubidots cloud service.
By the end of this tutorial you’ll have a fully functioning IoT prototype, which gathers data from the sensors attached to the LinkIt ONE development board, transmits the data through a wireless communication channel (GPRS), and provides visualization using cloud services on any GPRS/Wi-Fi enabled device.
This tutorial guides you through:
· Building the prototype, with details of the hardware requirements and how to put them together to create the prototype.
· Adding the device to the Ubidots to collect the sensor data.
· Using the Ubidots to view that data collected on the device
Before you start
If you haven’t built a LinkIt ONE project before, this section describes the steps you need to follow before commencing this project.
Download LinkIt ONE developer’s guide:
http://labs.mediatek.com/site/global/developer_tools/mediatek_linkit/documentation/index.gsp
· Arduino Software
Download and install Arduino software version supported by the LinkIt ONE development board as described in the LinkIt ONE developer’s guide.
For windows users:
For Mac users:
In addition to providing your coding environment, the software is used for monitoring the development board.
· LinkIt ONE SDK Installation and Configuration
Download and install the LinkIt ONE SDK.
http://labs.mediatek.com/site/global/developer_tools/mediatek_linkit/sdk_intro/index.gsp
Follow the instructions in the LinkIt ONE developer’s guide to install and configure the SDK. In addition to providing the API and tools to use Arduino, the SDK provides a tool to upgrade the development board firmware and reset it to the factory default settings.
Create your Ubidots account
Register on Ubidots and activate the account to prototype your own devices and applications. Ubidots offers a platform for developers that enables them to easily capture sensor data and turn it into useful information. Use the Ubidots platform to send data to the cloud from any Internet-enabled device. The service is also very affordable with up to 500,000 data point uploads (or dots) a month, with 1 Month of historical storage for free. You can also set triggers and alerts that can automate responses to data thresholds you set. Finally, all this is accessed by a powerful, standard and fairly well documented Application Programing Interface (API).
Building the Project hardware
This section describes the hardware and electronics, in addition to a LinkIt ONE development board, needed to build project and provides details on how to put them together.
The components used are as follows:
· GSM antenna connected to GSM Antenna Port. The antenna is provided in the LinkIt ONE development board’s kit and supports GSM 2G standards.
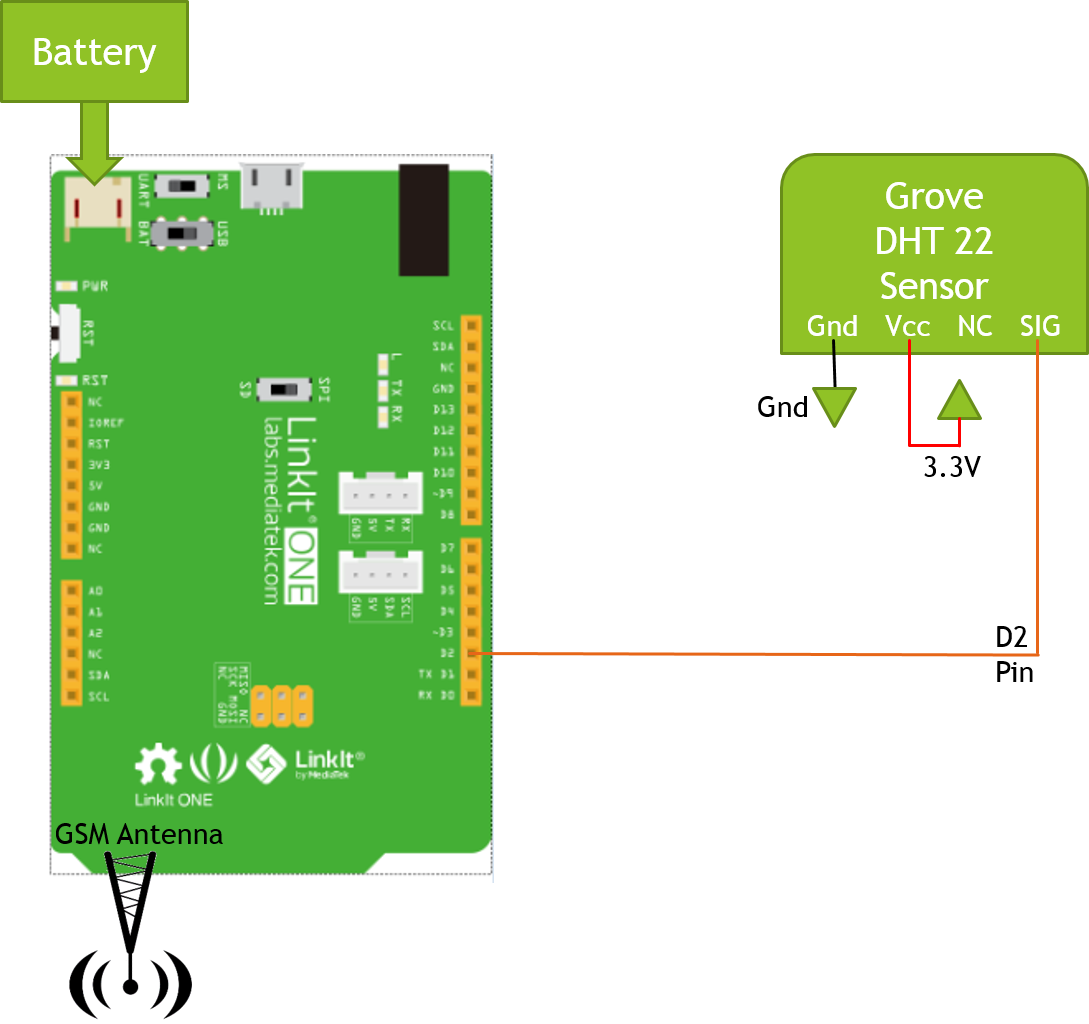
· Grove base shield is connected on the top of LinkIt ONE. Grove DHT 22 sensor is connected to the D2 pin of grove base shield i.e. to voltage (3v3), ground (GND), D2 pins of LinkIt ONE. DHT 22 measures temperature and humidity.
· The detecting range of DHT 22 sensor is 5% RH - 99% RH, and -40°C - 80°C. And its accuracy satisfyingly reaches up to 2% RH and 0.5°C.
· The LinkIt ONE development kit contains 1000mAh Li-Po battery. Connect it to the LinkIt ONE Board.
Assembling:
The components of the prototype are assembled according to the following diagram:
Setup the Ubidots Account
View the below snapshots or Watch the video of how to setup the Ubidots account!!
Creating Logger’s software
This project needs an Arduino Sketch to share data from the sensors with ubidots. This section describes the software required as follows:
· Overview of the Arduino sketch.
· Transmitting sensor data to the Ubidots.
A) Overview of the Arduino sketch
An Arduino sketch is a source code file representing the core controlling logic for the LinkIt ONE development board. It consists of two main structures: setup and loop.
o A setup() structure initializes resources, such as the Wi-Fi module.
o A loop() structure continuously listens to and processes events from hardware sensors and software modules. The loop() structure runs forever — until the device is shutdown.
The setup() structure is called only once at the beginning of the program and provides for initialization of the functions.
In our code, we are initializing Serial port with 9600 baud rate and then attaching our GPRS to the APN setting specific to the SIM card manufacturer.
The loop() structure executes continuously and provides continuous updates of the sensor data on the serial port and on ubidots.
B) Transmitting sensor data to the Ubidots
We first of all we connect our GPRS client to the things.ubidots.com server and then according to the API provided by ubidots we send the data to the server.
Explanation of the code:
1) Reading Battery Level
First of all include
in your Arduino sketch.
The Battery API provides 2 APIs:
a) The battery level API returns current battery level in 0~100 percentage
i.e. LBattery.level()
b) The charging state API can return if the battery is in charging state.
i.e. boolean
isCharging();
2) Reading Temperature and Humidity values from DHT 22
Include "DHT.h"
in your code
Specify to which pin DHT sensor is connected.
i.e. #define DHTPIN 2
Specify the type of DHT sensor (DHT 11, DHT 22)
#define DHTTYPE DHT22
Now initialize the object of your DHT class so you can read the sensor values in loop function.
DHT dht(DHTPIN, DHTTYPE);
Declare Temperature and Humidity sensor variables from DHT 22
float t = 0.0;
float h = 0.0;
In setup() function we will call dht.begin() to initialize the sensor.
i.e. dht.begin();
Now in loop() function, read the sensor values. First of all we will see whether we are getting any sensor values from DHT 22 if yes then only we will read the values and store them in the variables declared. And then send them to the PC for viewing.
if(dht.readHT(&t, &h)) //Reading Temperature and humidity from DHT 22
{
delay(2000);
// Sensor readings may also be up to 2 seconds 'old' (its a very slow sensor)
dht.readHT(&t, &h);
Serial.println("------------------------------");
Serial.print("Temperature: ");
Serial.println(t);
Serial.print("Humidity: ");
Serial.println(h);
}
3) GPRS initialization and sending data to the Ubidots
Include the GPRS library in your code
The GSM/GPRS APIs support:
a) Sending and receiving Short Message Service (SMS) messages.
i.e. #include
b) Data transfer over GPRS.
i.e.#include
Along with LGPRS library we will also require GPRS client library to include the ability to Post and Get information using HTTP. To act as a client connect to a remote TCP/IP server by creating an LGPRSClient object and calling LGPRSClient.connect().
i.e. #include
From ubidots account create your token and also save the variable id’s you have created in the below constants.
#define URL "things.ubidots.com"
#define TOKEN “Your
token”  // replace with your Ubidots
token generated in your profile tab
#define VARID1 "Temperature
Variable id"
#define VARID2 “Humidity
Variable id”
#define VARID3 “Battery
Level Variable id”
// Create instantiations of the GPRS
i.e. LGPRSClient client; //GPRS Client
In setup() function:
We will need to Attach to GPRS network with proper APN settings. Set up the Access Point Name (APN) information used to connect to GPRS network. Use the data provided by your telecom operator to set it up.
while (!LGPRS.attachGPRS("APN","Username","Password"))
{
delay(500);
}
Client has to be initiated after GPRS is established with the correct APN settings:
LGPRSClient globalclient
;
Again this is a temporary solution described in support forums
client =
globalclient;
In loop() function:
Collection endpoint technique is used to send data of several readings at the same time. It updates many variables in a single request, but can also be use to update one variable.
http://ubidots.com/docs/api/v1_6/collections/post_values.html
We will first of all take the GPS location where our project will be kept!!
//Location where this
logger is placed!!
String
loclat="19.21833";
String
loclng="72.978088";
String Location;
//Variable to store the whole lat and long together
Creating a string
containing latitude and longitude information of the  Logger's location:
Location="{\"lat\":";
Location=Location+loclat;
Location += " ,\"lng\":";
Location=Location+loclng+ "}";
We will take temperature, Location, Humidity and battery level and pack it in a string so that can be sent to ubidots in a single request!!
String payload =
"[{\"variable\":\"" VARID1
"\",\"value\":"+ String(temp)+",\"context\":"+Location+"},{\"variable\":\""
VARID2 "\",\"value\":" + String(hum) +
"},{\"variable\":\"" VARID3
"\",\"value\":" + String(LBattery.level()) + "}]";
Now find the length of the string.
String le = String(payload.length());
Now let's get a connection, report back via serial. If connection is established we will post the data to ubidots as specified in the collection endpoint technique:
Serial.print("Connect to ");
Serial.println(URL);
if (client.connect(URL, 80)) //Connecting to ubidots
{
// Build HTTP POST request
Serial.println("connected");
 client.print(F("POST
/api/v1.6/collections/values/?token="));
client.print(TOKEN);
client.println(F(" HTTP/1.1"));
 client.println(F("Content-Type:
application/json"));
 client.print(F("Content-Length:
"));
client.println(le);
client.print(F("Host: "));
client.println(URL);
client.println();
client.println(payload);
}
else
{
 // if you didn't get a connection to the
server:
 Serial.println("connection
failed");
}
delay(100);
// if there are incoming bytes available
// from the server, read them and print them:
if (client.available())
{
char c = client.read();
Serial.print(c);
}
 // if the server's disconnected, stop the
client:
 if (!client.available() &&
!client.connected())
{
Serial.println();
Serial.println("disconnecting.");
client.stop();
}
Note:
One thing we know that there is a lot more Flash (program) memory than RAM is available. So we are using F() syntax for storing strings in flash memory rather than RAM.
i.e. client.print(F("POST /api/v1.6/collections/values/?token="));
Result
Conclusion
In this tutorial you have implemented a remote Temperature humidity sensor logger application using LinkIt ONE development board, DHT 22 sensor, Ubidots cloud service and Arduino programming environment.


Comments
Please log in or sign up to comment.