/*
This is a sketch written by XA & Bernhard Jordi
for the sculpture "PingHader"
www.bernhardjordi.ch
*/

#include <Wire.h>
#include <AccelStepper.h>
#include <Adafruit_MotorShield.h>

Adafruit_MotorShield AFMS = Adafruit_MotorShield();
Adafruit_MotorShield AFMSbot(0x61); // Rightmost jumper closed
Adafruit_MotorShield AFMStop(0x60); // Default address, no jumpers

// Ausgabe anstellen?
const bool DEBUG = true;

int state = 0;
unsigned long state_2_millis = 0;

// Spicker: Select which 'port' M1, M2, M3 or M4
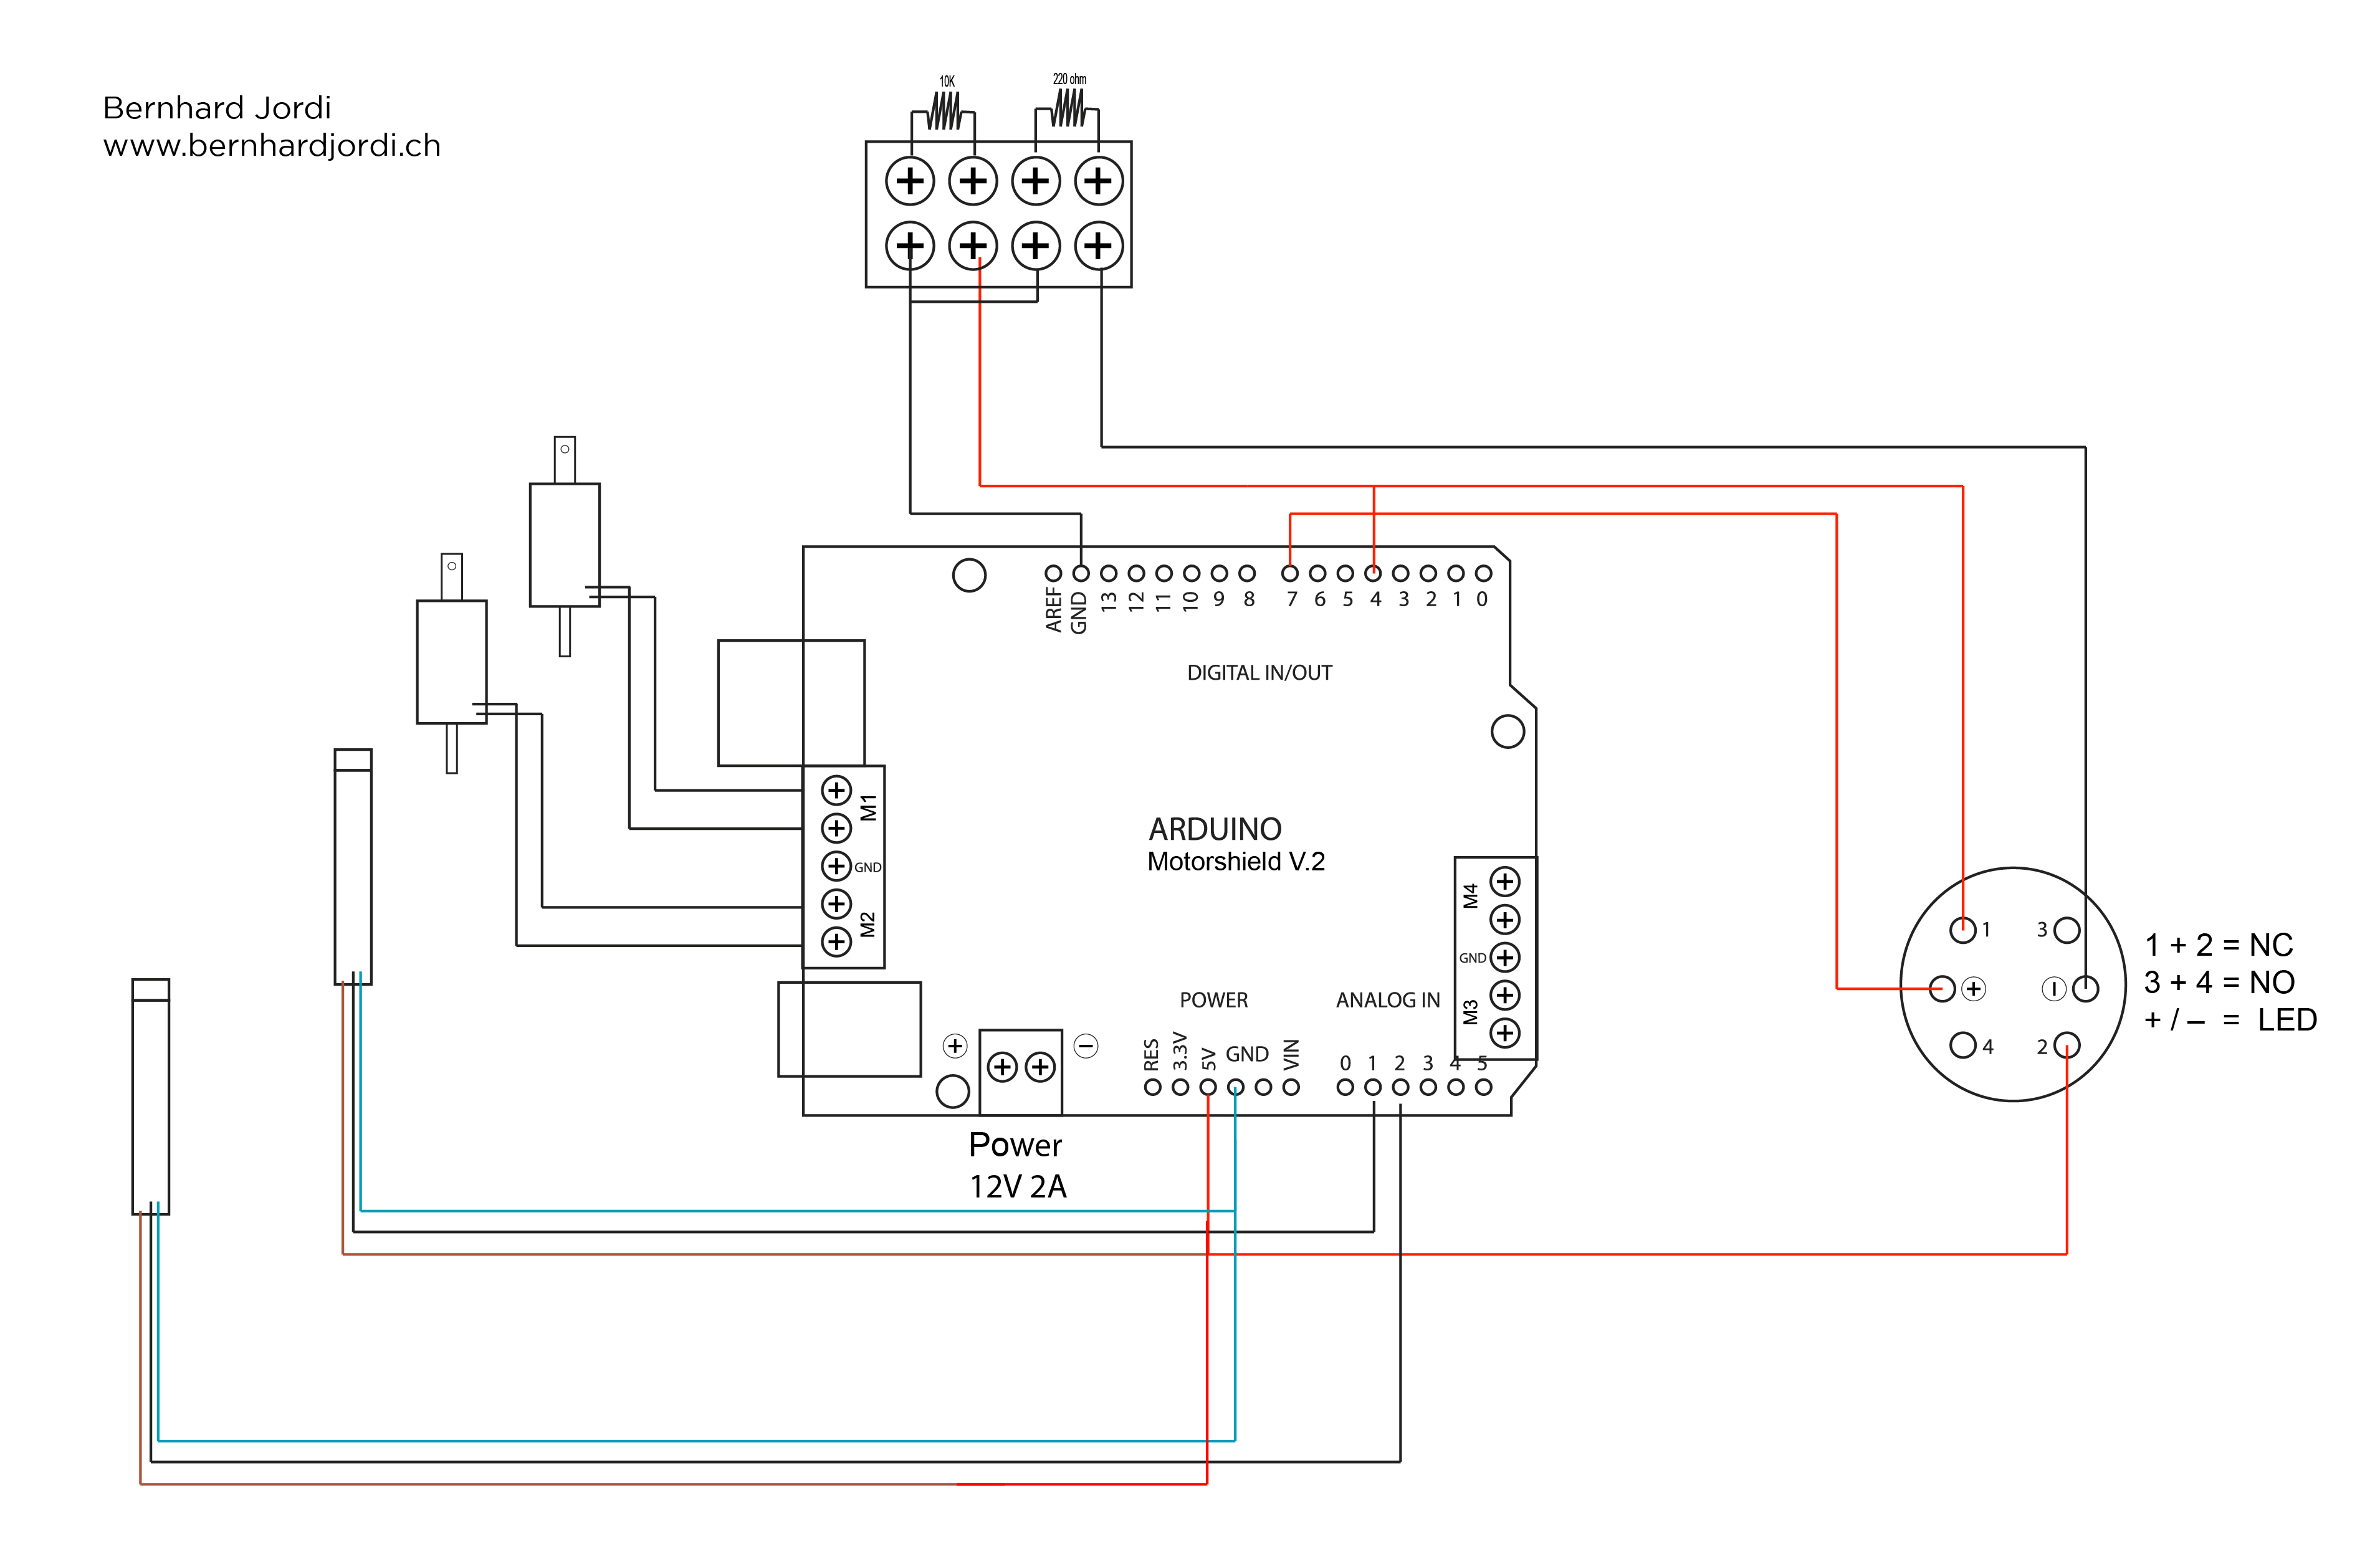
Adafruit_DCMotor *myMotor1 = AFMS.getMotor(1); // Anschluss M1
Adafruit_DCMotor *myMotor2 = AFMS.getMotor(2); // Anschluss M2


// Spickknopf: Sensor (Knopf) bei Spickmotor
const int BUTTON_SPICKMOTOR_PIN = A1; //
const int BUTTON_SPICKMOTOR_PIN2 = A2; //

// Druckknopf mit Licht
const int LED_BUTTON_LED_PIN = 7;      // Licht.
const int LED_BUTTON_PRESSED_PIN = 4;  // Knopf.
// variables will change:
int button_led_state = 0;    // Variable für Lichtknopf
int button_spickknopf_state = 0; // Variable für Spickerknopf
int button_spickknopf_state2 = 0; // Variable für Spickerknopf2

int maximale_anzahl_erfolgreiche_durchlaeufe;

unsigned long debug_millis = 0;

void setup() {
  // set up Serial library at 9600 bps
  if( DEBUG ) {
    Serial.begin(9600);
  }
  // Sensor (Knopf) bei Spickmotor
  pinMode(BUTTON_SPICKMOTOR_PIN, INPUT);
  pinMode(BUTTON_SPICKMOTOR_PIN2, INPUT);
  // Druckknopf mit abgestelltem Licht
  pinMode(LED_BUTTON_LED_PIN, OUTPUT);
  digitalWrite(LED_BUTTON_LED_PIN, LOW); // Kein Licht
  pinMode(LED_BUTTON_PRESSED_PIN, INPUT);
  // Zahnradmotor
  AFMStop.begin(); // muss vo AFMS.begin() geshcehen !!!!!
 // Spickmotor
  AFMS.begin();  // create with the default frequency 1.6KHz. Muss nach AFMStop.begin() geschehen !!!!!
  myMotor1->setSpeed(255);
  myMotor1->run(RELEASE);
  myMotor2->setSpeed(255);
  myMotor2->run(RELEASE);
  // Zufallsgenerator auf zufälligen Startwert
  randomSeed(analogRead(0));
  debug_millis = millis();
}

void loop() {
  // Strom an -> 0
  // Status 0: delay -> 1

  // Status 2: Licht Startknopf anstellen -> 3
  // Status 3: Warten auf Drücken des Startknopfs, Anzahl erfolgreiche Durchläufe festlegen, Licht Startknopf abstellen -> 4

  // Status 5: Impuls Spickknopf gedrückt?  ->

  // Status 7: Spicken. -> 12

  // Status 12: Wenn maximale Anzahl Durchläufe erreicht -> 2, sonst -> 5

  // DEBUG:
 if(DEBUG && (millis() - debug_millis > 1000)) {
    myprint("...");
    debug_millis = millis();
  }
  switch (state) {
    case 2:
      state_2();
      break;
    case 3:
      state_3();
      break;
    case 5:
      state_5();
      break;
    case 7:
      state_7();
      break;
    case 8:
      state_8();
      break;
    case 12:
      state_12();
      break;
    default: // 0
      state_0();
      break;
  }
}

// Status 0: Spickmotor kurz an- und abstellen
void state_0() {
  // Spickmotor kurz an- und abstellen
  delay(1000);
  myprint("state0.");
  state = 2;
}

// Status 2: Licht Startknopf anstellen
void state_2() {
  myprint( String("") + "Licht Startknopf anstellen");
  // Licht Startknopf anstellen
  digitalWrite(LED_BUTTON_LED_PIN, HIGH);
  state = 3;
}

// Status 3: Warten auf Drücken des Startknopfs, Anzahl erfolgreiche Durchläufe festlegen, Licht Startknopf abstellen -> 5
void state_3() {
  // Warten auf Drücken des Startknopfs
  myprint("status3");
  button_led_state = digitalRead(LED_BUTTON_PRESSED_PIN);
  if (button_led_state == HIGH) {
    myprint("Startknopf wurde gedrueckt.");
    maximale_anzahl_erfolgreiche_durchlaeufe = random(3, 23);
    myprint(String() + "Anzahl Durchläufe zufaellig auf " + maximale_anzahl_erfolgreiche_durchlaeufe + " festgelegt");
    myprint("Stelle Licht Startknopf ab.");
    // Licht Startknopf abstellen
    digitalWrite(LED_BUTTON_LED_PIN, LOW);
    delay(1000);
    state = 5;
  }
}


// Status 5:  Impuls Spickknopf gedrückt?
void state_5() {
  // Wenn Spicksensor (Knopf) gedrückt
  button_spickknopf_state = analogRead(BUTTON_SPICKMOTOR_PIN);
  if (button_spickknopf_state >= 500) {
    myprint("Spicksensor gibt an...");
    state = 7;
  }
  button_spickknopf_state2 = analogRead(BUTTON_SPICKMOTOR_PIN2);
  if (button_spickknopf_state2 >= 500) {
    myprint("Spicksensor2 gibt an...");
    state = 8;
    return;
  }
}

void state_7() {
  delay(random(0, 5000));
  spicke();
  delay(500);
  state = 12;
}

void state_8() {
  delay(random(0, 5000));
  spicke2();
  delay(500);
  state = 12;
}

// Status 12: Wenn maximale Anzahl Durchläufe erreicht -> 2, sonst -> 4
void state_12() {
  maximale_anzahl_erfolgreiche_durchlaeufe = maximale_anzahl_erfolgreiche_durchlaeufe - 1;
  myprint(String() + "Noch " + maximale_anzahl_erfolgreiche_durchlaeufe + " Durchlaeufe...");
  if( maximale_anzahl_erfolgreiche_durchlaeufe == 0) {
    state = 2;
  } else {
    state = 5;
  }
}

// Hilfsfunktion. Spickmotor spickt.
void spicke() {
  // Spickmotor kurz an- und abstellen
  myprint("Spickmotor spick!");
  myMotor1->run(FORWARD); // ON
  delay(500);
  myMotor1->run(RELEASE); // OFF
}

void spicke2() {
  // Spickmotor kurz an- und abstellen
  myprint("Spickmotor2 spick!");
  myMotor2->run(FORWARD); // ON
  delay(500);
  myMotor2->run(RELEASE); // OFF
}

void myprint(String text) {
  if( DEBUG ) {
    Serial.println(String("") + millis() + " ms, Status " + state + ": " + text);
  }
}


Comments
Please log in or sign up to comment.