


Hardware components | ||||||
| × | 1 | ||||
| × | 1 | ||||
| × | 1 | ||||
 |
| × | 1 | |||
 |
| × | 1 | |||
| × | 1 | ||||
Software apps and online services | ||||||
 |
| |||||
| ||||||
The goal of this study is to assess the accuracy and efficiency of technology when utilized for environmental help. As a high school student who has never taken STEM classes, I was able to design, collect, and record data using Arduino, an open-source electronic prototyping platform, as well as program a device to monitor and detect soil moisture. This project aims to demonstrate the benefits of coding and programming in real-world scenarios. This project taught me great lessons about coding, self-governing instruction, faults and remedies, analysis and data collecting in online programming, and how to integrate both technical and biological research. I was able to construct my own soil monitoring gadget at home using Arduino.cc. I feel that merging technology and biology, particularly in the environment, might lead to simpler and further sustainable solutions. A soil moisture project combines electronics and environmental science to measure and monitor the water content in soil. Using a sensor to translate moisture levels into electrical signals, a micro-controller like an Arduino can read this data and trigger actions based on predefined thresholds.
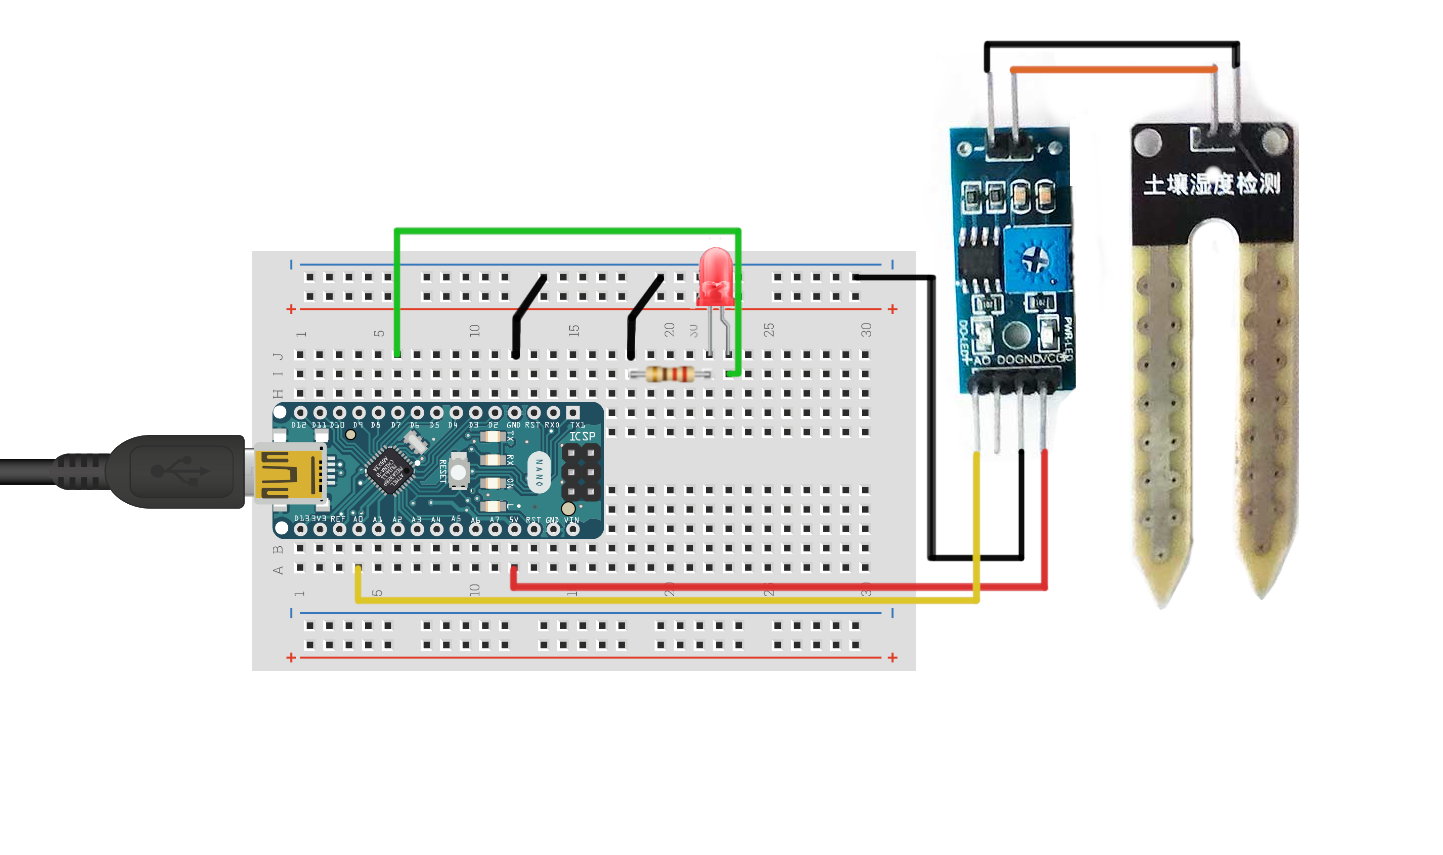
Here are the steps to connect everything, upload the sketch and get it running:1. Place the Nano into the breadboard as shown below. Do not connect the USB yet even though it is connected in the picture.
2. Connect all sensors, components and wires first. (Do not connect the Nano to the computer yet or supply it with power, it could fry the bread board and/or Arduino nano. That happens only after everything is connected.) Double check that everything is connected securely and properly.
2a. Connect the VCC pin of the soil moisture sensor to the 5V pin on the Arduino.
2b. Connect the GND pin of the soil moisture sensor to the Blue GND line on the breadboard.
2c. Connect the Analog output pin (A0) of the soil moisture sensor to the A0 analog input pin on the Arduino. You may choose between the Analog output pin and the Digital output pin.
2d. Connect an LED for Visual Indication:
- Connect the longer leg/bent leg (anode) of the red LED to digital pin 7 on the Arduino.
- Connect the shorter leg (cathode) of the LED to the 220Ω resistor.
- Connect the other end of the resistor to the blue ground line/bus on the breadboard
- Connect the GND pin on the Arduino to the blue GND blue line/bus on the breadboard.
4. Place the sensor in dry soil and observe how the numbers on the sketch change.
3. Once all of the above is completed, then connect the USB cable to the Nano and then connect the other end of the USB to the computer. If the numbers drop, that means the soil is dry; if they rise, that indicates the soil is heavily moist. Do this with both dry and moist cups of soil.
4. I used a code, provided by Google Gemini Advanced, that will read the soil moisture sensor and light up an LED if the soil is too dry.
For this project I had two cups of soil, one dry and a heavily moist soil. Using the Serial monitor, I was able to receive feedback indicating the levels of moisture from each cup.
Throughout this process I had to learn and understand how to create a sketch in Arduino. This project doesn't directly involve biological concepts, I was still able to position it within the broader context of biology and scientific research.
The following is a list of skills and concepts I learned from creating my soil moisture sensor project:
- I was able to emphasize how the project demonstrates an understanding of electronics, sensors, and programming - all crucial skills used in modern biological research.
- Highlight the potential applications of this type of sensor system in biological contexts like monitoring plant health, environmental studies, or even animal behavior tracking.
- Focus on how the project involves collecting data from the environment and using code to analyze and interpret it. These skills are fundamental to any scientific discipline, including biology.
- Showcase the project as an example of my problem-solving abilities and critical thinking skills.
- identified a need (monitoring soil moisture), designed a solution, implemented it using technology, and troubleshooted any issues that arose.
- Emphasize initiative and self-learning abilities and show a passion for learning and a willingness to go beyond the classroom, traits highly valued in any scientific field.


Comments
Please log in or sign up to comment.