


Hardware components | ||||||
| × | 1 | ||||
 |
| × | 1 | |||
 |
| × | 1 | |||
 |
| × | 1 | |||
 |
| × | 1 | |||
My wife found this large 9" metal letter "M" at a discount home goods store right after our first daughter was born (whose name starts with M). She picked it up for $6.99 and we put it in our daughter's nursery as a nice decoration.
My wife asked if I could backlight it and my first instinct was to use an Arduino to control some Neopixels and attach an ambient light sensor and motion sensor so it only comes on when it's dark and someone is in the room. Since I wanted to power this with a battery, I'd also want to enable deep sleep. This was rapidly becoming way overkill for what my wife had in mind, so I decided to instead complete the project with zero programming.
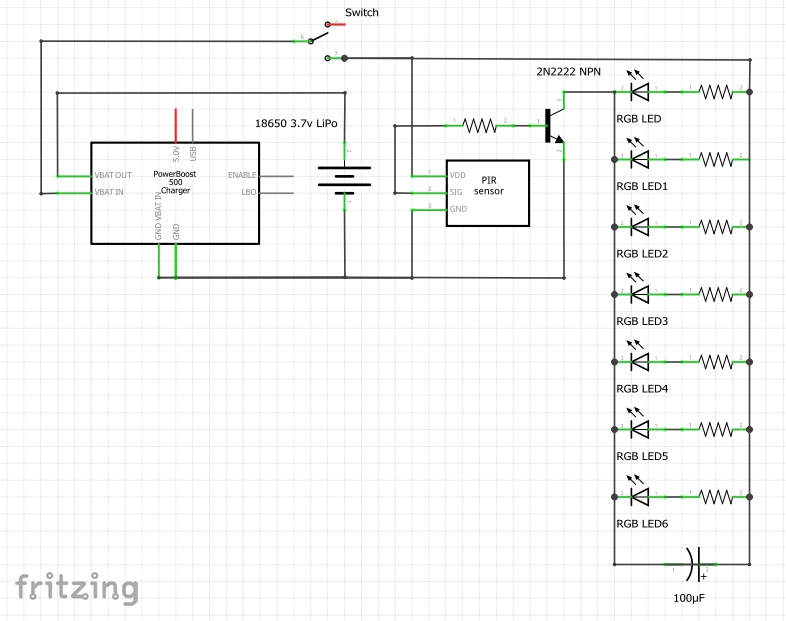
ResearchWhile researching how to drive/control RGB LEDs from a 555 timer stumbled across auto fading RGB LEDs. These did exactly what I wanted to do with the Neopixels but didn't require any external components other than the resistor. I figured I could use a PIR sensor to trigger an NPN transistor to supply power to the LEDs to accomplish everything I wanted but with less power and no microcontroller.
PrototypingHere is the prototype all wired up as a proof of concept.
Since this is going in a nursery, I used both a battery with a built in protection circuit and made sure the USB charging module had current regulation and under voltage protection.
It turns out the LEDs all start off red and then go through the same color pattern, but at slightly different rates. After about two cycles the colors are all out of sync which actually makes a really cool undulating effect. The problem was once the power was cut they all reverted back, so the next time it tripped it would light up like a big red alarm. I added a relatively large capacitor parallel to the LEDs so they keep their color state, but it had the secondary effect of gently fading them on/off when powered up/down.
If you're new to PIR sensors, Adafruit has the best tutorial I've seen and I always go back to reference it as a refresher. You can use this same setup for lots of LED configurations, so I didn't put the resistor values. I use this online LED resistor calculator to figure out the best way to wire LED arrays.
The BuildThe letter itself had a stamped metal mesh covering the front, so I had to add some diffusion paper so the colors kind of blend into each other.
I then wired everything up exactly as on the protoboard, except I put a single resistor inline with each LED, and then kept the LEDs all wired in parallel. I used heat shrink insulation where I could and was generous with the kapton tape and hot glue since the whole enclosure was metal.
I 3D printed an enclosure for the PIR sensor out of purple glow in the dark filament. It has embedded magnets, so it can be easily positioned in any direction.
I'm really happy with how it turned out and my daughter loves it.


Comments
Please log in or sign up to comment.