


Hardware components | ||||||
| × | 1 | ||||
| × | 1 | ||||
| × | 1 | ||||
 |
| × | 1 | |||
| × | 1 | ||||
| × | 1 | ||||
| × | 1 | ||||
Software apps and online services | ||||||
 |
| |||||
Hand tools and fabrication machines | ||||||
 |
| |||||
| ||||||
| ||||||
To understand the meaning of this project, you should be confident with the concepts of focus stacking in macrophotography or photomicrography, with an image capture application, and you should own a mechanical Z-stage, the kind with a small protruding knob that usually is moved manually, grabbing it between the thumb and the index finger.
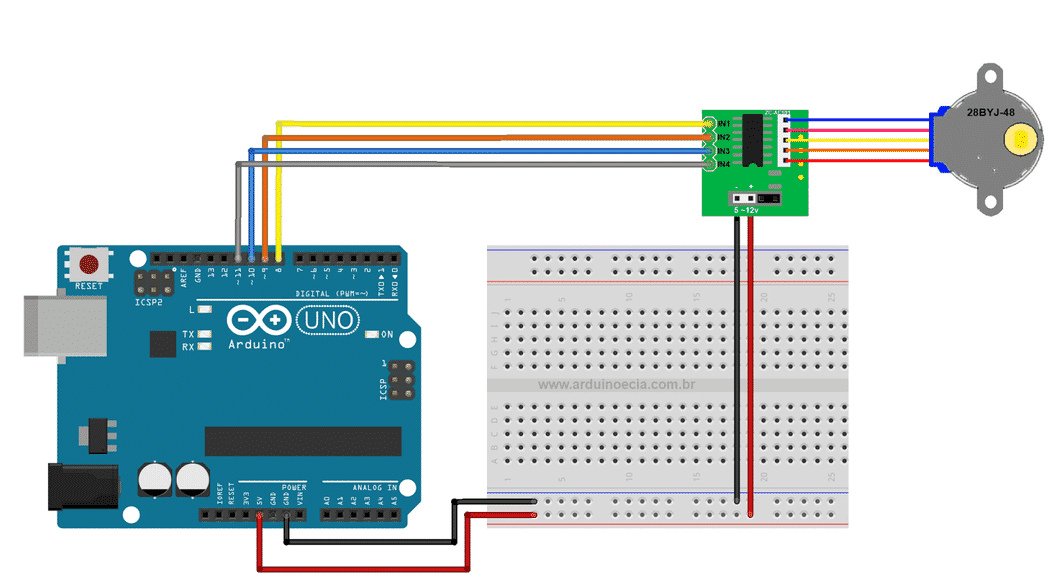
A few years ago, as an alternative to costly motorized macro-rails, I developed a simple Arduino UNO project where, thanks to a small "coupling sleeve" made from easily available plumbing accessories, a small stepper could control via serial dialogue the knob of the Z-stage of a microscope, ensuring the small, equal increments needed for photographic Z-stacking.
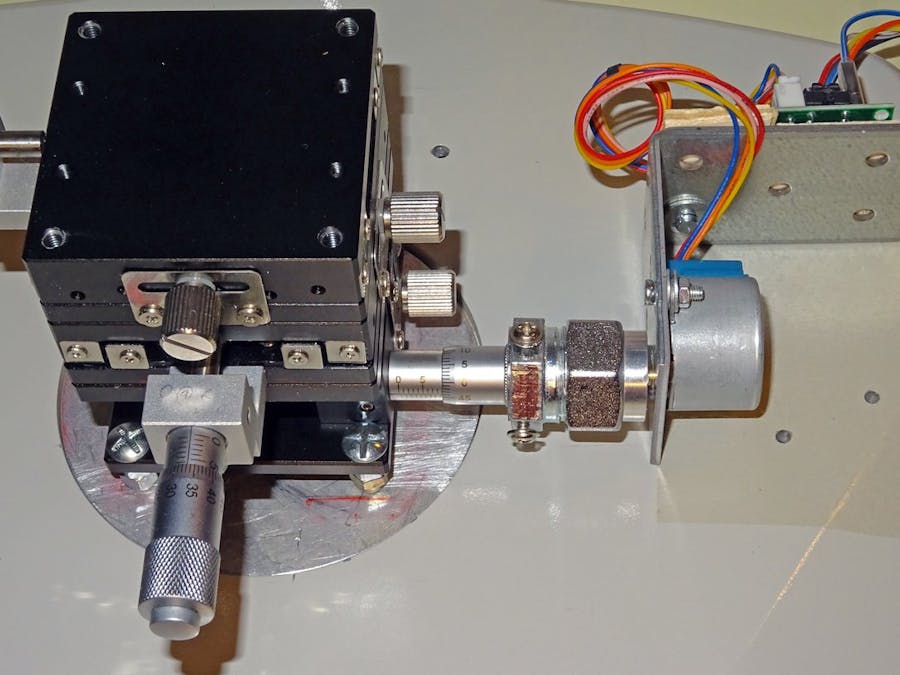
The solution is based on a small stepper driving the knob of a mechanical Z-stage, in the same way that one would do with his/her fingers. Thus, the mechanical coupling between motor and knob must be made with a small sleeve of suitable size. The sleeve will be fixed to the stepper thanks to a Pololu Universal Aluminum Mounting Hub for 5mm Shaft.Needless to say, any attempt at the automation of a Z-stage requires that it is mounted in the lowest position, under the X and Y stages - otherwise its position may vary unpredictably. But having the Z-stage in direct contact with the microscope stand does not necessarily mean that its knob keeps a fixed position: we cannot take for granted that our stepper can be fixed and keep a static position when activated.That would be the case of the more sophisticated Z-stages, based on worm gears, where the knob remains static while the mechanical stage is raised or lowered. But the solution proposed here deals with the worst scenario, where the knob gets longer or shorter when turned in each direction. Inelegant as it may seem, the need to follow the knob requires that the stepper is dragged back and forth by the knob.Consequently, we need an assembly that can hold the motor firmly, yet slide freely on the surface of the table stand, and heavy enough to resist the modest torque exerted by the motor when turning the knob. The easiest solution is provided by a right-angled metal brace.
The angled brace will lay (and slide) on the microscope table stand as illustrated in the picture.
The picture is self-explanatory and shows the inner side of the sleeve components.
The picture is self-explanatory and shows the sleeve mounted between the stepper and the knob.
Above, see the microscope stand, with the Z-stage suitably positioned for our small automation.
Above, see the complete setup, ready for action.
The drawback of this initial project were two:
- I had to send a command via serial monitor to the Arduino UNO for each small incremental rotation that I needed;
- I had to physically press a key on the keyboard to capture each image after each small incremental rotation.
Warning: although the mechanical part of the project, including the stepper, is the same as the original project, a different Arduino board is needed!
The availability of cheap Arduino boards, such as the Arduino UNO R4 Minima, capable of supporting keyboard emulation thanks to the Keyboard.h library provided the opportunity for a major revamping of the project. It should be clearly understood that, for the project to work, you need an Arduino version that can send keystrokes to an attached computer through their micro's native USB port.
Although a full description of the improved project with the Arduino source code can be found here, I decided to publish it also here on Hackster.io.
The improved software and the Arduino UNO R4 Minima now allow me to:
- choose the number of equal micro-rotations that I want to execute;
- choose the amount in degrees of each micro-rotation;
- execute the required number of micro-rotations;
- waits an hard-coded number of milliseconds to allow the damping of small vibrations before activating image capture;
- send an emulated keypress after each micro-rotation is completed. The keypress, in my case F1, activates image capture;
- after the required number of micro-rotations are executed, the program asks again number of rotations and amount of rotations desired.
Now I don't need to send one command at a time and press the capture key with my own hands. It suffices that I use the serial monitor to provide the two parameters (number and amount of rotations): Arduino will move the Z-stage as required and take the pictures. All I need is to check after a few minutes and, if needed, repeat the process.
IMPORTANT!!! The emulated keypresses are sent to the program in the foreground (in other words, to the window that has the focus)! To avoid that the keypresses are sent to the serial monitor used for the dialogue with Arduino, the user should keep side by side on the computer screen two windows: the serial monitor to send the commands to Arduino, and the image capture application. Immediately after answering to the prompts on the Arduino serial monitor, the user must click on (set the focus to) the window of the image capture application, thus enabling it to receive the keystroke that will capture a separate image after each increment.


Comments
Please log in or sign up to comment.