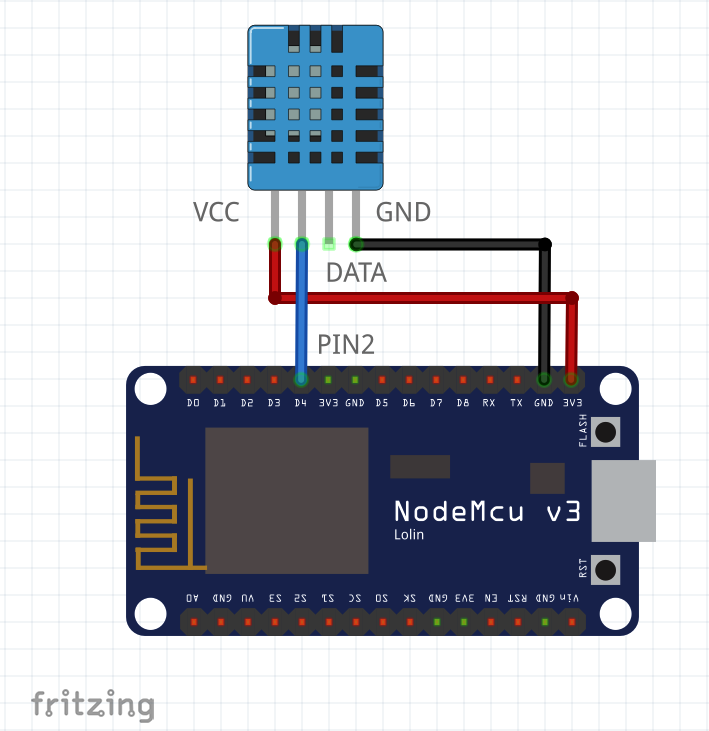
In the previous article, I connected my ESP8266-based NodeMCU board to a Cloud4RPi service. Now, it’s time for a real project!
Hardware requirements- Any board based on an ESP8266 chip (for instance, NodeMCU)
- A DHT11 or DHT22 sensor
- DHT sensor library by Adafruit — v1.3.7
- Adafruit Unified Sensor — v1.0.3
- cloud4rpi-esp-arduino — v0.1.0
- Cloud4RPI — Cloud control panel for IoT devices
- PlatformIO IDE for VSCode
I already had a DHT11 sensor, so I decided to use it for temperature and humidity measurements. Let’s choose an Arduino library to read sensor data.
Arduino registry contains several libraries, from which I selected the most popular one.
According to their GitHub repository, we are also required to add an Adafruit Unified Sensor package.
Step 1: Create and configure projectI already described how to create a PlatformIO project and install libraries in the first part. My project is called “MyNodeMCU”. The structure is shown below:
This project is a slightly modified Cloud4RPi example.
I decided to store the device token and Wi-Fi credentials in the configuration file instead of code.
The platform.io file looks as follows:
[platformio]
default_envs = nodemcuv2
[env:nodemcuv2]
platform = espressif8266
framework = arduino
board = nodemcuv2
Libraries installation is quite simple. You can do it from the IDE’s graphical interface, or by adding required library names to the lib_deps section of the platform.io file:
; Library options
lib_deps =
cloud4rpi-esp-arduino
Adafruit Unified Sensor
DHT sensor library
build_flags =
-D MQTT_MAX_PACKET_SIZE=1024
-D MQTT_MAX_TRANSFER_SIZE=128
-D CLOUD4RPI_DEBUG=0
-D SSID_NAME=\"__YOUR_WIFI__\"
-D SSID_PASSWORD=\"__YOUR_WIFI_PASS__\"
-D CLOUD4RPI_TOKEN=\"__YOUR_DEVICE_TOKEN__\"
Added libraries will be automatically installed into a project’s subfolder.
The main.cpp header looks as follows:
#include <Arduino.h>
#include <ESP8266WiFi.h>
#include <Cloud4RPi.h>
#include "DHT.h"
Adafruit provides a DHTtester.inoexample of a sensor connection.
This code initializes a sensor and defines a structure to store the measurement result (in case it was successful):
#define DHTPIN 2      // Digital pin connected to the DHT sensor#define DHTTYPE DHT11 // DHT 11
// ...
DHT dht(DHTPIN, DHTTYPE);
dht.begin();
// ...
struct DHT_Result {
    float h;
    float t;
};
DHT_Result dhtResult;
The next function shows how to read sensor data and store it in the data structure described above.
void readSensors() {
    float h = dht.readHumidity();
    // Read temperature as Celsius (the default)
    float t = dht.readTemperature();
    // Check if any reads failed and exit
    if (isnan(h) || isnan(t)) {
        Serial.println(F("Failed to read from DHT sensor!"));
        return;
    }
    dhtResult.h = h;
    dhtResult.t = t;
}
Once we have that data, the next step is to send it to the Cloud4RPi service.
The Cloud4RPi for Arduino page describes the library API, which is a set of methods used to:
-create, read and update variables, -send variable values into the cloud using the MQTT protocol.
The library supports three variable types: Bool, Numeric, and String.
The library workflow starts with creating an API instance using the Device Token from the cloud4rpi.io website (refer to the article’s part 1 for details).
#if defined(CLOUD4RPI_TOKEN)
    Cloud4RPi c4r(CLOUD4RPI_TOKEN);
#else
    Cloud4RPi c4r("!!!_NO_DEVICE_TOKEN_!!!");
#endif
Then, declare variables for DHT11 readings:
c4r.declareNumericVariable("DHT11_Temp");
c4r.declareNumericVariable("DHT11_Hum");
Then, get data from the sensor, save them into variables and publish the data to Cloud4RPi:
c4r.setVariable("DHT11_Temp", dhtResult.t);
c4r.setVariable("DHT11_Hum", dhtResult.h);
c4r.publishData();
Temperature and humidity does not change quickly, so sending more than one value per 5 minutes is not required.
Step 5: DiagnosticsCloud4RPi supports diagnostic data along with variable values. I used uptime, Wi-Fi signal strength, and IP address as diagnostic data:
c4r.declareDiagVariable("IP_Address");
c4r.declareDiagVariable("RSSI"); // WiFi signal strength
c4r.declareDiagVariable("Uptime");
Note: The millis function I use to obtain uptime resets to zero every ~50 days. Which is more than enough for my project.
The following code sets diagnostic variable values:
c4r.setDiagVariable("RSSI", (String)WiFi.RSSI() + " dBm");
c4r.setDiagVariable("IP_Address", WiFi.localIP().toString());
c4r.setDiagVariable("Uptime", uptimeHumanReadable(currentMillis));
c4r.publishDiag();
The uptimeHumanReadable function converts milliseconds to a convenient form:
String uptimeHumanReadable(unsigned long milliseconds) {
    static char uptimeStr[32];
    unsigned long secs = milliseconds / 1000;
    unsigned long mins = secs / 60;
    unsigned int hours = mins / 60;
    unsigned int days = hours / 24;
    secs -= mins * 60;
    mins -= hours * 60;
    hours -= days * 24;
    sprintf(uptimeStr,"%d days %2.2d:%2.2d:%2.2d", (byte)days, (byte)hours, (byte)mins, (byte)secs);
    return String(uptimeStr);
}
The function outputs a string like this 5 days 10:23:14 instead of a strange big number.
After compiling the created code and flashing it into NodeMCU, the device connects to a cloud service and starts sending data.
You can increase logging verbosity by setting the CLOUD4RPI_DEBUG preprocessor variable to 1 (add -D CLOUD4RPI_DEBUG=1 to build_flags section in platform.io file).
Next, open the cloud4rpi.io site and notice the new device online. Open it to see all variable values received from the device: sensor and diagnostics.
At this step, the data connection to the cloud is operational. Now, let’s configure the visual representation of the data.
I used the Dashboard configuration UI to create the following dashboard:
The dashboard is shareable, so I instantly share it with my friend.
ConclusionThe full project’s code is available in the gist.
That’s all for now!
Questions and suggestions are welcome in the comments.
Bonus pics:


Comments
Please log in or sign up to comment.