


Hardware components | ||||||
 |
| × | 1 | |||
 |
| × | 1 | |||
 |
| × | 1 | |||
Software apps and online services | ||||||
| ||||||
 |
| |||||
I wanted to create and then to share this project for other peoples like me who want to start manage this type of products, in particular to begin controlling remotly some objects. Since I was in this situation, when I bought the Nano 33IoT, I want to gives other people a starting point to gain confidence.
About this project.So in this project we will to see how turn on/off a simple LED remotly with Blynk. Blynk is a simple app that allows us to control objects connected to our boards.It is really flexible, has a beautiful user interface, works with all kinds of IoT platforms, and runs on both Android and iPhone.
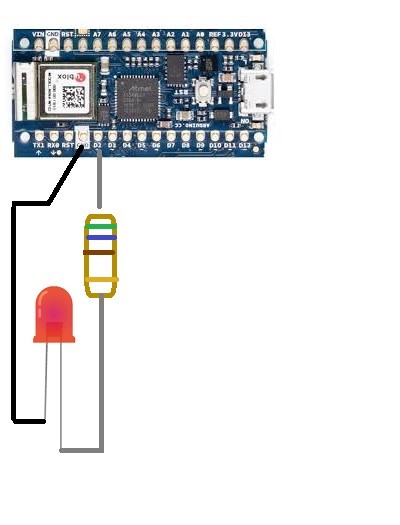
HardwareFor this project we will use Nano 33 IoT that handle wifi connection, 2 LEDs (green, red), 2 resistors (560 Ohms) and some wires.Power is supplied through the USB cable.That cable can go to your computer when programming or to a plug-in USB power supply when in use as a weather station.
SoftwareFor the software that will run on the arduino board is also very easy to get, because we will take it from the sketch examples. First of all open the Arduino IDE. Select tools->ManageLibraries. Then search and install Blynk library.
At this point open File -> Examples. Find Blynk -> Boards_Wifi and select Arduino_MKR1010. With this sketch we can connect the board to the WIFI through WIFI NINA. But Blynk does support WiFiNINA, which is used by the Nano 33 IoT and several other Arduino processors. So adding these two includes solved that problem: #include<WiFiNINA.h> and #include<BlynkSimpleWiFiNINA.h. To not have mistakes during the loading we must open ManageLibraries and install WIFI NINA. At the end verify and upload the sketch to NANO 33IoT.
Then insert the auth code, and wifi credentials (ssid, password). I will explain the auth code in the next paragraph and how we can get it.
Blynk sideNow we can go on with the project on Blynk. Open the application on your smartphone, insert your data to create an account and then create a new project.
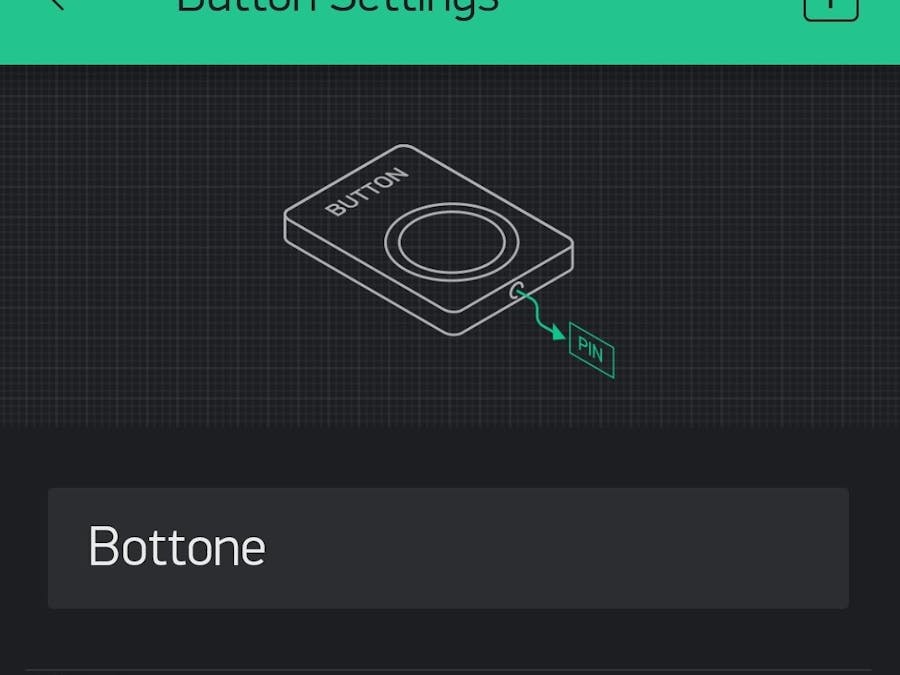
Insert a ProjectName then select ArduinoNANO as device and touch CREATE. Now you are in an empty page, touch the button '+'. From the list select Button. Here you can move it everywhere and change the size but now make a simple tap to the icon and it will open its configuration sheet. Insert D2 as pin output, set up to SWITCH and then you can go back and we finished the configuration.
Once you have created the project blynk sends you by email an authentication token that you must put in your arduino sketch and it needs to identificate your project on the blynk server.
After preparing your Nano 33 IoT touch the PLAY top right icon on Blynk. At this point when you touch the button on the smartphone, the led should change its state.


Comments
Please log in or sign up to comment.