DISCLAIMER: This application is used for demonstrative and illustrative purposes only and does not constitute an offering that has gone through regulatory review. It is not intended to serve as a medical application. There is no representation as to the accuracy of the output of this application and it is presented without warranty.
Our Trailer:
Full project, build instructions and un-edited videos below!
Introduction:Our heart beats 115200 times a day, it is such a fine machine that does not stop during our lives. However, not many people have the advantage to have this machine in good conditions. Many factors of daily life can permanently affect cardiac function.
Factors such as:
- Sedentarism.
- Diet full of Salt, saturated fats and refined sugar.
- Alcoholic intake.
- Smoking
- High blood pressure
- Obesity
- Family history of heart disease
- History of a previous heart attack
- Sge over 45 for men, or over 55 for women
- Male gender (there's a direct correlation for cardiovascular disease)
- Substance abuse
- Low potassium or magnesium
This brings us to our pain point:
Quite a lot of people have to undergo cardiac tests frequently in expensive hospitals with gigantic measuring devices. We are in a time where open health is stronger than ever and it is time to make the patient the point of care.
The market for electrocardiography is quite enormous, as it has become the standard for patients with heart risks.
What we can see in this graphic is that most of the electrocardiographs are those big machines (as a Biomedical Engineer I can attest that most, are quite old). In addition to this most in the "holter" category are not really wearables but smaller ones that can be carried despite that a wearable one that can be used at home could provide invaluable information about the patient's heart.
One thing that we have to notice first. The first of wearables has already come out in the market and the results are not that great. The main issue that Doctors put forth is that it is too much information, think of the internet before data aggregators, it has no value if it cannot be interpreted correctly and that is something that has to be taken into consideration. A solution should aggregate all that data and provide carers with useful information.
Second ProblemThis brings us to the second problem that is quite basic, most EKG machines whether they are Holter's or Rest EKGs use gel-based electrodes. These are completely unusable in an athletic environment i.e. Athletes trying to measure themselves during activity. For these reasons we will try while developing the IoT device, to develop at the same time Dry electrodes.
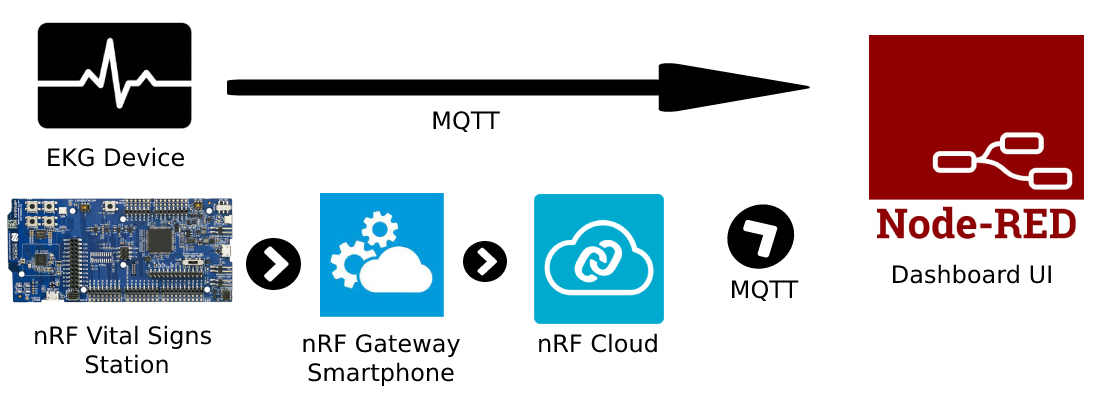
Connection DiagramThis is the connection diagram of the system:
Basically, through the nRF gateway and cloud we get the signals from our microcontroller, we clean it a bit and then send it to our Node-RED dashboard.
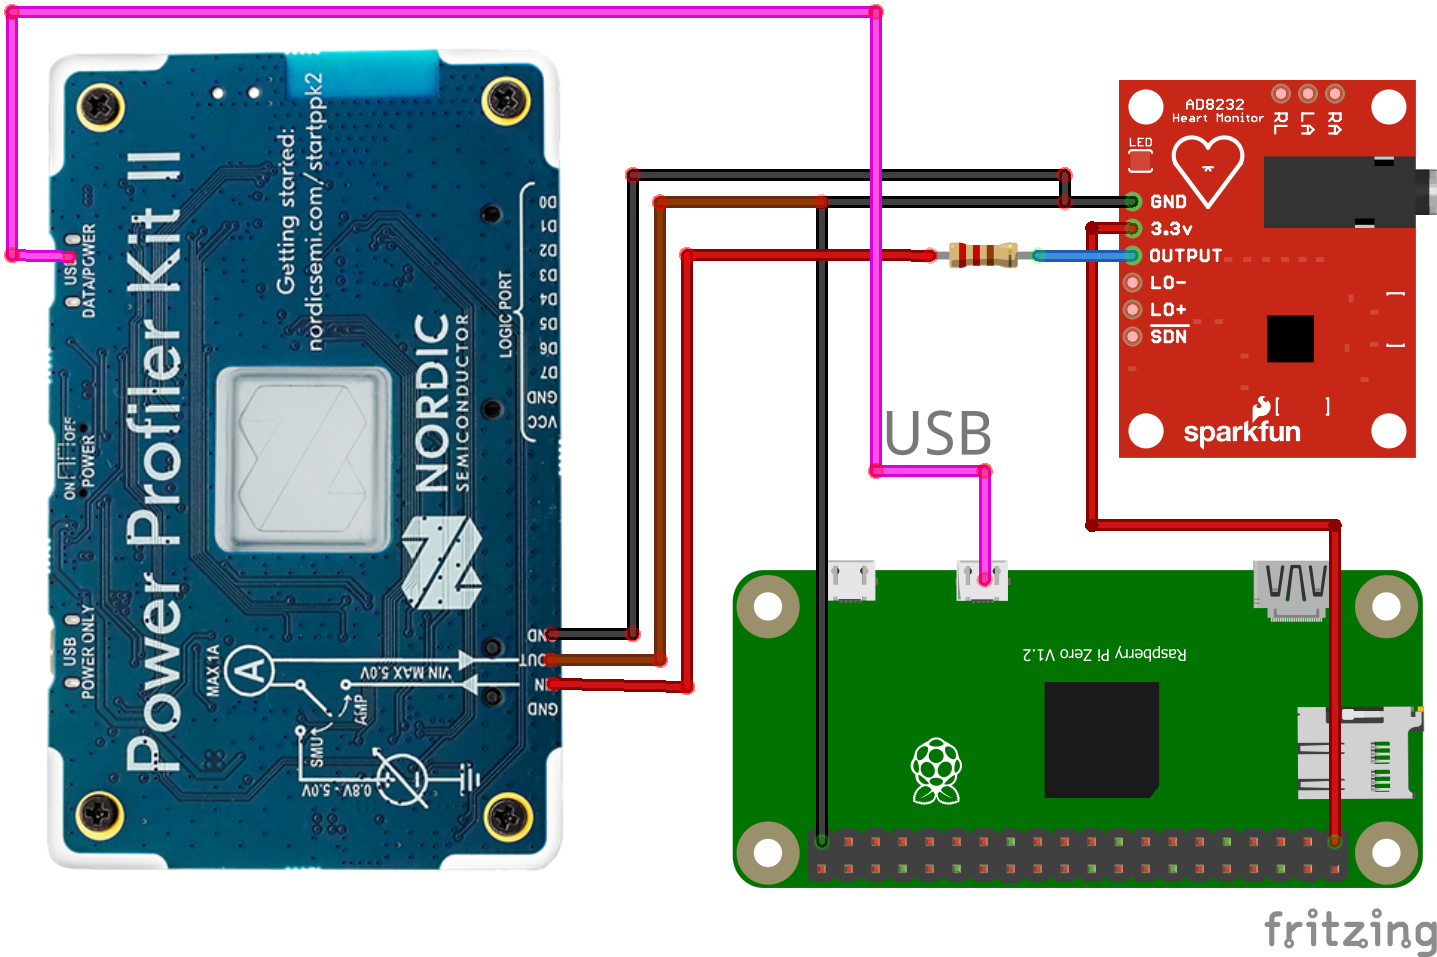
ECG system connections:
Notice the use of the Raspbery Pi Zero W and the AD8232 Sensor.
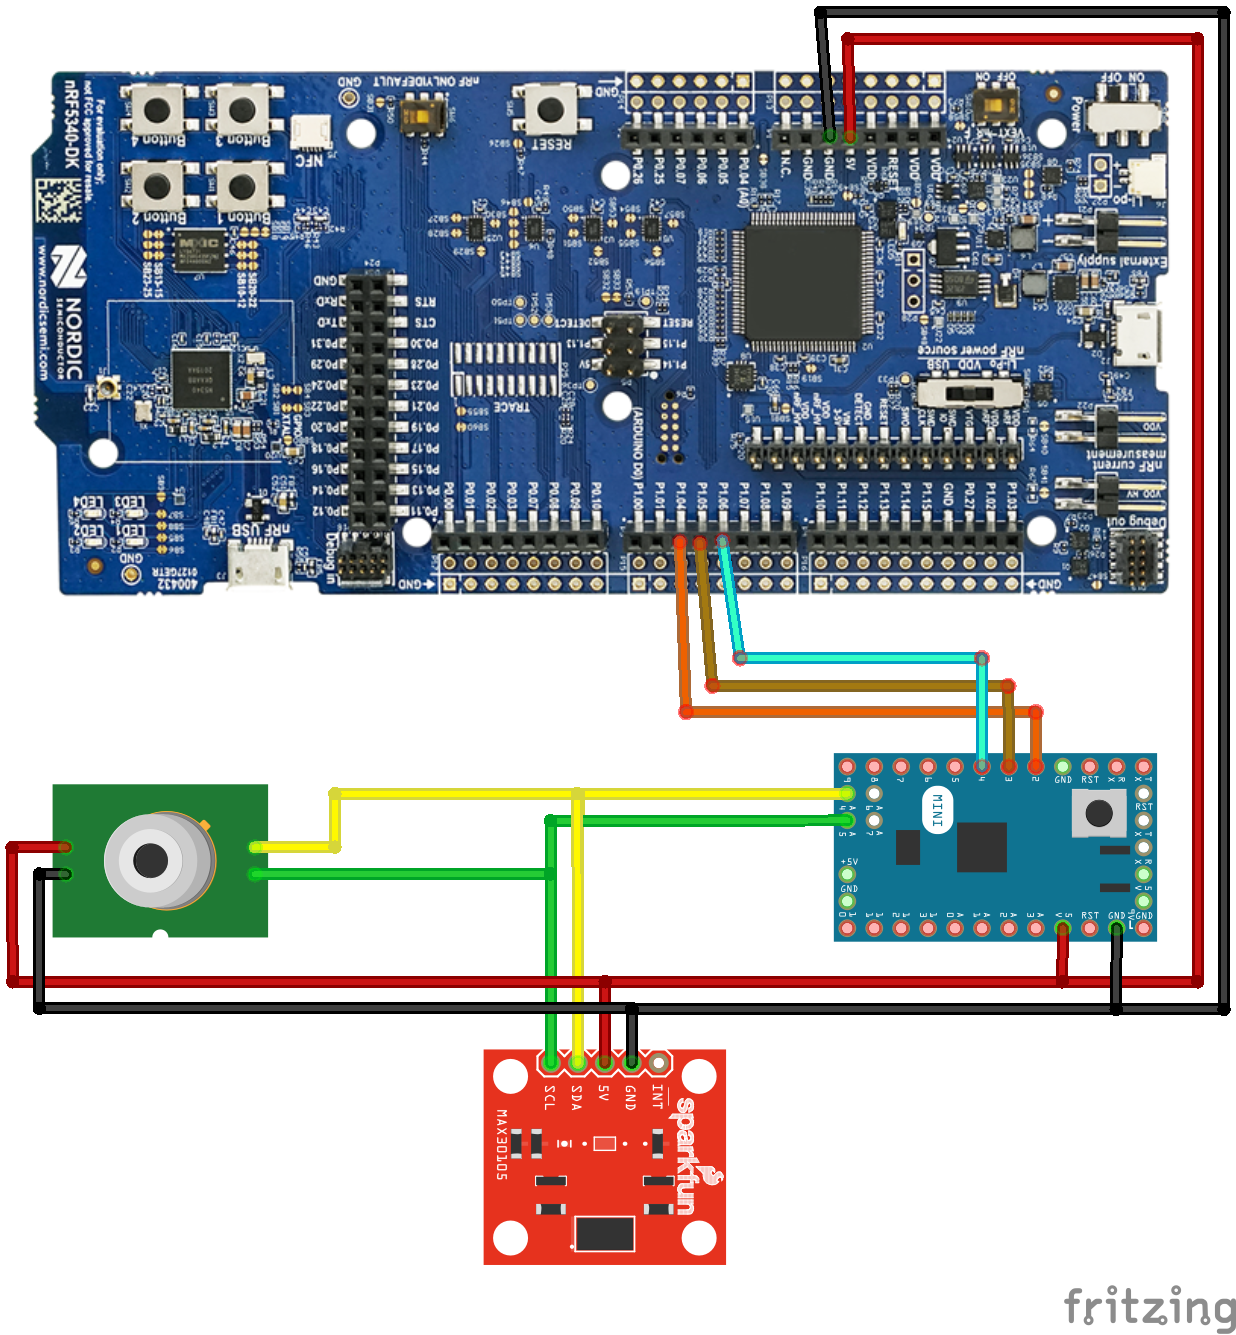
Connections for the nRF5340:
To easily send sensor data to the nRF5340, an Atmega328P was used. Also shown are the temperature sensor and a MAX30102 sensor.
Building Process :The project is divided into two main branches, the use of the nRF5340 as a vital signs monitor and the PPKII as an ECG, I will explain both in detail, starting with the nRF5340.
nRF5340 Setup:The complete project will be in the folder "nRF Project": https://github.com/altaga/EHM--Advanced-Wearables/tree/master/nRF%20Project
As the official documentation indicated, the hci_rpmsg project was used for the device's Network layer from Segger Embedded Studio v1.5.1.
The application for the CORE layer is in the nRF Project folder.
Read Sensor Data:To read the sensors, an Atmega328P was used as a driver to read the sensors easily and send the information to the nRF5340 as shown by the schematic. A proprietary transmission protocol was used, inspired by the communication of LCD Displays.
The data sent from the microcontroller to the board is at 16 bits, the first 8 bits being the data to send and the other 8 the sensor number.
static unsigned int temp = 0;
temp = readTriWire();
if (temp >> 8 != 0)
{
    if (temp >> 8 == 1)
    {
        memory = temp & 0x00FF;
    }
    else if (temp >> 8 == 2)
    {
        memory = memory<<8;
        memory = memory + (temp & 0x00FF);
    }
    else if (temp >> 8 == 3)
    {
        memory = memory<<8;
        memory = memory + (temp & 0x00FF);
    }
    else if (temp >> 8 == 4)
    {
        memory = memory<<8;
        memory = memory + (temp & 0x00FF);
        spo_val = memory;
        bt_gatt_notify(NULL, &stsensor_svc->attrs[2], &spo_val, sizeof(spo_val));
    }
    printk("%d \n",(temp & 0x00FF));
}
Each data received is inserted into a 32-bit memory variable, once we receive the 4 values, we send them to the BLE notify.
BLE :For the BLE notification, a 32-bit variable is being sent, with a data encoded every 8 bits.
Here is an example of how the information gets to nRF connect.
To see the transmission more clearly, record a video of how the data arrives in real time to the cloud and to the platform that you carry out in Node-RED (more details at the Node-RED section).
Here is a video of all this working!:
Power Consumption:As we can see, our device has a consumption of 50mAh.
The main idea of the project was originally to take EKG measurements through the power profiler kit ii. The circuit used to measure the ECG is an AD8232 module, however it outputs a voltage, not a current.
So for us to be able to turn this circuit into a current measurement circuit, we must include a resistor and put the PPKII in series with the resistor to close the circuit.
With this circuit we will now be able to measure the current that will pass through the resistance, which corresponds to the ECG wave. Here is a video example of an ECG capture with the PPKII.
RPI :However, having it connected to a PC to make measurements seemed absurd to us, so to use the PPKII we used a Raspberry Pi Zero.
Library used: https://github.com/IRNAS/ppk2-api-python
In the end the circuit used to make the EKG measurements with the raspberry is this one:
All the code implemented to perform the measurements and send them to Node-RED is in the RPI Software folder at our Github that you can find below.
However, it must be mentioned that all the data that reaches Node-RED is sent through MQTT, this MQTT server is installed on the Raspberry through Mosquitto.
We recommend using an MQTT installed directly from a service provider such as AWS for added security.
Node RED UI:For the deployment of this system we decided to use Node-RED, due to its ease of use and ability to generate dashboards it seemed the most appropriate.
For more documentation on how to use Node-RED (which is beyond the purpose of this project) go to:
Fortunately for us, nRF Cloud has its own mqtt service, as the official documentation says.
https://nrfcloud.com/#/docs/guides/mqtt
Following that guide I was able to configure the credentials of the MQTT server, the service is mounted on AWS, therefore we require the following to be able to successfully make the connection.
- Endpoint.
- Gateway Topic.
- ClientID
- caCert
- clientCert
- privateKey
To configure this data in Node-RED we must enter the MQTT node.
By clicking on the pencil symbol we can configure all the MQTT service.
Once everything is configured, we can receive all the data sent by the nRF5340 to nRF Cloud, here is an example of how we are receiving the 4 values in the Node-RED platform.
To filter each value to its corresponding graph, the following functions were used.
let p=JSON.parse(msg.payload);
p = p["message"]["event"]["characteristic"]
p = { payload: p["value"][0]};
return p;
Thus we will obtain graphs with the values of each sensor.
In the video already shown above we will see the graphs receiving the data in real time.
Setup PPKII MQTT:
In the case of Raspberry, the setup is much easier, since we will only have to put the IP of the raspberry as server and the topic "/station/1/hr".
Here is a video of the platform receiving the data from the PPKII.
The Final Product:Vital Signs Station:
ECG Station:
You can find our 3D printed case designs below!
Dry ElectrodesThis is perhaps the greatest development done in the project!
Due to the fact that this is a device that we are going to be using for long periods of time and it is also a device that must be used every day, we soon understood that the use of disposable electrodes is not feasible. So that's why we decided to make our own dry electrodes.
Materials:
- Copper Plate.
- Silver Conductive Ink.
- Electrode External Snap.
In order to read the EKG and also make the device as comfortable as possible, we take into consideration the arrangement of Electrodes of the AppleWatch
CR Apple Computers
First we place two electrodes on the right hand and one on the left hand as follows.
Right:
Left:
Ground:
With this arrangement of electrodes we can obtain an ECG signal that while not perfect, we can fix with a little processing on the Node-RED.
Final DEMO:
ClosingWe think we have achieved a great medical device prototype with this project. It does everything an IoT-capable device should do and probably we have solved some of the problems in relation with gel-based electrodes. And that is perhaps the main innovation with this device. It has huge market potential mainly with sports science applications. For our next steps in relation with this project we will focus on testing it in both sports and clinical applications and also on the market of sport-related or exercise related classes and services, which also show great potential.
References:


Comments
Please log in or sign up to comment.