


Hardware components | ||||||
 |
| × | 1 | |||
 |
| × | 1 | |||
 |
| × | 1 | |||
 |
| × | 1 | |||
Computer training school for Physical Programming by ElectricAvi.
For more information:
Say what? Fun educational Corona Clock!While the WHO guidelines on hand hygiene suggest a 20 to 30 seconds of hand-washing with soap and water, when you have small children the question remains how you're getting them to do so...
Well this is the main educational purpose of this project, giving the kids a fun reason for a good long hand wash with automatic detection and a visual clock.
Now we can't stop them from washing hands all day long :)
Show me!Here's some video of the clock (timing 20 sec with the detector on the right):
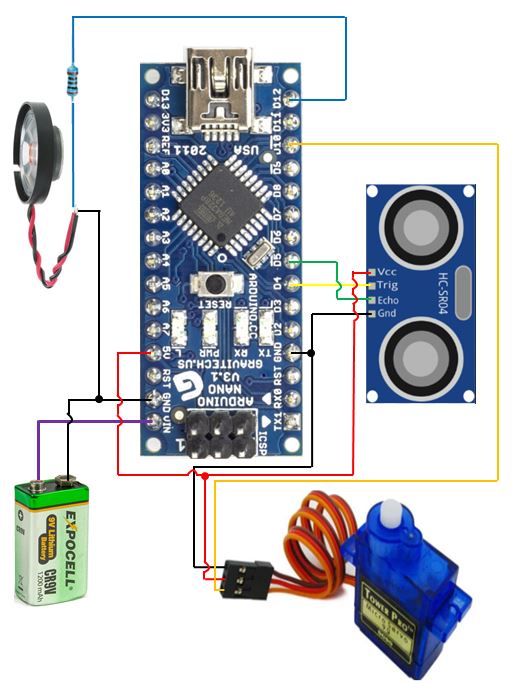
How it worksThe project includes some cheap components with the Arduino Nano as the microcontroller:
The ultrasonic range sensor (top right) is used for sensing a "hand" at a defined distance, reaching for the soap. Better place it as we did in the side of the sink looking at the center or possibly from above if you can.
Moving the Clock's handle in a specific direction was done with a servo motor, with the tiny SG90 micro-servo (buttom right).
A speaker is useful for making some sounds, especially when testing the prototype and making sure things work. And then some batteries, preferably rechargeable 9V, jumper wires and a breadboard.
Creativity TimeFirst you need to make some picture for the clock. Well, my kids have gladly drawn one for it (lockdown time is creativty time).
This is the final result:
The clock's handle will be placed on the buttom in the center. It will take it 20 seconds to move from the left side (unwashed germ hands and sad soaps) to the right side (big like, rainbows and happy soaps heh heh).
Of course there is also the fun time of building the whole thing with the kids, learning how the sensors work, making sounds and moving the motor.
Working PrototypeBreadboard is always good for making a prototype, just to make sure things actually work and to play with the sensors and sounds. Cool, it really works!
The components are connected to the arduino controller as follows:
Ultrasonic sensor:
const byte pin_SensorTrig = 4;
//pin attached to HC-SR04 distance sensor's input Trigger pin
const byte pin_SensorEcho = 5;
//pin attached to the returning Echo pin from the sensor
Servo:
const byte servoPin = 10;
//pin attached to SG90 9g micro servo Signal pin (Signal=orange,Vcc=red,Gnd=brown)
Speaker:
This simple 8 ohms speaker is connected to Arduino's pin 12. The speaker is off most of the time, but is still connected through a 100 ohms resistor to prevent over currenting the Arduino.
const byte pin_Speaker = 12;
//pin attached to optional Speaker through 100 ohm resistor
The whole thing needs to get much smaller and maybe a little bit waterproof. This was done with a plastic box and precise wires.
Instead of the big breadboard you can use some small PCB, but I preffer the option of a tiny breadboard which does not require too much welding :)
Rechargeable 9V battery is attached to arduino's Vin pin which makes it quite compact, but any other power source would work just as well.
Enjoy, we did!!


Comments
Please log in or sign up to comment.