

Hardware components | ||||||
 |
| × | 1 | |||
| × | 1 | ||||
| × | 1 | ||||
| × | 1 | ||||
Hand tools and fabrication machines | ||||||
 |
| |||||
 |
| |||||
| ||||||
Ever want to monitor your home but don't want to buy a $100 1080p webcam, or just wanted to build your own? Well, that is exactly what will happen in this tutorial!
To begin, you're going to need the following parts:
- 5v 2A DC Power Supply
And the following tools:
- Soldering Iron
- Drill
- Screw Driver
Visit https://goo.gl/KJcV7F to download the zip file, then extract it to flash with win32 disk imager which can be found here: https://goo.gl/VgGrNm.
Step 2: Make the SD Card HeadlessIn the boot partition, the one you see on Windows, add a file named wpa_supplicant.conf and edit it in Notepad. Copy and past the code below, and edit the SSID and password variables.
ctrl_interface=DIR=/var/run/wpa_supplicant GROUP=netdev update_config=1 network={ ssid="SSID" psk="PASSWORD" }
Then add a blank ssh.txt file to turn on ssh.
Step 3: Connect to the Pi Via SSHI used Fing to scan my network to find the Raspberry Pi, then used Putty (https://goo.gl/d7nFtq) to connect via SSH.
Step 4: Setup the PiCamThis is easy: copy the commands below into the terminal; it should do everything itself now!
sudo apt-get update
sudo apt-get dist-upgrade
sudo apt-get install git
git clone https://github.com/silvanmelchior/RPi_Cam_Web_Interface.git
cd RPi_Cam_Web_Interface ./install.sh
The subfolder field is the field that you get to the camera from (EX: 192.168.1.12/camera); this can be anything you want. Everything else is ready to go!
We're not going to reboot yet because we still need to turn the camera on, so select "NO" when it asks.
Step 6: Turn on the CameraWe're now going to turn on the camera. Run raspi-config:
sudo raspi-config
Then select interfacing options, then camera. A message will pop-up saying "would you like to turn the camera on," select yes and then yes again when it asks to reboot.
Step 7: Focus the CameraCrewmen the lens until it is perfect, it should be focused no matter the object's distance. The live video feed has no lag, so it is really easy.
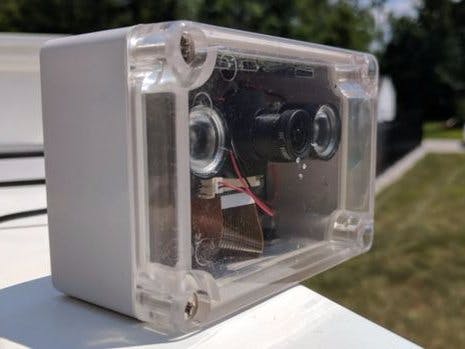
Step 8: Put Everything in the BoxSolder the wires by following the image I have provided. I would recommend checking the DC jack polarity before connecting but 5v normally goes to the shorter pin, and GND normally goes to the longer pin. Use hot glue to hold everything in place; in case you want to remove it later, be sure not to set any glue in the connectors. I used some standoffs to hold the camera in place. It works but remember they probably are not the strongest things, so be gentle with it.
Step 9: You're Done!Make sure to check out my YouTube video, it shows it in action! If you have any questions leave them in the comments.
I hope you liked the project. I have found it to be really useful. Let me know what you plan to do with it!
Also be sure to become part of my social community:
Se ya next time :)
Comments
Please log in or sign up to comment.