Introduction
Arduino Simulator is one of the useful tools to learn Arduino programming without real hardware. There might be cases where the hardware might not be available or there might not be sufficient comfort in space to rig up the hardware. Arduino simulators come in very handily to create projects without real hardware. They also help you in presenting your ideas, sharing projects with others and working together on projects like never before.
Things used in this project
- Arduino UNO
- MPU6050 Gyro and accelerometer sensor
Direct Project link
https://wokwi.com/arduino/projects/305936654686749250
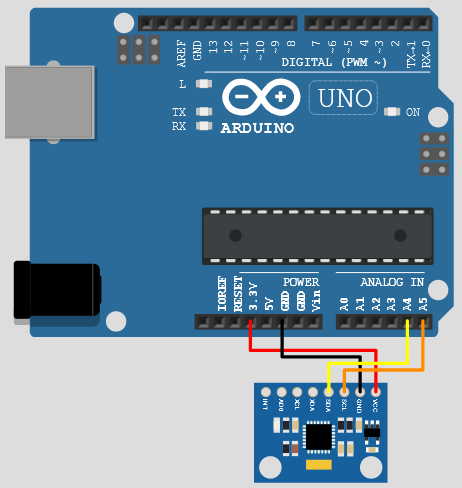
Connection diagram
Project code
// Basic demo for accelerometer readings from Adafruit MPU6050
#include <Adafruit_MPU6050.h>
#include <Adafruit_Sensor.h>
#include <Wire.h>
Adafruit_MPU6050 mpu;
void setup(void) {
Serial.begin(115200);
while (!Serial)
delay(10); // will pause Zero, Leonardo, etc until serial console opens
Serial.println("Adafruit MPU6050 test!");
// Try to initialize!
if (!mpu.begin()) {
Serial.println("Failed to find MPU6050 chip");
while (1) {
delay(10);
}
}
Serial.println("MPU6050 Found!");
mpu.setAccelerometerRange(MPU6050_RANGE_8_G);
Serial.print("Accelerometer range set to: ");
switch (mpu.getAccelerometerRange()) {
case MPU6050_RANGE_2_G:
Serial.println("+-2G");
break;
case MPU6050_RANGE_4_G:
Serial.println("+-4G");
break;
case MPU6050_RANGE_8_G:
Serial.println("+-8G");
break;
case MPU6050_RANGE_16_G:
Serial.println("+-16G");
break;
}
mpu.setGyroRange(MPU6050_RANGE_2000_DEG);
Serial.print("Gyro range set to: ");
switch (mpu.getGyroRange()) {
case MPU6050_RANGE_250_DEG:
Serial.println("+- 250 deg/s");
break;
case MPU6050_RANGE_500_DEG:
Serial.println("+- 500 deg/s");
break;
case MPU6050_RANGE_1000_DEG:
Serial.println("+- 1000 deg/s");
break;
case MPU6050_RANGE_2000_DEG:
Serial.println("+- 2000 deg/s");
break;
}
mpu.setFilterBandwidth(MPU6050_BAND_21_HZ);
Serial.print("Filter bandwidth set to: ");
switch (mpu.getFilterBandwidth()) {
case MPU6050_BAND_260_HZ:
Serial.println("260 Hz");
break;
case MPU6050_BAND_184_HZ:
Serial.println("184 Hz");
break;
case MPU6050_BAND_94_HZ:
Serial.println("94 Hz");
break;
case MPU6050_BAND_44_HZ:
Serial.println("44 Hz");
break;
case MPU6050_BAND_21_HZ:
Serial.println("21 Hz");
break;
case MPU6050_BAND_10_HZ:
Serial.println("10 Hz");
break;
case MPU6050_BAND_5_HZ:
Serial.println("5 Hz");
break;
}
Serial.println("");
delay(100);
}
void loop() {
/* Get new sensor events with the readings */
sensors_event_t a, g, temp;
mpu.getEvent(&a, &g, &temp);
/* Print out the values */
Serial.print("Acceleration X: ");
Serial.print(a.acceleration.x);
Serial.print(", Y: ");
Serial.print(a.acceleration.y);
Serial.print(", Z: ");
Serial.print(a.acceleration.z);
Serial.println(" m/s^2");
Serial.print("Rotation X: ");
Serial.print(g.gyro.x);
Serial.print(", Y: ");
Serial.print(g.gyro.y);
Serial.print(", Z: ");
Serial.print(g.gyro.z);
Serial.println(" rad/s");
Serial.print("Temperature: ");
Serial.print(temp.temperature);
Serial.println(" degC");
Serial.println("");
delay(500);
}
Arduino Simulation
Support
Arduino Simulations in this project was done using Wokwi Arduino Simulator. I would be glad to hear your feedback and suggestions. You can also meet the developers as well as a cool community from a different background who meet and chat there. It is a very welcoming community. Hop on to the Discord channel.
Share your interesting projects and browse through several curious projects from fellow developers and makers on Facebook Wokwi Group!
Stay Safe!
Don't stop learning!
#wokwiMakes


_ztBMuBhMHo.jpg?auto=compress%2Cformat&w=48&h=48&fit=fill&bg=ffffff)


Comments
Please log in or sign up to comment.