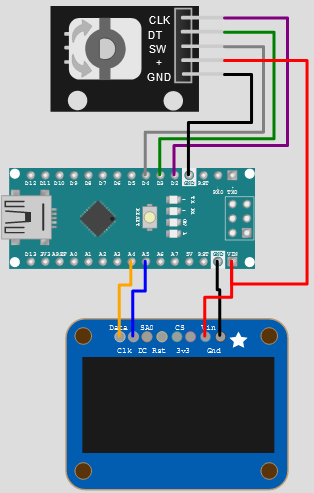
In this project, you will get to learn the working of the quadrature rotary encoder. You will get to tinker with the code, and also play with the simulations. Start learning Arduino programming for free! Please share your feedback about the simulator and the project as well. Let us get started
Virtual Arduino and Encoder simulation - Things used in the project- Arduino Nano
- SSD1306 Display
- Quadrature Rotary Encoder
/*
Rotary Encoder volume control example
Usage: rotate the knob to control the value,
click the knob to change between volume/bass/treble.
https://wokwi.com/arduino/projects/304919215794553409
Released under the MIT license.
Copyright (C) 2021, Uri Shaked.
*/
#include <Adafruit_GFX.h>
#include <Adafruit_SSD1306.h>
#include <Fonts/FreeSansBold9pt7b.h>
#include <Fonts/Picopixel.h>
#define ENCODER_CLK 2
#define ENCODER_DT  3
#define ENCODER_SW  4
uint8_t volume = 50;
uint8_t bass = 25;
uint8_t treble = 66;
typedef enum {
SET_VOLUME,
SET_BASS,
SET_TREBLE,
} Mode;
Mode mode = SET_VOLUME;
Adafruit_SSD1306 display(128, 64, &Wire, -1);
void nextMode() {
switch (mode) {
case SET_VOLUME:
mode = SET_BASS;
break;
case SET_BASS:
mode = SET_TREBLE;
break;
case SET_TREBLE:
mode = SET_VOLUME;
break;
}
}
void updateValue(int delta) {
switch (mode) {
case SET_VOLUME:
volume = constrain(volume + delta, 0, 100);
break;
case SET_BASS:
bass = constrain(bass + delta, 0, 100);
break;
case SET_TREBLE:
treble = constrain(treble + delta, 0, 100);
break;
}
}
void updateDisplay() {
display.clearDisplay();
display.setFont();
display.setTextColor(1);
display.setCursor(42, 2);
display.print("Volume");
display.drawRoundRect(10, 12, 102, 9, 2, WHITE);
display.fillRect(11, 13, volume, 7, WHITE);
if (mode == SET_VOLUME) {
display.setCursor(32, 2);
display.print(">");
}
display.setCursor(48, 22);
display.print("Bass");
display.drawRoundRect(10, 32, 102, 9, 2, WHITE);
display.fillRect(11, 33, bass, 7, WHITE);
if (mode == SET_BASS) {
display.setCursor(38, 22);
display.print(">");
}
display.setCursor(42, 42);
display.print("Treble");
display.drawRoundRect(10, 52, 102, 9, 2, WHITE);
display.fillRect(11, 53, treble, 7, WHITE);
if (mode == SET_TREBLE) {
display.setCursor(32, 42);
display.print(">");
}
display.display();
}
void setup() {
display.begin(SSD1306_SWITCHCAPVCC, 0x3C);
pinMode(ENCODER_CLK, INPUT);
pinMode(ENCODER_DT, INPUT);
pinMode(ENCODER_SW, INPUT_PULLUP);
updateDisplay();
}
long int modeLastChanged = 0;
int prevClk = HIGH;
void loop() {
if (digitalRead(ENCODER_SW) == LOW && millis() - modeLastChanged > 300) {
modeLastChanged = millis();
nextMode();
updateDisplay();
}
int clk = digitalRead(ENCODER_CLK);
if (clk != prevClk && clk == LOW) {
int dt = digitalRead(ENCODER_DT);
int delta = dt == HIGH ? 5 : -5;
updateValue(delta);
updateDisplay();
}
prevClk = clk;
}https://wokwi.com/arduino/projects/304919215794553409
Arduino Nano, Encoder and SSD1306 Simulation previewPlease share your feedback, give a like, write your opinion on how I can make this article better and useful for you. Please feel free to hop on to the Wokwi Discord Channel. Thank you and see you again with another project. Until then 😀
Share your interesting projects and browse through several curious projects from fellow developers and makers on Facebook Wokwi Group!
Stay Safe!
Don't stop learning!
#wokwiMakes


Comments
Please log in or sign up to comment.