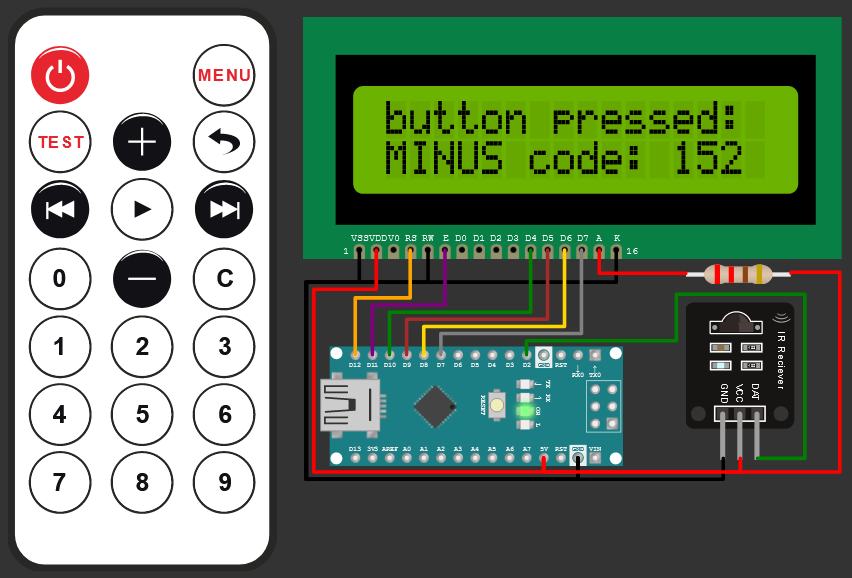
It is so easy to add IR remote to your projects. In this tutorial, I will show you how to easily add an IR remote and an IR receiver for your next Arduino project. I am using a free Arduino simulator to demonstrate IR receiver and IR remote projects.
Components needed- Arduino Nano (Arduino UNO) can also be used
- IR receiver
- IR transmitter (IR Remote)
- LCD (optional, to display the pressed key information)
#include <IRremote.h>
#include <LiquidCrystal.h>
#define PIN_RECEIVER 2 // Signal Pin of IR receiver
IRrecv receiver(PIN_RECEIVER);
LiquidCrystal lcd(12, 11, 10, 9, 8, 7);
void setup()
{
lcd.begin(16, 2);
lcd.print("<press a button>");
receiver.enableIRIn(); // Start the receiver
}
void loop()
{
// Checks received an IR signal
if (receiver.decode()) {
translateIR();
receiver.resume(); // Receive the next value
}
}
void lcdPrint(char* text)
{
lcd.clear();
lcd.setCursor(0, 0);
lcd.print("button pressed:");
lcd.setCursor(0, 1);
lcd.print(text);
lcd.print(" code: ");
lcd.print(receiver.decodedIRData.command);
}
void translateIR()
{
// Takes command based on IR code received
switch (receiver.decodedIRData.command) {
case 162:
lcdPrint("POWER");
break;
case 226:
lcdPrint("MENU");
break;
case 34:
lcdPrint("TEST");
break;
case 2:
lcdPrint("PLUS");
break;
case 194:
lcdPrint("BACK");
break;
case 224:
lcdPrint("PREV.");
break;
case 168:
lcdPrint("PLAY");
break;
case 144:
lcdPrint("NEXT");
break;
case 104:
lcdPrint("num: 0");
break;
case 152:
lcdPrint("MINUS");
break;
case 176:
lcdPrint("key: C");
break;
case 48:
lcdPrint("num: 1");
break;
case 24:
lcdPrint("num: 2");
break;
case 122:
lcdPrint("num: 3");
break;
case 16:
lcdPrint("num: 4");
break;
case 56:
lcdPrint("num: 5");
break;
case 90:
lcdPrint("num: 6");
break;
case 66:
lcdPrint("num: 7");
break;
case 74:
lcdPrint("num: 8");
break;
case 82:
lcdPrint("num: 9");
break;
default:
lcd.clear();
lcd.print(receiver.decodedIRData.command);
lcd.print(" other button");
}
}#include <IRremote.h>
#include <LiquidCrystal.h>
#define PIN_RECEIVER 2 // Signal Pin of IR receiver
IRrecv receiver(PIN_RECEIVER);
LiquidCrystal lcd(12, 11, 10, 9, 8, 7);IRrecv creates an object of type receiver. It takes the Pin number as an input parameter. LCD is also initialised in 4-bit data mode. We also include the header files for IR and LCD
void setup()
{
lcd.begin(16, 2);
lcd.print("<press a button>");
receiver.enableIRIn(); // Start the receiver
}
In the setup function, we initialise the CLD and print a text for the user. We also enable the IR reception.
void translateIR()TranslateIR function takes the decoded data and maps it to the corresponding button of the IR remote. you can add a corresponding action in your custom projects here. For example, turning on the lights, motor, or switching off the fan etc.)
void lcdPrint(char* text)This is used to print the decoded information on the LCD
IR remote basicsThere is a wonderful article here on Adafruit learning page
https://learn.adafruit.com/ir-sensor/ir-remote-signals
Another resource I found which is helpful
https://www.circuitbasics.com/arduino-ir-remote-receiver-tutorial/
Support and any feedback?Please hop on to the Discord channel for any suggestions or comments. You can visit the Arduino simulator home page.
Share your interesting projects and browse through several curious projects from fellow developers and makers on Facebook Wokwi Group!
Stay Safe!
Don't stop learning!
#wokwiMakes
More projects here: https://www.hackster.io/write2puneeth


_ztBMuBhMHo.jpg?auto=compress%2Cformat&w=48&h=48&fit=fill&bg=ffffff)
_wzec989qrF.jpg?auto=compress%2Cformat&w=48&h=48&fit=fill&bg=ffffff)


Comments
Please log in or sign up to comment.