I have a disabled classmate, he lost the use of his legs due to an accident. We are separated and now I miss him. Previously our class was on the 3rd floor and then after the accident happened we were separated because he couldn't come to class. Our school does not have an elevator and to get to our class on the 3rd floor, we have to climb the stairs which are on the left and right of the building. Our class has the advantage that we can study while enjoying the beautiful charm of green rice fields and other beautiful views that can increase our enthusiasm for learning. I totally understand about his feelings and his desire to get back together in our class. For that reason, I made a Smart Stair Lift prototype so that it would be easier for him to go to class and bring back his enthusiasm for learning and happy smiles into our class. I also added position monitoring to find out the location of the stair lift whether it's above or below and commands to prepare the position when it's going to be used. I also set the speed of the driving motor so that it is comfortable and safe according to the existing regulations. I hope that apart from helping my classmates, it can also make it easier for my teachers to be able to reduce the burden of climbing the stairs to get to our class so that we can study optimally.
IntroductionStair lift is a mobility aid specifically designed to help people who have difficulty going up and down stairs. This tool consists of a chair or platform that is raised and lowered by means of rails attached to a ladder. Stair lifts are usually installed in houses that have several levels or in buildings that do not have elevator access. Stair lifts are especially helpful for people with physical limitations, such as the elderly, people with disabilities, or people recovering from injuries or surgeries. By using a stair lift, these people can go up and down the stairs more easily and safely without worrying about falling or tiring.
The stair lift mechanism generally consists of several important components, including seats or platforms, motors, rails or tracks, controllers, and security systems. The following is a more detailed explanation of each of these components:
1. Chair or platform: This section is a seat or footwear used by people who will use the stair lift. Seats or platforms can be mounted on rails or tracks and equipped with seat belts to ensure user safety.
2. Motor: Motor is an important component of a stair lift as it is responsible for moving the chair or platform up or down the stairs. This motor usually uses electric power and is operated by using a button or controller.
3. Rails or tracks: Rails or tracks are components that are used to mount a chair or platform and are used as the path traveled by the motor when moving the chair or platform up or down stairs. These rails or tracks are usually made of strong and durable materials.
4. Controller: The controller is the device used to operate the stair lift. These controllers are usually equipped with buttons or levers that are used to move the chair or platform.
5. Security system: The security system is an important component of the stair lift to ensure the safety of users. Several security systems that are usually present in stair lifts include seat belts, sensors that stop movement if there is an obstacle in the path, and an emergency button to stop movement in an emergency.
In operation, the stair lift is usually activated by pressing a button or lever on the controller. The motor will then move the seat or platform up or down the rail or track, while ensuring user safety through the installed security system. Basically the stair lift applies newton's II law in its theory.
the design of the stair lift prototype design is described in the form in the image below
This prototype has a height of 120 cm and a length of 180 cm with a tilt angle of 48.19 degrees. The material used is hole iron with a thickness of 3 mm. There is a place for the driving motor, controller box, object space and using a sling rope to be used as a puller.
So that, if we redirect based on the theory of Newton's II law, it will have the form of an equation like the following image:
Then if we make the implementation in real form with the design and calculations that have been done, it will be like the following image:
* at the time of implementation ensure work safety and also provide a little tolerance in size so that errors do not occur.
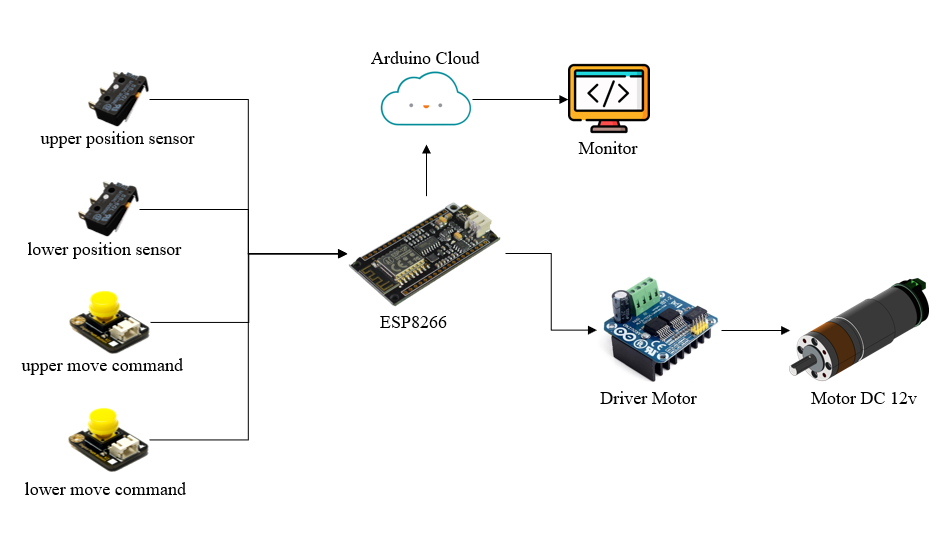
Diagram Block SystemThe top position sensor will provide input data which will be initialized to find out that the lift media position is above and for the bottom position sensor it will provide input data which will be initialized to find out that the lift media position is below. Then the up button gives the command so that the media moves up and the down button gives the command so that the media moves down. Input data from buttons and micro switches will be processed by ESP8266. The position input data will be sent to the Arduino cloud for monitoring the position of the media lift and the command input data will be used to drive the motor that pulls and lowers the media lift.
How to makePrepare the necessary tools and materials according to the list provided previously and make sure you have made the mechanics of the stair lift prototype design as before.
1. Connect the pins on the top and bottom micro switching to the ESP8266 pin using solder and tin to make it strong and attach it to the top and bottom, make sure when the media goes up or down it will hit the micro switching. For reinforcement, you can add iron glue or something else.
2. Also connect the pins on the top and bottom push buttons to the ESP8266 pins using solder and tin to make them strong and attach them to the top and bottom. For reinforcement, you can add iron glue or something else.
3. Attach the driving motor in the place that has been designed and also attach a sling rope to pull the media. strengthen with a clamp that has been bolted so that it does not come off. other than that make sure to use a strong sling rope. Don't forget to connect the motor pin to the motor driver so that the speed can be controlled.
4. Make a circuit like the schematic in the picture below.
Connect the 12v dc power to the motor driver then parallel it to the step down module. Set the step down to have a 5V output. Then point to ESP8266 for resource. Also connect the pin on the IBT2 driver to the ESP8266.
5. Upload the program to the ESP8266 with a similar tutorial on the link https://www.hackster.io/DFRobotOfficial/getting-started-with-hackster-eedu-kits-arduino-iot-cloud-0e3bf7
Publication : https://ieeexplore.ieee.org/document/10052942
Video : https://youtube.com/shorts/pPnYUfi4Hr0?feature=share


Comments
Please log in or sign up to comment.