

Hardware components | ||||||
 |
| × | 1 | |||
 |
| × | 1 | |||
Software apps and online services | ||||||
| ||||||
| ||||||
This is not the first time I write about graphical programming for embedded devices. You can find out my previous posts:
Scratch Programming to Control Robot
However, this time, it is a different story 😁. We don't just make some plug-ins for the existing platforms, we are going to modify the software and make it work our way. Of course, everything is open-source. Everyone should be able to do it. But, does it take time and effort to dig into their source code?
The answer is: "It may be easier than you think!". In this post, I want to show you the steps to include a new hardware platform and build your customized version of one existing graphical programming software. And then, everyone will be able to do it themselves.
Alright, let's start.
2.1. Entry, a Scratch-style programming platform
Scratch-style programming platform, in short, is the software platform that provides a graphical way to program: instructions are represented as colorful blocks, instead of boring textual lines. These programs are designed to help everyone, especially children, to learn programming and creative thinking.
Ladies and gentlemen, I would like to introduce you Entry, a Scratch-style graphical programming platform.
From Entry homepage: Entry is an education platform created to help anyone learn to code. Students are able to learn to code while playing. Teachers are able to teach and manage students effectively.
This open-source software program comes from Korea, developed and maintained by Entry Labs. It is written in HTML5 and JavaScript.
Tho they provide Developer guide, there is no English manual, so it may be painful for non-Korean speakers to catch up (including me 😢). Fortunately, Google Translate worked quite well 👏, and their source code is not too complicated to follow, so I still managed to get it.
2.2. System architecture
The system architecture of Entry is quite similar to Scratch, except that here they provide an official Hardware Connector app for users.
There are two core modules in Entry: Entry-js and Entry-hw.
+ Entry-js is the editor work-space module. If you want to create new programming blocks or modify user interface, you will need to check this module.
+ Entry-hw, or Entry Hardware Connector module, is used to allow Entry editor interact with hardware devices.
By design concept, Entry editor can be loaded on web browsers, however, due to security reason, web browsers can not interact directly with serial COM port, so that's why a hardware connector app is needed. They already supported tons of hardware devices in Entry-hw, but if yours is not on the list, you can add and define the communication interface for your device.
3. Steps to include your hardware platform3.1. Define new platform in Hardware connector
Source code for Entry-hw is available here.
After download, to start Entry HW Connector program, you can browse to the downloaded folder, and run this command from the command line ( Don't forget to install Node.js beforehand ):
npm install
and then launch the program:
npm start
Basically, there are a lot of hardware platforms supported by Entry HW Connector app. If you want to include a new one, you need to browse to \app\modules\, and create three files:
+ Your_Device_Name.json (Define configuration)
+ Your_Device_Name.png (Icon file)
+ Your_Device_Name.js (Define interface functions with Entry editor and hardware device)
The use of these files is straightforward. You can take a look at other hardware platforms in \app\modules\ folder, e.g., Arduino, and see how they made it work.
Below is a sample phpoc.json file that I've created:
{
   "id": "240199",
   "name": {
       "en": "PHPoC Blue",
       "ko": "PHPoC 블루"
   },
   "platform": ["win32"],
   "icon": "phpoc_test.png",
   "module": "phpoc_test.js",
   "url": "www.phpoc.com",
   "select_com_port": true,
   "entry": {
       "protocol": "json"
   },
   "hardware": {
       "type": "serial",
       "control": "slave",
       "vendor": ["Sollae Systems"],
       "baudRate": 115200
   }
}
Note that in the json file above, you will need to define a unique hardware ID for your device. For testing, you can set it as anything different from the existing IDs.
Actually, this part is just for your information, because in my project I don't use Hardware connector app. Wonder why? Because with PHPoC device I am using, I can connect it with Entry editor via WebSocket (no security restriction tho), so there is no need of serial port connection neither Hardware connector app. But I already tried this step, so you can still leave me questions if you have any 😎.
3.2. Design programming blocks for your hardware platform
Next is Entry-js, the editor work-space module.
npm install
You can use this build command:
npm run dist
It will compile source files into \dist\entry.js file.
You can use the command below to run a test server on localhost.
npm run serve
There is a lot of stuff in entry-js, but for adding new programming blocks for your hardware, you just need to follow the steps below:
- Browse to \src\playground\blocks\, create block_Your_Device_Name.js
You can refer to other block definition files in the same folder to create your own. Here you will define the shape, color, the data type, the functions to handle exchanging data with Hardware connector.
Entry.PHPoC = {
   name: 'phpoc',
   imageName: 'phpoc.png',
   title: {
       "ko": "PHPoC 보드",
       "en": "PHPoC Board"
   },
    deviceVersion: '99',
    deviceID: '24.1',
....
Entry.PHPoC.setLanguage = function() {
   return {
       ...
       en: {
           template: {
	       phpoc_connect: 'Connected to Websocket %1',
               phpoc_get_analog_value: 'Value of Analog port %1',
               phpoc_value_map: 'Map %1 from %2 ~ %3 to %4 ~ %5',
               ...
           }
       },
   };
};
- In the same folder, open index.js, then include your newly created block_Your_Device_Name.js file, and also remember to add your hardware device to Hardware list here.
For example, in Your_Device_Name.json, you have defined your hardware ID as below:
"id": "2C0103",
In block_Your_Device_Name.js, you already defined your class as below:
Entry.Your_Device = {
    name: 'your_device',
}
Then, in index, js, you need to include the file above:
require('./block_Your_Device_Name');
and include your device object:
Entry.HARDWARE_LIST = {
   '1.1': Entry.Arduino,
...
   '2C.1': Entry.Your_Device,
}
Just remember, only first 4 digits in the defined hardware ID are used here.
Following the steps above, basically you can add new hardware and define new programming blocks.
4. Build your customized graphical programming softwareEntry offline is a desktop app (based on Electron framework) that includes both editor and hardware connector module. You can download source code from here.
In entry-offline folder, the hardware connector module is available at:
\src\renderder\bower_components\entry-hw\app\modules\
And the editor work-space module, is available at:
\src\renderder\bower_components\entryjs\dist\entry.min.js
Note that here, this module has been compiled and minified. You can refer to 3.2 to compile entry.js file from entry-js module.
You also need to add the new object types, which you declared in block_Your_Device_Name.js, to \src\renderer\src\static.js. Probably you will know what to do after taking a look at the file and referring to other included objects, it is quite straightforward. You can refer to the below:
EntryStatic.getAllBlocks = function() {
    ...
       {
           category: 'arduino',
           blocks: [
               'arduino_download_connector',
                ...
 		'phpoc_connect',
		'phpoc_get_digital',
	        'phpoc_get_analog_value',
		'phpoc_value_map',
		'phpoc_get_ultrasonic_value',
		'phpoc_set_digital',
		'phpoc_set_led',
		'phpoc_set_servo',
		'phpoc_disconnect',

      }
}
Finally, after finish your editing, you may run some commands for packaging and building the customized software. Let's refer to package.json file to select the appropriate commands. For example, I use the following command to make installation file for Windows 64-bit:
npm run make:win
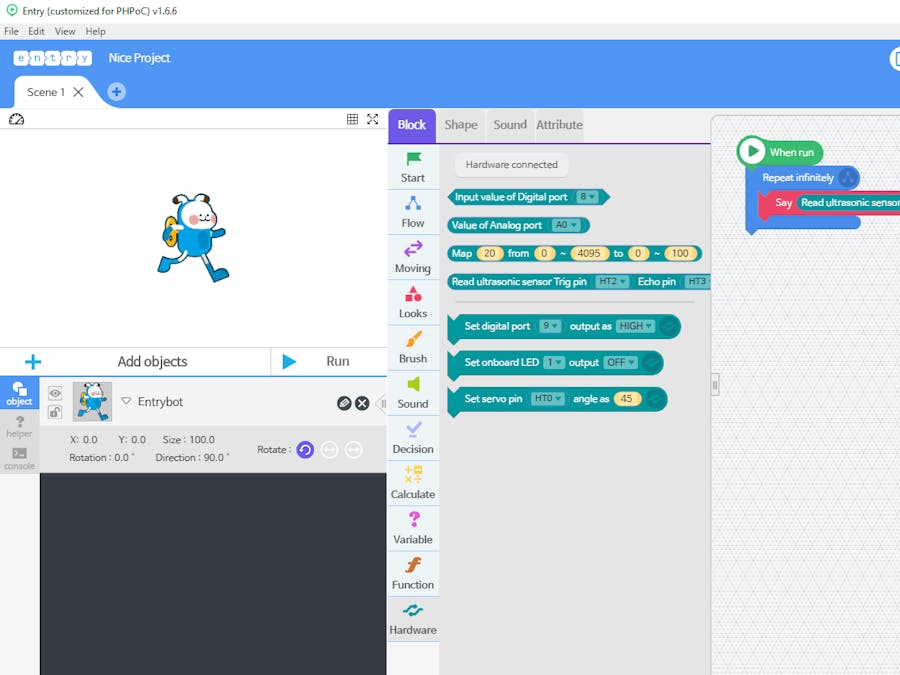
You can download my customized version of Entry from here.
Don't forget to upload PHPoC script to your board before running this program.
Cheers 😁


Comments