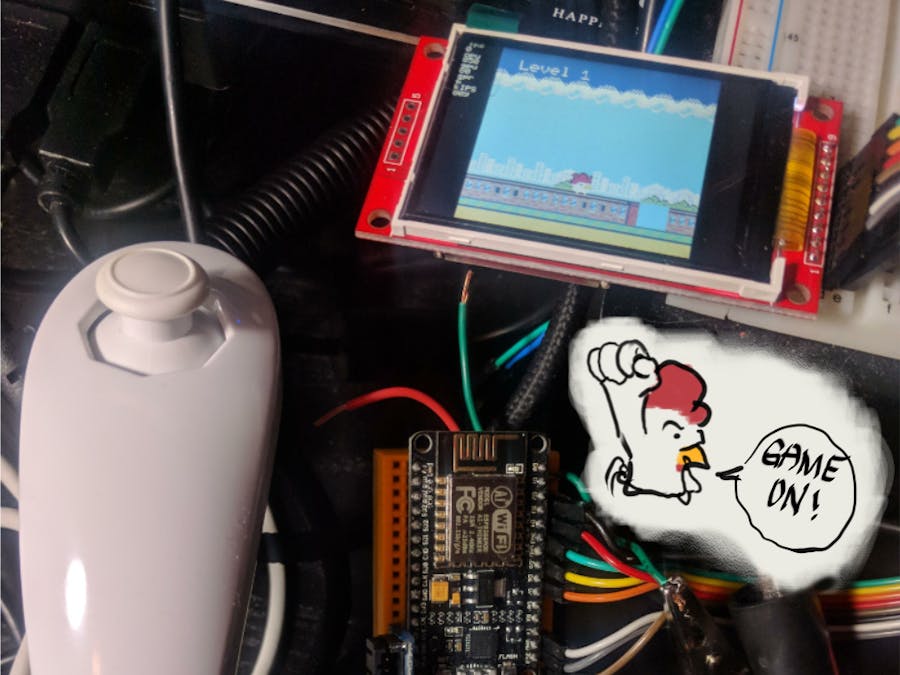
I was excited to see a game "engine emulator and compiler readily available for the ESP8266. It's pretty neat! You can make your game using corax89's repository and upload it to the ESP8266 to play. I actually used a fork of corax89's code under mali1741 where he uses a nunchuk instead of the PCF8574 button matrix or I/O expander. However, implementing the hardware wasn't as straightforward as I thought it would be. Implementing it directly from corax89's repository resulted in a repeated flashing screen and MCU reset. The instructions to do it isn't as fleshed out as well. So I cobbled together my own configuration in hopes that it will help others to implement theirs. Here we go!
Get your parts togetherThis project uses the following parts:
- NodeMCU aka ESP-12E module
- ILI9341 SPI TFT LCD Screen (240x320)
- Wii Nunchuk
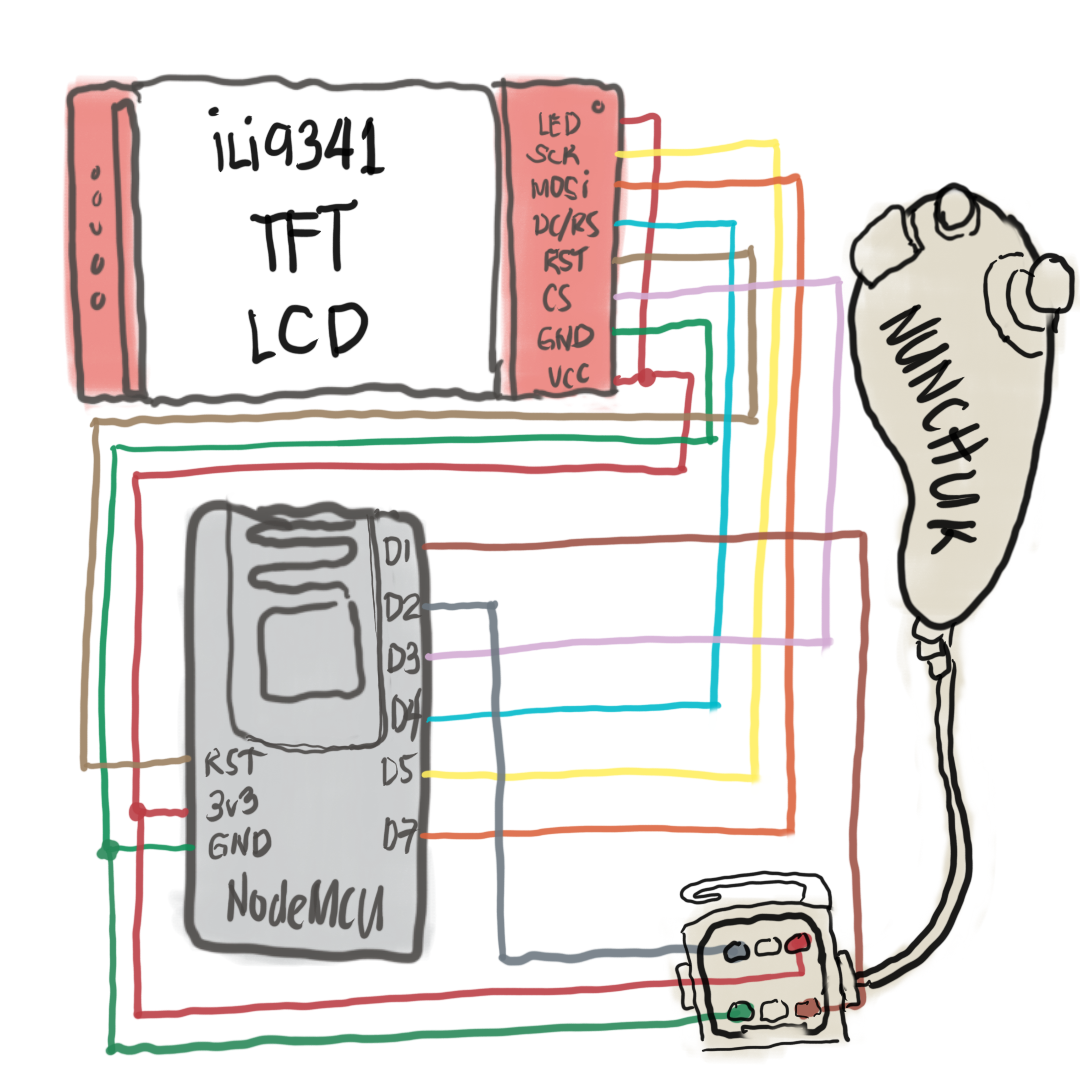
Go ahead and connect the hardware as shown above. One of the LCD pins, SDO/MISO, is left floating or no connection. Then we can do some sanity checks to make sure all the hardware are working properly using some sketches.
Upload the codeWe'll be using the files found in the repository and the zipped libraries. The project uses the NintendoExtensionCtrl, coos, and TFT_eSPI libraries. Make sure to use the ones zipped because the new versions of these libraries are not compatible. I found this out the hard way after trying several versions of each library from their respective repositories.
Sanity Check #1: ILI9341 SPI TFT LCD Screen (240x320)
// Demo based on:
// UTFT_Demo by Henning Karlsen
// web: http://www.henningkarlsen.com/electronics
/*
The delay between tests is set to 0. The tests run so fast you will need to
change the WAIT value below to see what is being plotted!
This sketch uses the GLCD and font 2 only.
Make sure all the required fonts are loaded by editting the
User_Setup.h file in the TFT_eSPI library folder.
 #########################################################################
 ###### DON'T FORGET TO UPDATE THE User_Setup.h FILE IN THE LIBRARY ######
 ######            TO SELECT THE FONTS YOU USE, SEE ABOVE           ######
 #########################################################################
*/
// Delay between demo pages
#define WAIT 0 // Delay between tests, set to 0 to demo speed, 2000 to see what it does!
#define CENTRE 240
#include <TFT_eSPI.h> // Hardware-specific library
#include <SPI.h>
TFT_eSPI tft = TFT_eSPI();                   // Invoke custom library with default width and height
#define TFT_GREY 0x7BEF
uint32_t runTime = 0;
void setup()
{
 randomSeed(analogRead(0));
 Serial.begin(38400);
// Setup the LCD
 tft.init();
 tft.setRotation(1);
}
void loop()
{
 int buf[478];
 int x, x2;
 int y, y2;
 int r;
 runTime = millis();
// Clear the screen and draw the frame
 tft.fillScreen(TFT_BLACK);
 tft.fillRect(0, 0, 480, 13, TFT_RED);
 tft.fillRect(0, 305, 480, 320, TFT_GREY);
 tft.setTextColor(TFT_BLACK,TFT_RED);
 tft.drawCentreString("* TFT_eSPI *", CENTRE, 3, 1);
 tft.setTextColor(TFT_YELLOW,TFT_GREY);
 tft.drawCentreString("Adapted by Bodmer", CENTRE, 309,1);
 tft.drawRect(0, 14, 479, 305-14, TFT_BLUE);
// Draw crosshairs
 tft.drawLine(239, 15, 239, 304, TFT_BLUE);
 tft.drawLine(1, 159, 478, 159, TFT_BLUE);
 for (int i=9; i<470; i+=10)
   tft.drawLine(i, 157, i, 161, TFT_BLUE);
 for (int i=19; i<220; i+=10)
   tft.drawLine(237, i, 241, i, TFT_BLUE);
// Draw sin-, cos- and tan-lines
 tft.setTextColor(TFT_CYAN);
 tft.drawString("Sin", 5, 15,2);
 for (int i=1; i<478; i++)
 {
   tft.drawPixel(i,159+(sin(((i*1.13)*3.14)/180)*95),TFT_CYAN);
 }
 tft.setTextColor(TFT_RED);
 tft.drawString("Cos", 5, 30,2);
 for (int i=1; i<478; i++)
 {
   tft.drawPixel(i,159+(cos(((i*1.13)*3.14)/180)*95),TFT_RED);
 }
 tft.setTextColor(TFT_YELLOW);
 tft.drawString("Tan", 5, 45,2);
 for (int i=1; i<478; i++)
 {
   tft.drawPixel(i,159+(tan(((i*1.13)*3.14)/180)),TFT_YELLOW);
 }
 delay(WAIT);
 tft.fillRect(1,15,478-1,304-15,TFT_BLACK);
 tft.drawLine(239, 15, 239, 304,TFT_BLUE);
 tft.drawLine(1, 159, 478, 159,TFT_BLUE);
// Draw a moving sinewave
int col = 0;
 x=1;
 for (int i=1; i<(477*15); i++)
 {
   x++;
   if (x==478)
     x=1;
   if (i>478)
   {
     if ((x==239)||(buf[x-1]==159))
       col = TFT_BLUE;
     else
       tft.drawPixel(x,buf[x-1],TFT_BLACK);
   }
   y=159+(sin(((i*0.7)*3.14)/180)*(90-(i / 100)));
   tft.drawPixel(x,y, TFT_BLUE);
   buf[x-1]=y;
 }
 delay(WAIT);
 tft.fillRect(1,15,478-1,304-15,TFT_BLACK);
// Draw some filled rectangles
 for (int i=1; i<6; i++)
 {
   switch (i)
   {
     case 1:
       col = TFT_MAGENTA;
       break;
     case 2:
       col = TFT_RED;
       break;
     case 3:
       col = TFT_GREEN;
       break;
     case 4:
       col = TFT_BLUE;
       break;
     case 5:
       col = TFT_YELLOW;
       break;
   }
   tft.fillRect(150+(i*20), 70+(i*20), 60, 60,col);
 }
 delay(WAIT);
 tft.fillRect(1,15,478-1,304-15,TFT_BLACK);
// Draw some filled, rounded rectangles
 for (int i=1; i<6; i++)
 {
   switch (i)
   {
     case 1:
       col = TFT_MAGENTA;
       break;
     case 2:
       col = TFT_RED;
       break;
     case 3:
       col = TFT_GREEN;
       break;
     case 4:
       col = TFT_BLUE;
       break;
     case 5:
       col = TFT_YELLOW;
       break;
   }
   tft.fillRoundRect(270-(i*20), 70+(i*20), 60, 60, 3, col);
 }
 delay(WAIT);
 tft.fillRect(1,15,478-1,304-15,TFT_BLACK);
// Draw some filled circles
 for (int i=1; i<6; i++)
 {
   switch (i)
   {
     case 1:
       col = TFT_MAGENTA;
       break;
     case 2:
       col = TFT_RED;
       break;
     case 3:
       col = TFT_GREEN;
       break;
     case 4:
       col = TFT_BLUE;
       break;
     case 5:
       col = TFT_YELLOW;
       break;
   }
   tft.fillCircle(180+(i*20),100+(i*20), 30,col);
 }
 delay(WAIT);
 tft.fillRect(1,15,478-1,304-15,TFT_BLACK);
// Draw some lines in a pattern
 for (int i=15; i<304; i+=5)
 {
   tft.drawLine(1, i, (i*1.6)-10, 303, TFT_RED);
 }
 for (int i=304; i>15; i-=5)
 {
   tft.drawLine(477, i, (i*1.6)-11, 15, TFT_RED);
 }
 for (int i=304; i>15; i-=5)
 {
   tft.drawLine(1, i, 491-(i*1.6), 15, TFT_CYAN);
 }
 for (int i=15; i<304; i+=5)
 {
   tft.drawLine(477, i, 490-(i*1.6), 303, TFT_CYAN);
 }
 delay(WAIT);
 tft.fillRect(1,15,478-1,304-15,TFT_BLACK);
// Draw some random circles
 for (int i=0; i<100; i++)
 {
   x=32+random(416);
   y=45+random(226);
   r=random(30);
   tft.drawCircle(x, y, r,random(0xFFFF));
 }
 delay(WAIT);
 tft.fillRect(1,15,478-1,304-15,TFT_BLACK);
// Draw some random rectangles
 for (int i=0; i<100; i++)
 {
   x=2+random(476);
   y=16+random(289);
   x2=2+random(476);
   y2=16+random(289);
   if (x2<x) {
     r=x;x=x2;x2=r;
   }
   if (y2<y) {
     r=y;y=y2;y2=r;
   }
   tft.drawRect(x, y, x2-x, y2-y,random(0xFFFF));
 }
 delay(WAIT);
 tft.fillRect(1,15,478-1,304-15,TFT_BLACK);
// Draw some random rounded rectangles
 for (int i=0; i<100; i++)
 {
   x=2+random(476);
   y=16+random(289);
   x2=2+random(476);
   y2=16+random(289);
   if (x2<x) {
     r=x;x=x2;x2=r;
   }
   if (y2<y) {
     r=y;y=y2;y2=r;
   }
   tft.drawRoundRect(x, y, x2-x, y2-y, 3,random(0xFFFF));
 }
 delay(WAIT);
 tft.fillRect(1,15,478-1,304-15,TFT_BLACK);
 for (int i=0; i<100; i++)
 {
   x=2+random(476);
   y=16+random(289);
   x2=2+random(476);
   y2=16+random(289);
   col=random(0xFFFF);
   tft.drawLine(x, y, x2, y2,col);
 }
 delay(WAIT);
 tft.fillRect(1,15,478-1,304-15,TFT_BLACK);
 for (int i=0; i<10000; i++)
 {
   tft.drawPixel(2+random(476), 16+random(289),random(0xFFFF));
 }
 delay(WAIT);
 tft.fillRect(0, 0, 480, 320, TFT_BLUE);
 tft.fillRoundRect(160, 70, 319-160, 169-70, 3,TFT_RED);
 tft.setTextColor(TFT_WHITE,TFT_RED);
 tft.drawCentreString("That's it!", CENTRE, 93,2);
 tft.drawCentreString("Restarting in a", CENTRE, 119, 2);
 tft.drawCentreString("few seconds...", CENTRE, 132, 2);
 tft.setTextColor(TFT_GREEN,TFT_BLUE);
 tft.drawCentreString("Runtime: (msecs)", CENTRE, 280, 2);
 tft.setTextDatum(TC_DATUM);
 runTime = millis()-runTime;
 tft.drawNumber(runTime, CENTRE, 300,2);
 tft.setTextDatum(TL_DATUM);
 delay (10000);
}
Use this sketch by Henning Karlsen to check that your TFT wiring and libraries are working properly. It should display some graphics and cycle through them intermittently.
Sanity Check #2: Wii Nunchuk
/*
*  Project     Nintendo Extension Controller Library
*  @author     David Madison
*  @link       github.com/dmadison/NintendoExtensionCtrl
*  @license    LGPLv3 - Copyright (c) 2018 David Madison
*
*  This file is part of the Nintendo Extension Controller Library.
*
*  This program is free software: you can redistribute it and/or modify
*  it under the terms of the GNU Lesser General Public License as published by
*  the Free Software Foundation, either version 3 of the License, or
*  (at your option) any later version.
*
*  This program is distributed in the hope that it will be useful,
*  but WITHOUT ANY WARRANTY; without even the implied warranty of
*  MERCHANTABILITY or FITNESS FOR A PARTICULAR PURPOSE.  See the
*  GNU Lesser General Public License for more details.
*
*  You should have received a copy of the GNU Lesser General Public License
*  along with this program.  If not, see <http://www.gnu.org/licenses/>.
*
*  Example:      Nunchuk_Demo
*  Description:  Connect to a Nunchuk and demonstrate all of the avaiable
*                control data functions.
*/
#include <NintendoExtensionCtrl.h>
Nunchuk nchuk;
void setup() {
	Serial.begin(115200);
	nchuk.begin();
	while (!nchuk.connect()) {
		Serial.println("Nunchuk not detected!");
		delay(1000);
	}
}
void loop() {
	Serial.println("----- Nunchuk Demo -----"); // Making things easier to read
	boolean success = nchuk.update();  // Get new data from the controller
	if (!success) {  // Ruh roh
		Serial.println("Controller disconnected!");
		delay(1000);
	}
	else {
		// Read a button (on/off, C and Z)
		boolean zButton = nchuk.buttonZ();
		Serial.print("The Z button is ");
		if (zButton == true) {
			Serial.println("pressed");
		}
		else if (zButton == false) {
			Serial.println("released");
		}
		// Read a joystick axis (0-255, X and Y)
		int joyY = nchuk.joyY();
		Serial.print("The joystick's Y axis is at ");
		Serial.println(joyY);
		// Read an accelerometer and print values (0-1023, X, Y, and Z)
		int accelX = nchuk.accelX();
		Serial.print("The accelerometer's X-axis is at ");
		Serial.println(accelX);
		// Print all the values!
		nchuk.printDebug();
	}
}
This sketch by David Madison detects the nunchuk then continues to recognize the button presses and analog stick movement.
You can also use different pinouts, you'll just have to change User_Setup.h found in the TFT_eSPI library in Arduino sketchbook folder/directory (this may vary depending on your setup. For example for mine, it's found in Documents/Arduino/libraries/TFT_eSPI). It should have something like this:
// Only define one driver, the other ones must be commented out
#define ILI9341_DRIVER
#define TFT_CS  PIN_D3 // Chip select control pin D3
#define TFT_DC  PIN_D4 // Data Command control pin
#define TFT_RST  -1    // Reset pin
After verifying all the parts are working individually, time to upload the ESP_ILI9341_game_engine.ino. To avoid any issues, make sure all the files are within the same folder. This includes the data folder containing the game .bin files. Your Arduino IDE should look like this:
Now choose the board that you have, for me it's the NodeMCU 1.0 (ESP-12E Module). The COMPORT depending on where your device is connected. Finally the Flash Size set to what your board has. Here's a screenshot of my settings:
You can check the size of your memory using the sketch by Markus Setller if you're not sure:
/*
 ESP8266 CheckFlashConfig by Markus Sattler
 This sketch tests if the EEPROM settings of the IDE match to the Hardware
*/
void setup(void) {
 Serial.begin(115200);
}
void loop() {
 uint32_t realSize = ESP.getFlashChipRealSize();
 uint32_t ideSize = ESP.getFlashChipSize();
 FlashMode_t ideMode = ESP.getFlashChipMode();
 Serial.printf("Flash real id:   %08X\n", ESP.getFlashChipId());
 Serial.printf("Flash real size: %u bytes\n\n", realSize);
 Serial.printf("Flash ide  size: %u bytes\n", ideSize);
 Serial.printf("Flash ide speed: %u Hz\n", ESP.getFlashChipSpeed());
 Serial.printf("Flash ide mode:  %s\n", (ideMode == FM_QIO ? "QIO" : ideMode == FM_QOUT ? "QOUT" : ideMode == FM_DIO ? "DIO" : ideMode == FM_DOUT ? "DOUT" : "UNKNOWN"));
 if (ideSize != realSize) {
   Serial.println("Flash Chip configuration wrong!\n");
 } else {
   Serial.println("Flash Chip configuration ok.\n");
 }
 delay(5000);
}
After all that, click the upload button to compile and transfer the ESP_ILI9341_game_engine.ino into the ESP8266.
And TADA! Your LCD should greet you with the ESP LGE logo.
We have it working but no games? It's because we haven't uploaded the games to the ESP8266's SPIFFS. There are numerous ways to do it, but we can use this Arduino plugin: https://github.com/esp8266/arduino-esp8266fs-plugin.. The installation instructions can be found on the repository. It's easy to follow, but I'll break it down here:
1. Download the newest release of the tool: https://github.com/esp8266/arduino-esp8266fs-plugin/releases/tag/0.4.0
2. Make a new folder named "tools" in your Arduino sketchbook directory.
3. Unzip the file inside the "tools" folder
4. Restart the Arduino IDE.
Now there should be a new option when you click on the "tools" tab on the Arduino IDE called ESP8266 Sketch Data Upload.
When you click on this, it'll upload the games or any .bin file inside the "data" folder into your ESP8266 SPIFFS.
BONUS: Create your own gameI created my Infinite_Chicken_Run Game using parts from other games hosted on the repository. The chicken sprite was my own creation though. :]
So get yourself acquainted with how things work either through the "help" function, the user guide (https://corax89.github.io/esp8266Game/user_guide/index.html), or going through the code of other games on the web emulator and compiler: https://corax89.github.io/esp8266Game/index.html. Start by choosing a demo game and clicking through here:
Click "load examle" [sic], click "compile" and then click "run".
Once you pieced your game together and testing it for game-breaking bugs. Click on "save". This should prompt a .bin file download or automatically do so if you're using GoogleChrome.
Game on!Again, building this thing from the ground up wasn't as straightforward as I thought. There was a lot of reflection time on my part (a lot of "What am I doing wrong?). Thankfully, I got it working despite using different components from the original project. This walkthrough should save you some headaches. Peace and game on!


Comments
Please log in or sign up to comment.