What you see, Is not real, What is real, You don't see.....(--Old Man)
- What you see, Is not real, What is real, You don't see.....(--Old Man)
Oversleeping is when someone struggles to wake up to their alarm each morning and therefore sleeps in, longer than their intended wake-up time. They often get too much sleep and this can have negative impacts on health and wellbeing such as an increased risk of diabetes, heart disease, and stroke. Oversleeping often leaves people feeling very tired throughout the day, even after a nap.
Good sleep can improve concentration and productivity.Good sleep can maximize problem-solving skills and enhance memory. Poor sleep has been shown to impair brain function.
- Good sleep can improve concentration and productivity.Good sleep can maximize problem-solving skills and enhance memory. Poor sleep has been shown to impair brain function.
So, these all are the stated problems for good and bad or oversleeping. This indeed leads to many health problems and one such occurred in my home.So, I decided to make an alarm system with the help of BOLT IOT.
- So, these all are the stated problems for good and bad or oversleeping. This indeed leads to many health problems and one such occurred in my home.So, I decided to make an alarm system with the help of BOLT IOT.
Using just a Bolt device, Buzzer, Led, Twilio and an online service called Integromat, you can build one yourself. Happy learning :)
The system works by setting up a scenario on the Integromat service which activates the buzzer and led connected to your Bolt device activating the alarm at a set time every day.
Now, let's go assembling ;)
You have seen which all components we require to build a project. Let's take a glance at the respective pin number.
- Sensors:
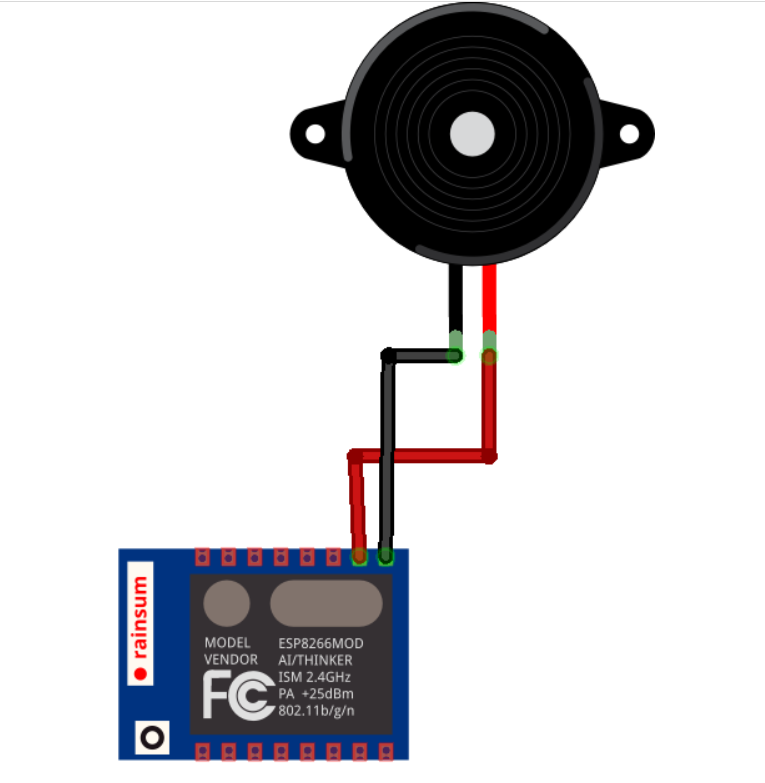
1. BUZZER:
2. LED:
3. LM35:
CONNECTION:
- ForBuzzer:
A Buzzer has 2 legs: 1. Positive and 2. Negative as shown above. You need to connect the positive leg into pin number 1 of the bolt module and negative into the ground.
- LED( Light Emitting Diodes):
A similar for led but just connect the positive leg into pin number 1 of the module and negative in the ground.
LM35Temperature Sensor:
- LM35Temperature Sensor:
Connect the supply pin in 5 Volt, Ground into the ground, and the Output voltage into A0 of your module.
LM35 is a precession Integrated circuit Temperature sensor, whose output voltage varies, based on the temperature around it. It is a small and cheap IC that can be used to measure temperature anywhere between -55°C to 150°C. There will arise of 0.01V (10 milli V) for every degree Celsius rise in temperature.
BUILD:
STEP 1:
Make circuit connections as given above. Connect the Bolt WiFi module to the computer using the USB cable. Then power on the Bolt IoT module.
STEP2:
Create the account on www.integromat.com Sign in to your account.
STEP 3:
Click on a new scenario. Search and select Bolt IoT and enter your API key to connect the WiFi module.
Enter your Device ID and select pin 1 as the buzzer is connected to this. Choose state as HIGH to turn the buzzer on.
Next, we want to ring the buzzer for a few seconds. For this click on the tools icon (purple) and select the sleep option. Enter the amount of delay in seconds for the buzzer to remain on.
Click on add new module and again select Bolt IoT. Select Write Digital Write Option in the command section. Enter the Device ID and API key and select the 'LOW' state.
Now we have three modules in total which will look like this:
It's time to set up some conditions for our IoT alarm clock to go off... Click on the little clock icon on the initial Bolt module.
As per the convenience, time can be set. That's it. You have successfully completed all the procedures. Now save your scenario by clicking on the save button. Hence, you can follow the same for the LED.
Step 6:
You can make your Twilio Account using the https://docs.boltiot.com/docs/python-library#alert-notification
And that's it.
Here's my final integromat scenario:
FINALOUTPUT:
Comment below for any query!!
Happy Learning.! :)


.png?auto=compress%2Cformat&w=48&h=48&fit=fill&bg=ffffff)


Comments
Please log in or sign up to comment.