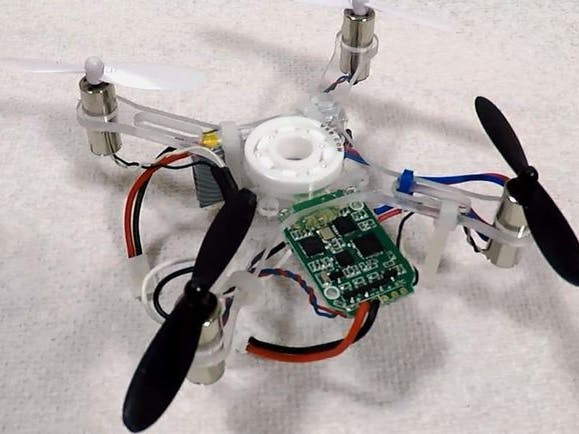
Introduction: SpinnerDrone Flies and Spins!
Spinners are all the rage right now, and quadcopters, AKA drones, have been popular for some time. Why not combine the two into a device that I like to call the "Spinner Drone?" The design takes the internal components from a Hubsan H107C quadcopter, and mounts them to a new polycarbonate frame, along with a ceramic bearing.
Step 1: Parts Required
- Polycarbonate SpinnerDrone Frame: Tindie
- Hubsan H107C Quadcopter: Amazon
- VXB 608ZR02-PTFE Full Ceramic Miniature Bearing: Amazon
- Wire
- Heat shrink
Step 2: Machine Frame
If you want to make your own frame, cut out a piece of 1/8 inch polycarbonate per this DXF file. I used a CNC router, but it would be adapted for a laser cutter, waterjet, or even a 3D printer. Initially, I was going to have an extra ring of material on the top and bottom to support the bearing, but that wasn't necessary.
Frame Performance: This new polycarbonate frame will be significantly lighter than what normally comes with the H107C, and is extremely tough. So used without a bearing, this frame it would make a great performance upgrade to this drone. On the other hand, it doesn't offer the components much protection, and as cut lacks dedicated light mounting holes, so there are a few tradeoffs!
Step 3: Insert Bearing
Push your ceramic bearing into the middle hole. If machined correctly, it will fit inside with a press fit, but don't be afraid to use hot glue or similar if needed. As shown here, the frame/bearing could make a fun spinner design without even adding the drone components!
So this design can actually perform as a spinner, high-performance drone, or spinnerdrone!
Step 4: Disassemble Quadcopter
For disassembly, detach the bottom with a screwdriver. To get the motors out, you can unsolder them from the main board and push them out, but I decided to cut them out with a Dremel tool. Since I wouldn't need the frame anyway, this seemed easier, and helps keep track of which motor is which.
I detached the Camera to save weight, but this could be kept on for FPV footage if you so desire.
Step 5: Insert Motors
Remove the propellers as needed, then plug them into the four motor holes. Pay attention to the orientation, as it's critical that the motors/props are in the right orientation with respect to the control board. In my case, some of the motors were able to press fit into these holes, however, some were loose. Use a bit of hot glue to secure them as necessary.
Step 6: Wire New Frame
Although the wires will be connected to each of the motors, in order to place the control board out of the way of the bearing, you'll need to extend some of the wiring. Add extra wire as needed with solder, using heat shrink to keep them from shorting.
Soldering Note: Following this project, after years of using a cheap soldering iron with no temperature control as shown here, I finally upgraded to a TS100 mini soldering iron (Amazon). The difference is night and day—fast heat up time, settable temperature, and it automatically turns off. Highly recommended. Also, got a stand (Amazon) at the same time, which doesn't quite fit correctly, but is quite an improvement as well.
Step 7: Attach Control Board, Battery, and "Landing Gear"
Attach the control board with hot glue, in the same orientation that it was in the Hubsan drone. Fasten the battery down with zip ties, allowing extra tie material to stick down as shown to form landing gear.
Attach zip ties to act as forward landing gear through the slots next to the forward motors as shown in the second image. Clip all to let the quadcopter sit level.
Step 8: Fly and Spin!
Connect the battery, then link the controller as you would with a normal Hubsan drone. You'll now be able to fly the drone normally, and can still entertain yourself when the battery dies!
Note that Amazon links are affiliate, and the frame from Tindie is mine.


Comments
Please log in or sign up to comment.