Introduction
With DJI Windows SDK, developers can create customized applications to unlock the full potential of the DJI Drones. The features of the latest DJI Windows SDK include high- and low-level flight control, aircraft state through telemetry and sensor data, obstacle avoidance (on supported products), camera and gimbal control, live video feed of what the camera sees, live video feed of what the camera sees, and state information and control of battery and remote controller. The supported products are Mavic 2 Enterprise Dual, Mavic 2 Enterprise, Mavic 2 Series, MAVIC AIR, PHANTOM 4 PRO V2, and MANIFOLD 2. Microsoft Azure provides the industry’s broadest portfolio of IoT services and capabilities that meets the requirements from the edge to the cloud. Azure IoT products and services are composed of Azure IoT Hub, Azure IoT Central, Time Series Insights, Azure Digital Twins and others.
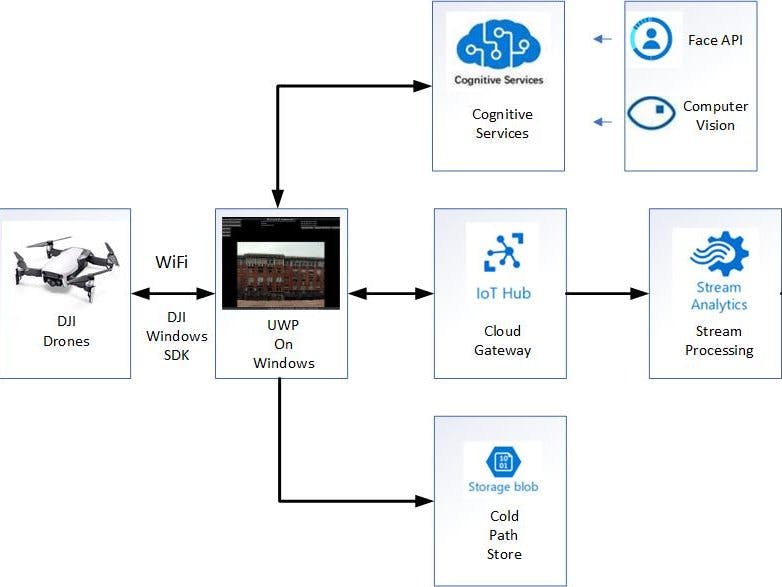
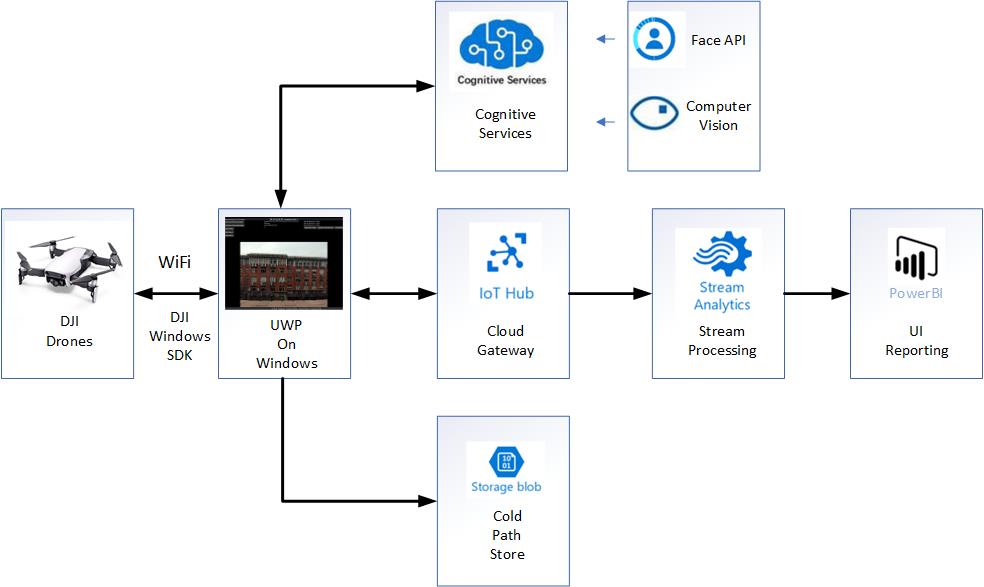
In this project, Azure Cloud services for DJI drones are achieved by taking advantages of DJI Windows SDK and available NuGet libs for Azure Cloud services. The motivation for this project is to show that it is easy for DJI drones to communicate with Azure services, not only for sensor data, but also images captured by on-board cameras. The architecture of the project is presented in Figure 1. Realtime sensor data, i.e., 3-axis aircraft velocities are fetched by UWP application running on Windows 10 device. As soon as the data is received, it will be transmitted to Azure IoT Hub, which will be streamed to Azure Stream Analytics. Data analytics can be performed by Azure Stream Analytics and the output can be fed to PowerBI to achieve data visualization. Moreover, the data can also be transmitted to Azure Storage Table directly for data storage. Azure cognitive services can be used to perform facial analysis or computer vision to demonstrate real-time artificial intelligence for DJI drones.
Project InstructionsStep 1: Configure Drones to WiFi ModeTime: 2 minutesParts: Mavic AirTools: N/A
As shown in Figure 2, press and hold the Function button on the aircraft for four seconds until you hear a double beep, which indicates that the aircraft has switched to Wi-Fi control.
Connect the WiFi of Mavic Air using PC's WiFi, DJI Windows SDK would connect to the aircraft successfully. Make sure that your WiFi of aicraft is connected by only on device. The WiFi SSID of the device is MAVIC_AIR-*****, and the password is also available on the device. Refer to Figure 3 to see details.
On Windows 10, click network settings, and you will see the SSID of the Mavic Air as Figure 4.
Click connect and input the password, you will see the aircraft is now successfully connected to the PC.
Note: please check your WiFi on PC, since the Mavic Air supports both 2.4GHz and 5.8GHz. If you can’t find the aircraft on the list, please make sure your device’s WiFi and the aircraft’s WiFi work on the same band. You can use DJI Go 4 App on smartphone to switch the frequency band.
Step 3: Create Azure IoT HubTime: 5 minutesParts: Microsoft Azure SubscriptionTools: N/AIn the Azure Portal (https://portal.azure.com), click the on the "New" icon along the left to see all the services, then click the "Internet of Things" item and choose “IoT Hub”.
Complete the fields of “Name”, “Pricing Tier”, “IoT Hub Units”, “Device-to-Cloud Partitions”, “Resource group” and “location”, then click the "Create" button. It should be noted that “F1 Free” Pricing is enough for this project. And we’d better choose the local location of the service.
Wait for the new IoT hub to show as "Online". When it is ready, open the blade of the new IoT hub, take note of the URI and select the key icon at the top to access to the shared access policy settings.
Select the Shared access policy called iothubowner, and take note of the Primary key and connection string in the right blade. We may copy these into a text file for future use.
For more information, we can refer to this doc online: Create an IoT hub using the Azure portal (https://docs.microsoft.com/en-us/azure/iot-hub/iot-hub-create-through-portal).
Step 4: Authenticate the PC with Device ExplorerTime: 5 minutesParts: Device ExplorerTools: N/ACommunication between Azure IoT Hub and devices is secured. On Windows, we can use Device Explorer app to complete this Authentication process. A pre-built version of the Device Explorer application for Windows can be downloaded by clicking on this link: https://github.com/Azure/azure-iot-sdk-csharp/releases/tag/2019-1-4 (Scroll down for SetupDeviceExplorer.msi). The default installation directory for this application is "C:\Program Files (x86)\Microsoft\DeviceExplorer".
Open the Device Explorer app and fill the IoT Hub Connection String field with the connection string of the IoT Hub that we created and click on Update. Go to the Management tab and click on the Create button. The Create Device popup will be displayed. Fill the Device ID field with a new Id for your device (DJIMavicAir for example) and click on Create as in Figure 5.
In this project, we will need Azure Storage Table to store the data from Mavic Air. So, we can create it as follows. In the Azure Portal, click the on the "STORAGE" icon along the left to view your existing storage accounts (if any), then click the "+NEW" button in the lower left corner. In the "NEW" panel, select "STORAGE" | " STORAGE ACCOUNT" button. Wait for the new storage account's status to show as "Online". Select the newly created Storage account, and then click MANAGE ACCESS KEYS at the bottom of the page. Copy the Storage account name and one of the access keys.
We use Microsoft Azure Storage Explorer (https://azure.microsoft.com/en-us/features/storage-explorer/) to create the Azure Storage Table “DJITable”.
Azure Stream Analytics is used in this project to filter the sensor data that gathered by IoTHub, and stream the data to PowerBI and Azure Storage Table. The new Stream Analytics is created as follows.
In the Azure Portal (https://portal.azure.com), click the on the "New" icon along the left to see all the services, then click the "Internet of Things" item and choose “Stream Analytics job”.
Complete the fields of “Job Name”, “Resource group” and “location”, then click the "Create" button. Wait for the new Stream Analytics to show as "Online".
Now, it’s time to config the Stream Analytics Job. First, in the Inputs window, we choose IoT Hub, and in the IoT Hub Settings screen, we complete the following information:
⦁ Input Alias: DJIData
⦁ Subscription: Use IoT Hub from Current Subscription
⦁ Choose an IoT Hub: input the name used during the IoT Hub creation
⦁ IoT Hub Shared Access Policy Name: iothubowner
⦁ IoT Hub Consumer Group: powerbi
Click Next, and then Complete (leave the Serialization settings as they are).
To set up the output, go to the Stream Analytics Job's OUTPUTS tab, and click the ADD AN OUTPUT link. In the Add an output to your job popup, select the POWER BI option and the click the Next button. In the following screen you will setup the credentials of your Power BI account to allow the job to connect and send data to it. Click the Authorize Now link.
To set up the Query configuration, go to the Stream Analytics Job QUERY tab and replace the query with the following statement:
SELECT
    *
INTO
    [VelocityData]
FROM
    [DJIMavicAir]
It should be noticed that we just select all the data from IoTHub to PowerBI. Click on the SAVE button and YES in the confirmation dialog. Now that the job is configured, the START button is enabled. Click the button to start the job and then select the JOB START TIME option in the START OUTPUT popup. After clicking OK the job will be started. Once the job starts it creates the Power BI datasource associated with the given subscription.
Step 7: Create Face API Services on Azure PortalTime: 5 minutesParts: Microsoft Azure SubscriptionTools: N/AFor this part, we will create Face API that we used on Azure Portal. Login https://portal.azure.com with your username and password. Click “Create a resource”, in the Search bar, input “Face”. Then, Click “Create” to start a creation process, input your Face API name, Location, Pricing tier (F0 is enough for this project) and resource group. After the resource is created, go to your Face API page, click Keys under Resource management, copy Key 1 to your local document for further use. See picture below.
Register for a DJI Developer account: https://account.dji.com/register.
During the registration process, email information and a credit card or phone number will need to be supplied to verify registration.
Download DJI Windows SDK: http://developer.dji.com/windows-sdk/downloads. The latest version is Beta 0.3.2.
Step 9: Download and Configure the ProjectTime: 5 minutesParts: Visual Studio Community, DJI Windows SDKTools: N/AMake sure that Visual Studio 2019 Community is installed on your development PC. Download the source project from Github: https://github.com/shijiong/AzureCloudService4DJI. Then upzip all files to your local directory. Then create a folder named "DJIWindowsSDK", and copy all the DJI Windows SDK library files in it. See Figure 8 for details.
Add reference of DJIWindows SDK to your project. See Figure 9 for details
Every application needs a unique App Key to initialize the SDK. Go to the DJI Developer Website's Developer Center: https://developer.dji.com/en/user/apps. Select "Apps" tab on the left. Select "Create App" button on the right. Select "Windows SDK" as the "SDK" type. Select the "Category", enter the App Name, Package Name and "Description" of the application. An application activation email will be sent to complete the App Key generation. The App Key will appear in the developer center, and can be copied and pasted.
Open MainPage.xaml.cs, update the IoT Hub connect string with yours that generated in Step 4 on line 100, modify the App Key that you get in Step 9 on line 135, input the Azure Storage Account information that you set in Step 5. Finally, update the key_face and face_airroot with yours that you have in Step 7 on line 126 and line 127.
Rebuild the project and deploy to the local computer, you will find the UI is shown as follows.
Once the application is running, we can try to connect the DJI Mavic Air to the development PC by WiFi as we described in Step 1 and Step 2. If the application is registered, we will see “Register app successfully” in the Output window.
Click “Set Shoot Photo Work Mode”, you will see the live video stream on your PC’s screen.
Then, we can click “Shoot Photo” to take a picture and store on the aircraft’s memory. If you want to record video, you can click “Set Record Video Work Mode” and use “Start Record” to start video recording, “Stop Record” to stop.
Moreover, we will see the 3-axis aircraft velocities display on the screen, which is shown in Figure 13.
Click “Upload to IoTHub”, the application will upload the data to the Azure IoT Hub every 5 seconds. Figure 14 presents the data that captured by Device Explorer.
Click “Upload to Azure Storage”, the application will upload the data to the Azure Storage Table every 5 seconds. Figure 15 presents the data that stored in “DJI Table”.
Click “Screen Shoot”, you will see the “Screen Choose” window, choose “MyDJISDKDemo”, the application will capture the whole screen and send it to Azure Face API for face recognition.
Once it receives the response from the Azure, every recognized face on the screen will be overlapped with an orange rectangle, which is shown in Figure 17.
In this project, we have developed a UWP application targeting Azure cloud services for DJI drones, including Azure IoT Hub, Azure Stream Analytics, PowerBI, Azure Storage Table and Microsoft cognitive services. Moreover, we have demonstrated how to use the application.


Comments
Please log in or sign up to comment.