


Hardware components | ||||||
 |
| × | 1 | |||
| × | 1 | ||||
| × | 1 | ||||
| × | 1 | ||||
Software apps and online services | ||||||
 |
| |||||
Tired of waving at your motion sensor and dealing with lights that turn off while you're still in the room?
Traditional PIR sensors struggle with accuracy, missing small movements, and only guess when you're in a room. Millimeter wave (mmwave) sensors are a smarter way to automate your lighting, using precise detection to pick up even the tiniest movements, like breathing.
Ready to upgrade your setup? Let’s start by setting up the hardware.
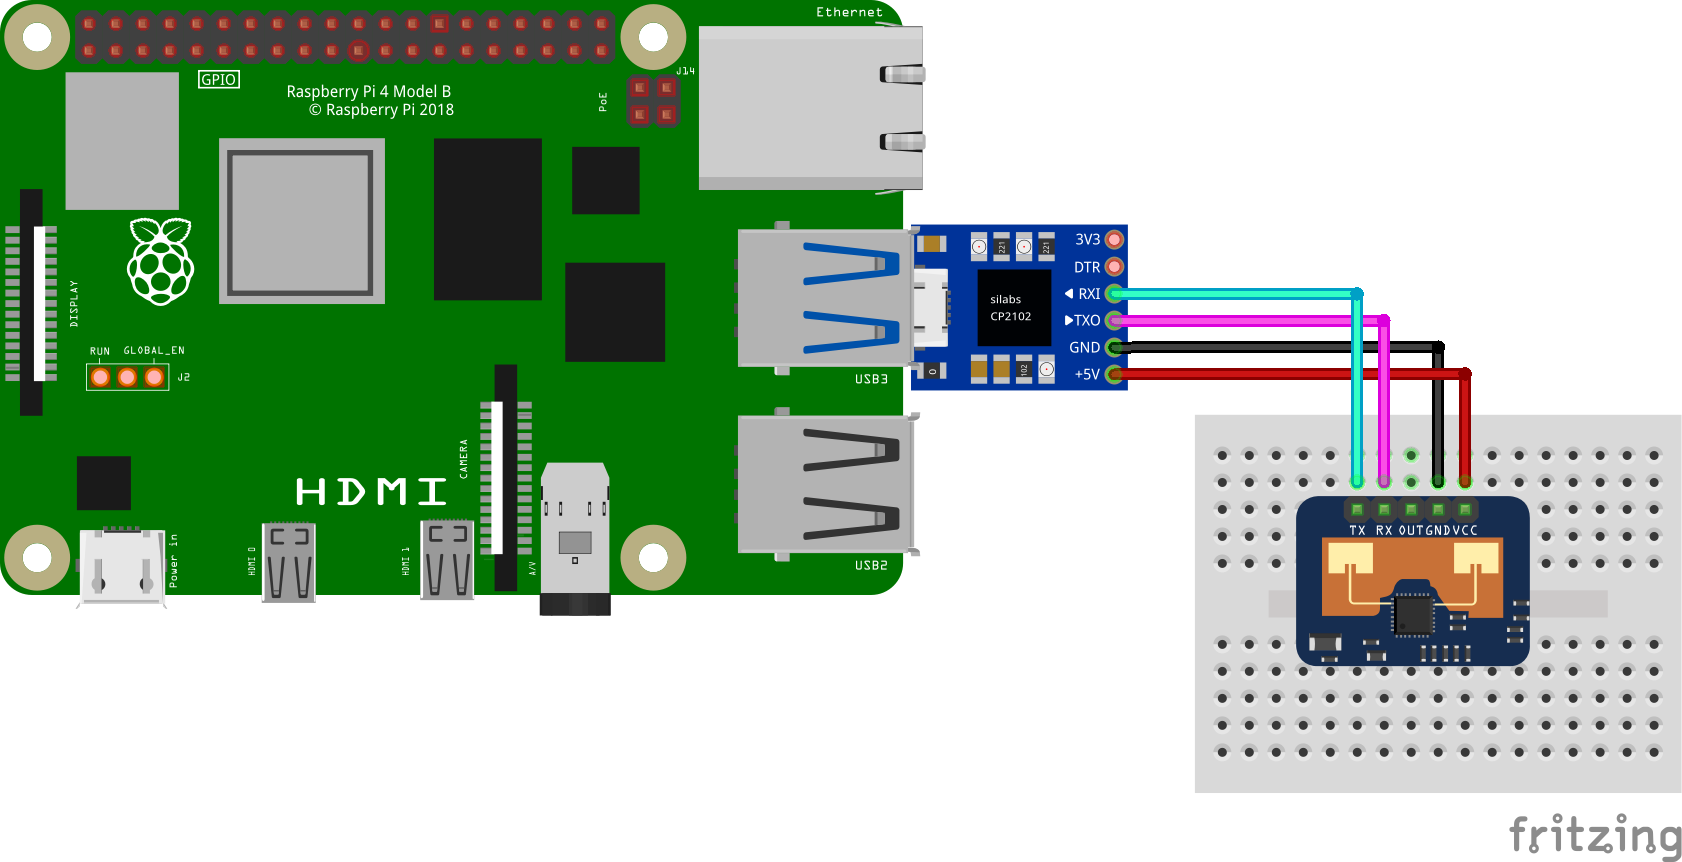
- Connect the CP2102 serial adapter: Plug the adapter into the USB-A port of the Raspberry Pi.
- Wire the LD2410 sensor to the adapter: Refer to the following wiring diagram to see how to connect the adapter to the LD2410 mmwave sensor. Make sure the transmitting pin (TX) on the adapter is connected to the receiving pin (RX) on the sensor, and vice versa. Refer to the sensor product specifications for additional details.
- Plug your Kasa smart plug into a power outlet.
- Set up your smart plug and connect it to your local Wifi using the Kasa mobile app from the App Store or Google Play.
- Find your smart plug's IP address on your router's admin page. From a web browser, enter your router's IP address (commonly
192.168.1.1or192.168.0.1) and log in using your admin username and password. Look for a section like "Connected Devices, " "Device List, " or "DHCP Clients." Locate your Kasa smart plug by its name, MAC address (shown in the Kasa mobile app), or manufacturer name (usually TP-Link). Make a note of the IP address since we'll need it again soon.
Command line alternative install thepython-kasalibrary, and enter the commandkasa discoverto locate the IP address of the connected device.
- Plug a lamp into the Kasa smart plug
Now that you have physically connected the hardware components, let's configure the software in the next section.
Set up your Raspberry PiThe Raspberry Pi boots from a USB flash drive (or microSD card). You need to install Raspberry Pi OS on a USB flash drive that you will use with your Pi. For more details about alternative methods of setting up your Raspberry Pi, refer to the Viam docs.
Install Raspberry Pi OS- Connect the USB flash drive (or microSD card) to your computer.
- Download the Raspberry Pi Imager and launch it.
- Click CHOOSE DEVICE. Select your model of Pi, which is Raspberry Pi 4.
- Click CHOOSE OS. Select Raspberry Pi OS (64-bit) from the menu.
- Click CHOOSE STORAGE. From the list of devices, select the USB flash drive you intend to use in your Raspberry Pi.
- Configure your Raspberry Pi for remote access. Click Next. When prompted to apply OS customization settings, select EDIT SETTINGS.
- Check Set hostname and enter the name you would like to access the Pi by in that field, for example,
test. - Select the checkbox for Set username and password and set a username (for example, your first name) that you will use to log into the Pi. If you skip this step, the default username will be
pi(not recommended for security reasons). And specify a password. - Connect your Pi to Wi-Fi so that you can run
viam-serverwirelessly. Check Configure wireless LAN and enter your wireless network credentials. SSID (short for Service Set Identifier) is your Wi-Fi network name, and password is the network password. Change the sectionWireless LAN countryto where your router is currently being operated.
- Select the SERVICES tab, check Enable SSH, and select Use password authentication.
Be sure that you remember thehostnameandusernameyou set, as you will need this when you SSH into your Pi.
- Save your updates, and confirm
YESto apply OS customization settings. ConfirmYESto erase data on the USB flash drive. You may also be prompted by your operating system to enter an administrator password. After granting permissions to the Imager, it will begin writing and then verifying the Linux installation to the USB flash drive. - Remove the USB flash drive from your computer when the installation is complete.
- Place the USB flash drive into your Raspberry Pi and boot the Pi by plugging it in to an outlet. A red LED will turn on to indicate that the Pi is connected to power.
Make sure you are using a 5V 3A USB-C power supply to power your Raspberry Pi 4. Using a power supply with inadequate amperage can lead to instability, throttling, or unexpected behavior. Additionally, while USB boot is enabled by default on newer Raspberry Pi 4 models, older versions may require a firmware update to enable it. Refer to the Raspberry Pi documentation for detailed setup instructions and compatibility.
- Once the Pi is started, connect to it with SSH. From a command line terminal window, enter the following command. The text in <> should be replaced (including the < and > symbols themselves) with the user and hostname you configured when you set up your Pi.
ssh <USERNAME>@<HOSTNAME>.local- If you are prompted "Are you sure you want to continue connecting?", type "yes" and hit enter. Then, enter the password for your username. You should be greeted by a login message and a command prompt.
- Update your Raspberry Pi to ensure all the latest packages are installed
sudo apt update
sudo apt upgrade- In the Viam app under the LOCATIONS tab, create a machine by typing in a name and clicking Add machine.
- Click View setup instructions.
- To install
viam-serveron the Raspberry Pi device that you want to use to communicate with and control your webcam, select theLinux / Aarch64platform for the Raspberry Pi, and leave your installation method asviam-agent.
- Use the
viam-agentto download and installviam-serveron your Raspberry Pi. Follow the instructions to run the command provided in the setup instructions from the SSH prompt of your Raspberry Pi.
- The setup page will indicate when the machine is successfully connected.
- In the Viam app under the CONFIGURE tab, click the + icon in the left-hand menu and select Component.
- Select
sensor, and find themmwave:mmwavemodule. This adds the module for getting readings from your LD2410C mmwave sensor. - Name the component
mmwave-sensor.
- Click Save to apply your configuration changes. This may take a moment.
- Expand the TEST section to view the readings detected by the mmwave sensor.
TROUBLESHOOTING: Double check the wiring on your sensor component. Also check under the LOGS tab to see what might be going wrong.Configure your smart plug
- In the Viam app, let's configure the rest of our hardware so that your machine can communicate with the smart plug over wifi. Click the + icon in the left-hand menu and select Component. Select
generic, and find thekasa:switchmodule. This is a generic module that's been configured to use thepython-kasalibrary. In other words, it's a layer of abstraction that lets us use the Kasa manufacturer's APIs with Viam.
- Add this module and re-name it
kasa-switch. - Notice adding this module adds the generic hardware component called
kasa-switchas well as a module calledkasasmartplugwhich contains the logic for how our Raspberry Pi and smart plug work with each other. - Under the CONFIGURE section of the
generic-1card, add your own smart plug's IP address that you found in a previous step, formatted like the following.
{
  "plug_ip": "192.168.1.169"
}- Save your updates.
Now that we've connected and configured both the smart plug and the mmWave sensor, let's program the lamp to power on or off based on the sensor's detected states.
We've already learned how to use a prebuilt Viam module to work with hardware components. In the next section, we'll set up a presence detection service using a prebuilt Viam module that contains the control code for working with the hardware that we've already configured.
Configure the presence detection service- In the Viam app under the CONFIGURE tab, click the + icon in the left-hand menu and select Service.
- Select
generic, and find themmwave-kasa:mmwave-kasamodule. This adds the module for controlling the smart plug based on detected presence. - Name the service
presence-detector. - In the new
presence-detectorpanel, configure your service by adding the following attributes in the CONFIGURE field. This tells your presence detector service to use specific components within your Viam machine (identified by component names in the Viam app).
{
  "kasa": "kasa-switch",
  "sensor": "mmwave-sensor"
}- Click Save to apply your configuration changes. This may take a moment. The LED will display a ripple effect when the program begins.
- Once the program begins, the smart plug should turn on when the state detected by the sensor is "Moving Target" or "Static Target". You can view the logs under the LOGS tab for more details about what's happening behind the scenes, and the detected states as they correspond to the LED.
- Update the code: To further customize the logic of the smart light, you can use this starting code and create your own Viam module.
- Update the hardware: If you don't have a smart plug, you can add a visual indicator light to light up an RGB LED.
- Assemble an mmwave sensor enclosure: I found an existing design that I liked. Since the design had enough space to accommodate wires, I simply switched from female-to-male to female-to-female jumpers. You could also solder the connections if you wish. The enclosure includes a slot to securely slide the mmWave sensor into place, ensuring it is oriented correctly for detecting motion and presence.


Comments
Please log in or sign up to comment.