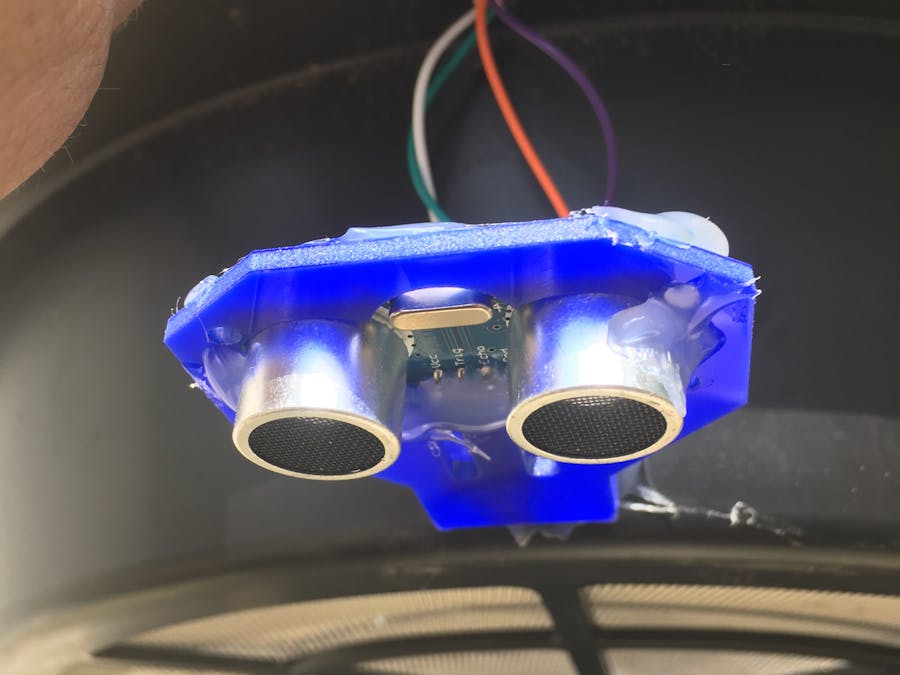
The drought that South Africa is facing an in particular the Western Cape has meant that many people have installed rain water tanks to their homes, to supplement their water supply. We (BIGBrave) wanted to do something to help! So using the learnings of our Beverage Insights product and the mad coding skills of one of our resident wizards (GuyDelta) we put together this awesome DIY IoT project with some easily sourced electronics and some free online tools, namely Adafruit IO and Arduino IDE.
Adafruit Huzzah ESP8266 with an ultrasonic sensor to measure water tank volumes and connected to an MQTT feed.
1. Goal:This project provides the ability to calculate and report the total litres of water within cylindrical water-tanks, more specifically rainwater tanks connected to a rainfall-gutter-collection system. Using the Adafruit Feather Huzzah ESP8266 and an HC-SR04 ultrasonic sensor communicating to an Adafruit IO dashboard via MQTT, this provides the ability to collect and monitor tank volume in real time in any web-browser on any device, as well as providing the ability to set notification triggers.
Based on the Adafruit MQTT Library ESP8266 Example written by Tony DiCola for Adafruit Industries and the Ultrasonic Sensor HC-SR04 and Arduino Tutorial written by Dejan Nedelkovski, www.HowToMechatronics.com
The following are component and tool lists that is used to build this project, however, the project is flexible enough to be utilized with many alternate configurations. If you are only interested in the setting-up of the ESP8266, installation of its code, and communication with the Adafruit IO dashboard, you can skip to step 2. Setup below.
1.1. Component List- 1 x Adafruit Feather Huzzah ESP8266 https://www.adafruit.com/products/2821 (Or equivalent ESP8266 board)
- 1 x HC-SR04 Ultrasonic Sensor
- 1 x HC-SR04 Ultrasonic Sensor pre-cut holder
- 1 x Male/Male USB to Micro-USB cable
- 1 x 5v USB charger adapter
- 10m x 4 core alarm cable
- 1 x ABS Hammond Housing
- Solder
- Hot Glue
- Soldering Iron
- Glue Gun
- Drill
- Arduino IDE
Setup and create an Adafruit IO account at https://io.adafruit.com/ and make note of your username and key.
Download and install the ESP8266 USB to Serial drivers according to the following example:https://learn.adafruit.com/adafruit-huzzah-esp8266-breakout/using-arduino-ide
The following driver worked for us: https://www.silabs.com/products/development-tools/software/usb-to-uart-bridge-vcp-drivers
Download and install the Arduino IDE and the Adafruit Feather – and Adafruit MQTT libraries.https://www.arduino.cc/en/Main/Software
https://learn.adafruit.com/adafruit-all-about-arduino-libraries-install-use/how-to-install-a-library
After completing the install, replace the Adafruit_MQTT_Client.cpp file in your arduino library with the latest version from https://github.com/adafruit/Adafruit_MQTT_Library
The remainder of the setup will require your WIFI SSID and Password.
If you have any trouble setting up the development environment, and setting up the board to communicate with the ultrasonic sensor, the following tutorials might help:
https://learn.adafruit.com/mqtt-adafruit-io-and-you?view=all
https://github.com/adafruit/Adafruit_MQTT_Library/blob/master/examples/mqtt_esp8266
howtomechatronics.com/tutorials/arduino/ultrasonic-sensor-hc-sr04/
2.2. Configure source for your environmentDownload levelup_mqtt_esp_ultrasonic.ino from https://github.com/BRAVETech/levelup-adafruit-huzzah-esp8266-ultrasonic-sensor
Look for the following lines and replace with your information:
#define WLAN_SSID       "... Your WIFI SSID here ..."
#define WLAN_PASS       "... Your WIFI Password here ..."
#define AIO_USERNAME    "... Your Adafruit Username here ..."
#define AIO_KEY         "... Your Adafruit Access Key here ..."
const int TANK_RADIUS = 38; //Radius in cm, max: 32767
const int TANK_HEIGHT = 185; //Full height in cm, max: 32767
const float CAL_FACTOR = 0.0344; //Calibration factor, this value is based on sound velocity
If you are a bit more adventurous and have multiple tanks connected in series, then a simple multiplication in the whatis_volumefunction will give the total volume, provided each tank is the same volume. Change return liters; to return liters * x; where x is the number of tanks e.g. return liters * 3;.
Upload this code to the device using the Arduino IDE.
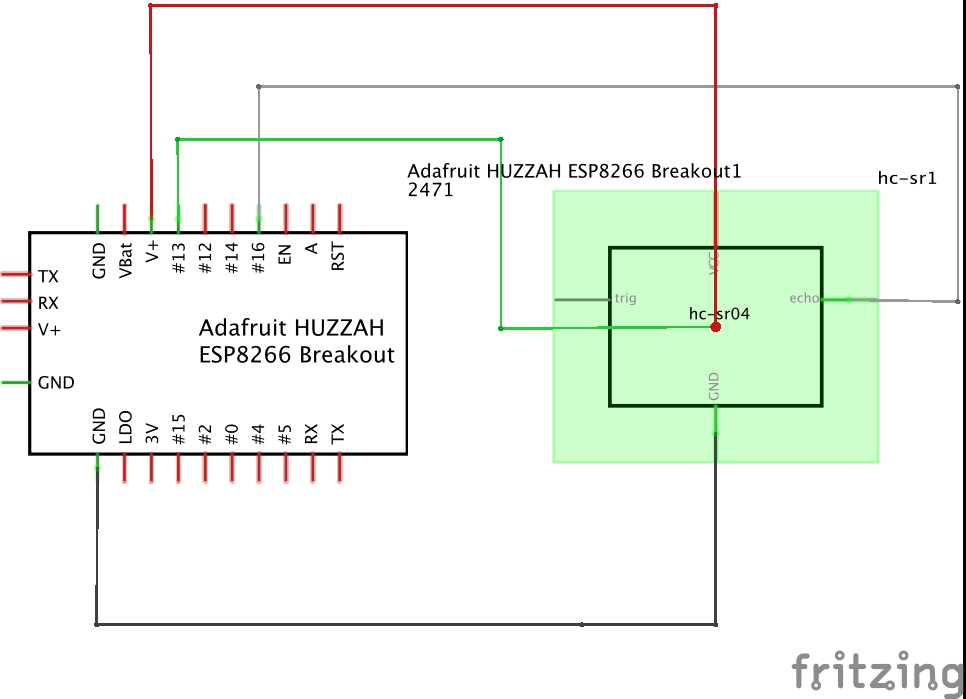
3. BuildConnect the HC-SR04 Ultrasonic Sensor to the Adafruit Feather Huzzah ESP8266 digital pins 13, 16, GND and USB as per the table below.
Adafruit Feather Huzzah ESP8266 - HC-SR04 Ultrasonic Sensor
USB 5v - VCC
GND - GND
PIN 13 - TRIG
PIN 16 - ECHO
The rain water tank system that we kitted out has 3 tanks connected in series. We installed the HC-SR04 Ultrasonic Sensor in a tank that did not have a water inlet connected to it so we didn’t need worry about splashes etc.


Comments
Please log in or sign up to comment.