


Hardware components | ||||||
_ztBMuBhMHo.jpg?auto=compress%2Cformat&w=48&h=48&fit=fill&bg=ffffff) |
| × | 1 | |||
 |
| × | 1 | |||
 |
| × | 1 | |||
 |
| × | 1 | |||
 |
| × | 1 | |||
 |
| × | 1 | |||
Software apps and online services | ||||||
 |
| |||||
Hand tools and fabrication machines | ||||||
 |
| |||||
It is easier to use chassis kits and accessories to build car robots.
Chassis kits provide everything to build robots with most microcontroller boards. You'll use the following Parts to build chassis kits.
2WD Robot Smart Car Kit x1
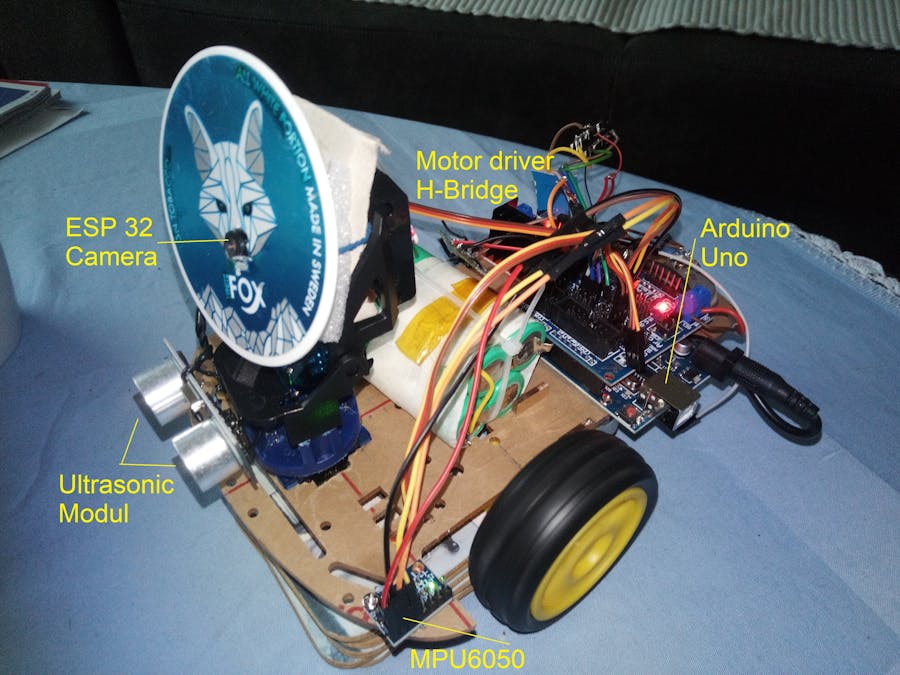
About this projectThe basic idea was to build a module that can be controlled and is suitable for car networking. This paper shows the design and building of a cheap smart Arduino module 2WD, controllable via serial line. My solution uses MPU 6050 and corresponding software to correct the motor's hardware imperfection that prevents the robot car from not going straight. The commands for control are defined as a standard.
It is based on open source hardware Arduino and offers a plurality of communication possibilities, like USB, Wi-Fi, Ethernet, serial PC radio control or Bluetooth. The result of this work is a configurable and adaptable user interface for the Automotive Demonstrator that can be easily updated, customized and made accessible for new applications without the need to update or rebuild the program.
Wi-Fi is most common protocols that mobile devices have. In my previous projects I added an ESP32-CAM camera module and connected serial to the Arduino Uno on the Robot and so building a remote control for car robots and RobotArm. I also created a project to have a mobile device interact with the ESP32 board over Wi-Fi. I will show how you can use different devisec, which are responsible for controlling the wheels and for streaming and object or face detection. The simplest Arduino is responsible for motor functions. ESP32 can regulate image streaming and image recognition. It can also generate controls for driving in "follow mode", which will be explained in another project.
What you need
Any of the devices shown in the picture above can be used as a controller for Platform. As I said, you can use different devices and customize commands to suit your needs. In many cases, we not only want to transmit a command (“drive straight ahead”), but also the associated numerical values (“how long?”, “how fast?”, “how far?”).
For example, to control a robot, we could use the commands “Left” and "Right", each followed by a number that indicates how much throttle the corresponding motor should give.
In project “Remote control and Video Monitoring with ESP32 for Robot “we have use a table for different commands. For our purposes we modified the table a bit and we have the following commands:
Buttons to move the car in Left, Right, Forward and reverse directions
To control a camera, we could change the commands, for example instead of "2" for left and "4" for down, would be a full command for servo to horizontal position or servo to vertical position, each followed by a number representing the indicates angular positions.
CodeFor the project we use ready-made solution from my previous project. The complement consists in the subprograms, which are responsible for servo control and program part loop, where commands coming over the serial interface will be called. A part of main program in loop was changed to enable communication with serial connection to computer or other connected control device.
In part "case switch" all needed functions were called. Some direct and some via control variables.
In the "Loop" program part, the "Forward" and "Back" subroutines must remain fixed, as it is very important for them to be constantly updated, which, however, applies to the rest of the servo function too. The others such as "Left", "Right" and "Halt" by the call need to be executed only once.
The basic program for driving straight ahead is explained in detail on the page here.
In store there are a lot of different apps for controlling Robot. It's about the same principle. However, the difference is in the graphic design. To easily use the HC-06 Bluetooth module to control the robot/robot arm, we particularly use the APP control.
In the simplest App there are 10 control keys. When connect well the HC-06 Bluetooth module to Android phone using an APP, press the control key, android phone will send and receive a corresponding value.
I added some new commands to the command set. Commands V and H are in two parts. With the Serial.ParseInt you can read several characters from serial. Thus value of Angle is updated. Subroutine MovToV() and MovToH() then control servo at specified position.
For example, to control a servo, we could use the commands '2' for "left" and '3' for "right", or commands '4' for "down" and '1' for "up".. For both movements there is a speed limit of 1° in 40 ms (command delay(t)). So you get better quality of the picture in the movement.
But if we want an accurate angle for servo control, then we use command H or V for horizontal or vertical positioning, each followed by a number, which specifies which position server should put. A complete command that can be entered in the Serial Monitor or sent by Processing would be e.g. "H120" or "V-60".
Subroutine SchwenkV () and SchwenkH() allow servo to move in specified direction, but at a slower speed, 1° in “t” ms (standard t=40ms).
Both subroutines have preset limits for border movement. Vertical camera movement subroutine limits movement between 50° and 130°. However, there is no restriction for movement in horizontal.
Subroutine mov() sets the camera back to the start position (90°) for panoramas and tilt servo. The program is also in main loop and becomes active when command "5" comes on serial interface.
Subroutine stp() sets all variables to zero for performing new servo motion.
The subprogram "halt()", which stops movement of the module, already contains the subprogram "stp()", which stops all servos.
After installation, if everything is well connected, you can test motors with a simple program. It's important that subroutine like Forward or Backward works well. Also function like left or right should work fine if everything is well connected.
The concrete use of this platform, as shown in the video, can be read in these tutorials.
Remote control and Video Monitoring with ESP32 for Robot
ConclusionSuch a robot car can be used for various purposes. This robot can be used in industry. Also, can be used in military fields or by the civil defensemen to help in the detection of survivors when natural disasters or wars. The possibility of development to add an arm of the car and is programmed to assist in conducting experiments in scientific laboratories,, for example. Such usage can be found in Tutorial here.


_3u05Tpwasz.png?auto=compress%2Cformat&w=40&h=40&fit=fillmax&bg=fff&dpr=2)
Comments
Please log in or sign up to comment.