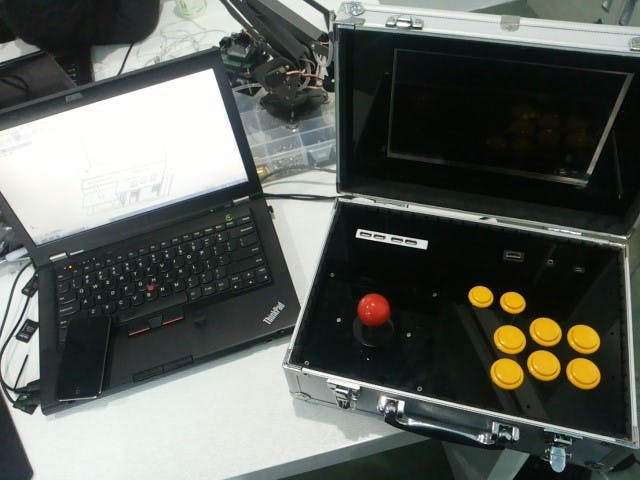
The Proto Mech is from Xefili’s DIY Arcade Kiosk, we made some improvement so that it can be more easily carried around and be more simplified. Here is how we make it, and if you just want to play some Arcade Game, or you don’t want to be bothered with the hardware problem, you can just download the Image File of our system to your Banana Pro, then all is done.
Software
Our system is based on the Arch Linux, and here is the improvement:
- Updated Arch Linux to last release
- Updated kernel to 3.4.103
- Framebuffer fixes under X11
- Now the emulator, if in frame buffer, will executed automatically on tty2, not more in X11. This helps to prevent flickers issues
- Now exiting the emulator, if in frame buffer, the program goes back to X desktop refreshing the view --NOTE: the refresh is done via this script:
/home/bananapi/screen_reset.sh.Edit the script to fit your screen resolution
- Added emulation station in frame buffer mode (edit/add themes or manual scraper in /root/.emulation station)
- Added skin for emulation station
- Fixed execution of Retroarch in frame buffer and X11
- Removed old instructions from this thread due outdated Retroarch, joy pad auto start
- Uninstall the LX panel and LX RandR of the LXDE to remove the desktop and cursor
First, you should download the .iso file form this link: http://forum.lemaker.org/thread-6212-1-1-_copy_this_link_to_quote_.html It’s in the DOWNLOAD ISO block.
The .iso is suitable for a 8GB card. Pay attention to it!
Then, if you have a Banana Pro and a monitor with BGA, burn the .iso to your SD card, then you can help yourself play the Arcade Kiosk!
Before it, we could remove the Florence virtual keyboard-which has been removed by Xefil in the latest vision of the .iso. But what we used is the previous vision, so we have to do this. It is easy by typing “pac man –R Florence” in the command line mode when you are logging in with root. Make it to auto start the RetroArch, to which we devoted our whole month.
Before it, we could remove the Florence virtual keyboard-which has been removed by Xefil in the latest vision of the .iso. But what we used is the previous vision, so we have to do this. It is easy by typing “pac man –R Florence” in the command line mode when you are logging in with root.
Xefil installed LXDE desktop environment for the .iso. So we can find the auto start programs in the '/etc/xdg/lxsession/LXDE/autostart', vim it, we can remove the auto start of Florence.
After this, when you reboot the .iso, you can find the Florence disappeared. The first stage end.
Now we have to make the Retro Arch autostart. Also vim the ‘/etc/xdg/lxsession/LXDE/autostart’, add this line to it: @/home/bananapi/scripts/retroarch_framebuffer_start.sh. Then we can get the RetroArch autostart.
Then we could enjoy the Retro Arch starting when the machine starts. It’s good. But there is a drawback that the icon of mouse still remain in the screen. We must remove it, it affects our playing!
How could we remove it? We know that Arch Linux essentially has no desktop. It has because we installed LXDE. So if we remove LXDE, the problem will be solved. But the auto start relies on lxsession, part of LXDE. So we can’t remove all of the LXDE. So we remove part of it! Yes, we could remove the LXpanel and LXRandR, then the mouse icon will disappear. Do this by typing: pacman –R LXDE, please choose what you want to remove.
Up to now, we could get the Retro Arch to auto start, but if we want to change the VGA monitor to LCD, we should change the script.bin. Change it to the LCD file. Thus, we could get the portable Arcade.
HardwareWe use a suitcase as the container of the Banana Pro, LCD, buttons, rocker and other hardware, this is also why we called it “Case”.
After you download the CAD file and get the part with your ideal material,you can assemble it follow the instructions: the holder can be wooden, Aleckplate and even metal.
After you download the CAD file and get the part with your ideal material, you can assemble it following the instructions:
The first part that you should operate is the bottom part, as you can see, the bottom part is the base. There are many location holes on it to solidify the structure of the holder. You will need some columns of 65 mm and 40 mm to support the structure.
Banana ProThe Banana Procan be fixed on the bottom part with columns, and you can change the position to fit your requirement. To make it more easy to exchange the SD card we suggest that you make reverse side of Banana Pro upwards.
There are two cocked parts to make the structure sealed and limit the height of the columns.
Rocker & Driver BoardThere is a part used to fix the rocker to the columns. And the driver board is fixed to the bottom part. The driver board of rocker is also the driver of the buttons. The driver board connects with the Banana Pi/Pro through the USB port.
LCD & Driver BoardThere are rockers, buttons, micro USB power input, audio output, HDMI output and 4 USB ports on the panel. These I/O ports are connected to Banana Pro through extension cord. With USB ports you can connect keyboard and mouse to the system, just like a computer with LCD screen.


Comments
Please log in or sign up to comment.