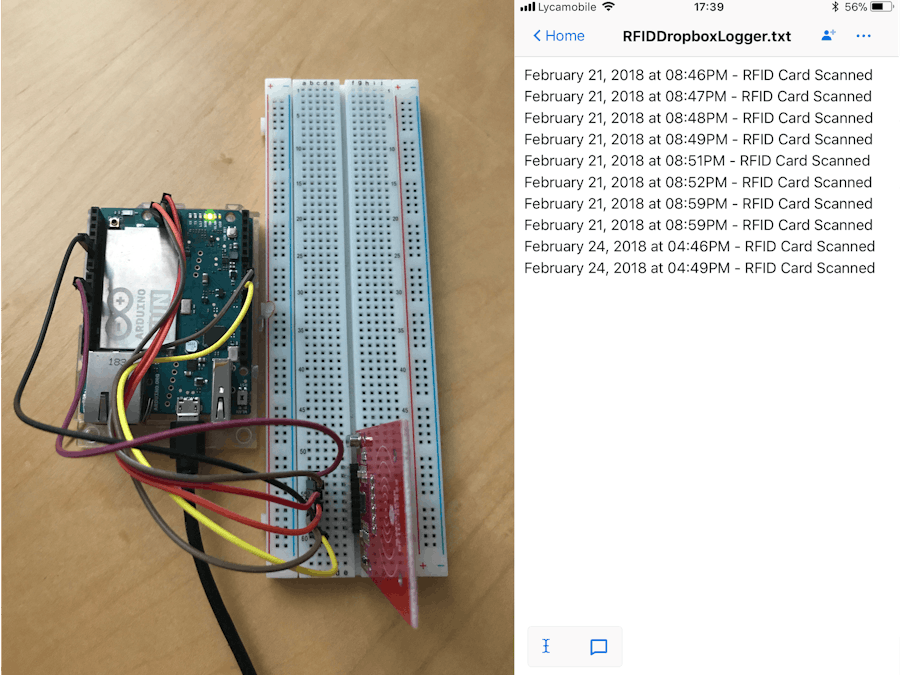
Have you ever wanted a system that keeps track of the time at which your employees arrive to work, have you ever wanted to check the time at which a person enters your room (I have), this device aims to make all of that as simple as possible. RFIDDropboxLogger will keep track of everyone scanning an RFID card using an RFID module and will write to Dropbox whenever it happens to keep you updated with all the information. Thanks to IFTTT, this is all possible and easy to do.
This project will require IFTTT to work, to connect to IFTTT we will have to use another cloud-based platform called Adafruit IO. This platform will allow us to easily connect our Arduino Yún to the Cloud and then to IFTTT. Here is an image illustrating the process.
The Arduino Yún will monitor the RFID module searching for a card, when one is detected, the micro controller will increment the value to send by 1 and then parse the value to Adafruit IO. Using an IFTTT trigger, whenever a change in value is detected on Adafruit IO, (in our case, the variable incrementation) the app will trigger a Dropbox trigger which will append the time at which an RFID card had been scanned to a text file. Note that this operation will last approximately 15 minutes. Here is an image illustrating the code.
If(RFID Card Present)will check if an RFID card is present.
Increase valuewill increment the value to send by 1.
Send valuewill send the incremented value to Adafruit IO.
An Adafruit IO and IFTTT accounts are required to create the project, a guide to creating these is in Constructing the Project below.
BenefitsThe user operating this project will benefit in:
- Monitoring RFID usage
- Monitoring time of RFID usage
- Monitoring amount of times the RFID module has been used
Step 1: Required Apparatus
The project requires very few things.
- Jumper Wires (Male to Male & Male to Female)
- 1 Breadboard
Step 2: Connecting the Circuit
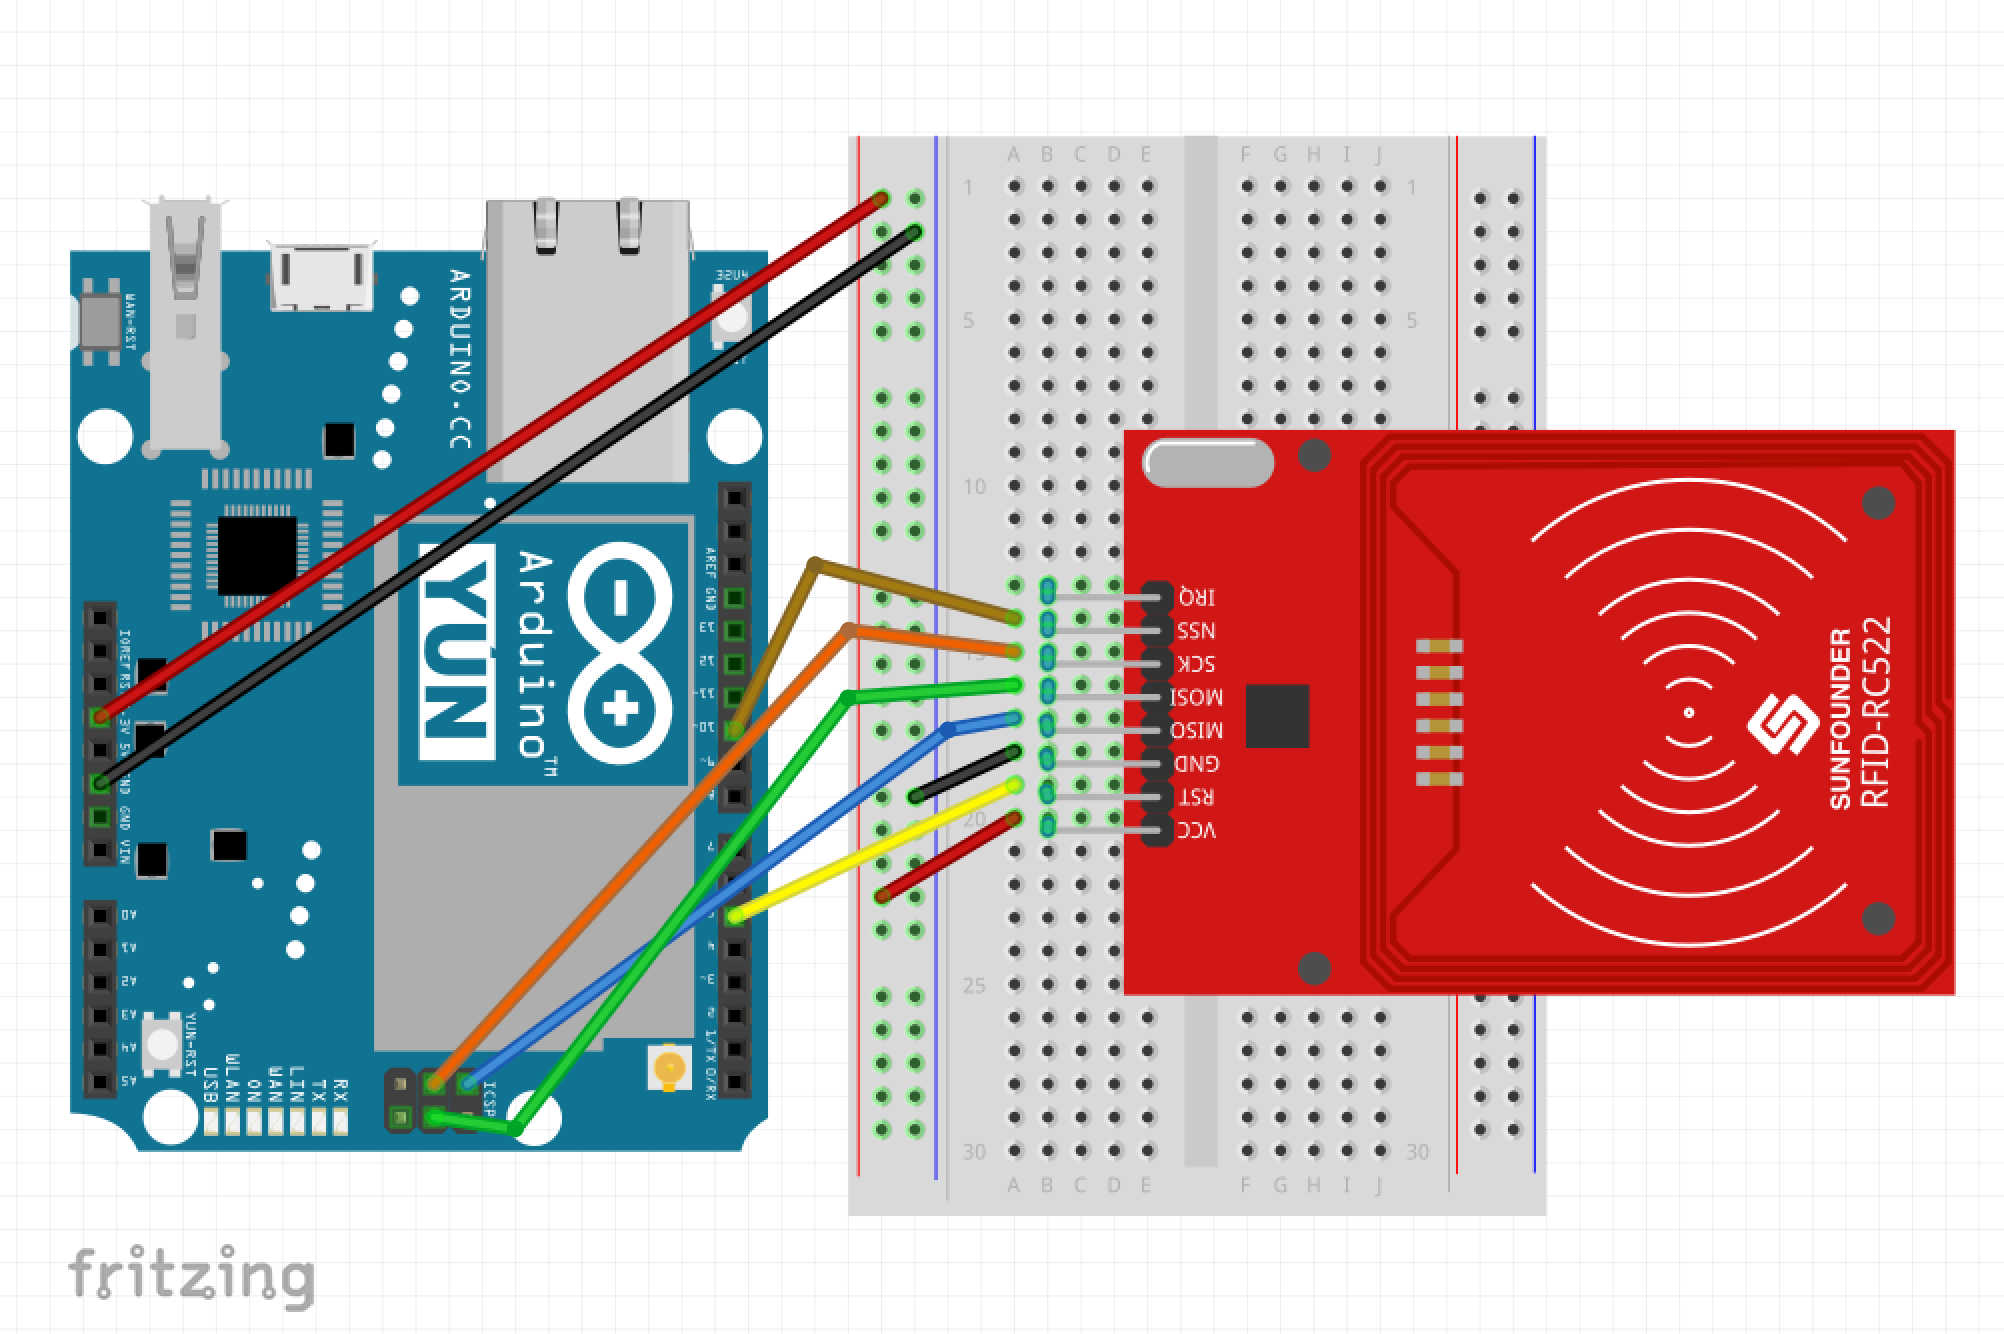
A simple circuit, just connect the RFID module to the Arduino Yún. Here is an image displaying the project's schematics.
Step 3: Acknowledging the Code
There are three main parts to the code:
- connect to MQTT
- search for RFID
- send value
Each part will be explained below.
- Connect to MQTT
void MQTTConnect()
{
 int8_t ret;
 if(mqtt.connected()) // if already connected
 {
   return;
 }
 if(proDebug == 1)
 {
   Serial.println("Connecting to Server");
 }
 while((ret = mqtt.connect()) != 0) // attempt to connect
 {
   if(proDebug == 1)
   {
     Serial.print("  Error - ");
     Serial.println(mqtt.connectErrorString(ret));
     Serial.println("  Attempting Reconnection in 5 seconds");
   }
   mqtt.disconnect();
   delay(5000);
 }
 if(proDebug == 1)
 {
   Serial.println("  Success - Connection Established");
   Serial.println("Scan Card");
   Serial.println("");
 }
}
This part of the code will connect the Arduino to MQTT services on Adafruit IO, this will allow the Arduino Yún to write to a Feed on Adafruit IO.
- Search for RFID
if(!mfrc522.PICC_IsNewCardPresent())
 {
   return;
 }
 if(!mfrc522.PICC_ReadCardSerial())
 {
   return;
 }
 String content = ""; // string to store card id
 // store card id
 for(byte i = 0; i < mfrc522.uid.size; i++)
 {
   // store the card id number in a variable
   content.concat(String(mfrc522.uid.uidByte[i] < 0x10 ? " 0" : " "));
   content.concat(String(mfrc522.uid.uidByte[i], HEX));
 }
This part will search for a new RFID card and continue with the code once one is found, the card's ID is also collected and stored to a variable though not essential.
- Send Value
valueToSend++; // increase value to trigger write
 if(proDebug == 1)
 {
   Serial.print("Publishing ");
   Serial.println(valueToSend);
 }
 Console.println(valueToSend);
 if(!sendToDropbox.publish(valueToSend))
 {
   if(proDebug == 1)
   {
     Serial.println(F("  Error - Failed to Send Data"));
   }
 }
 else
 {
   if(proDebug == 1)
   {
     Serial.println(F("  Success - Data Sent"));
   }
 }
This part will increase the send value variable by 1 so that IFTTT can detect a change. Then the value will be sent to Adafruit IO, after the variable is parsed, the Arduino will verify that it has been sent.
This loop will repeat continuously allowing cards to be constantly scanned, it may take about 15 minutes for IFTTT to check if the value on the Adafruit IO feed has changed.
Setting up the Variables
Ensure that all variables marked TODO are edited to preference. Insert your Adafruit IO credentials in the appropriate sections (configuration illustrated below) and set proDebug to 1 or 0. Note that mode 1 will enable debugging and will require connection to a Mac/PC and the Serial Monitor open to work. Default set to 1.
Libraries
- Bridge & Bridge Client - copyright (c) Arduino LLC under the GNU Lesser General Public Licence, this library is in the public domain.
- Console - copyright (c) 2013 Arduino LLC under the GNU Lesser General Public Licence, this library is in the public domain.
- SPI - copyright (c) 2015 Hristo Gochkov under the GNU Lesser General Public Licence, this library is in the public domain.
- MFRC522 - this library is in the public domain.
- Adafruit MQTT & Adafruit MQTT Client - copyright (c) 2015 Adafruit Industries under the MIT Licence.
Adafruit IO Setup
- Step 1: Download libraries
The first thing to do is to open the Arduino Library manager and search for Adafruit_MQTT_Library, and then download it.
- Step 2: Create an Adafruit IO account
Follow the images below illustrating this process.
- Step 3: Configure Adafruit IO
Follow these images to configure feeds for the Adafruit IO communication with IFTTT.
IFTTT Setup
Nearly there, now we have to configure IFTTT to finish the project off. Use the following steps to configure IFTTT; if you already have an IFTTT account, you may skip the first step.
- Step 1: Create an IFTTT Account
You can download the IFTTT app for Apple or Android if you want, the setup in this tutorial will be done on the app, but it can also be done on the IFTTT Website. Follow the images below to set up your account.
- Step 2: Create a Trigger
We will use the app for this step as it is slightly easier, follow the images for the setup.
Setup
Follow the images below to get the credentials required for the project.
Obtaining your username is easy, just copy your username and paste it in the required location int the Arduino Sketch. Now connect your Arduino Yún to your Mac/PC and upload the code.
BackgroundI was recently thinking of a way to track the number of times an RFID module has been used, and to monitor the time at which it has. I happened to think about Dropbox at the same time and decided to create an Arduino Yun that parses RFID module operation data to a text file on Dropbox.
The Arduino Yun will monitor the amount of times that the RFID module has been activated and if set up, IFTTT will send the user a notification with the number of times that the module has been activated for.


Comments
Please log in or sign up to comment.