


Hardware components | ||||||
 |
| × | 1 | |||
| × | 2 | ||||
Software apps and online services | ||||||
 |
| |||||
Hand tools and fabrication machines | ||||||
 |
| |||||
 |
| |||||
Halogen lamps are slowly but surely becoming obsolete in EU. Not to mention their energy efficiency, which is much worse compared to modern LED light sources. We have two ceiling lights (Artemide Mercury) in our living room that used halogen lamps. We bought them in 2012, there was no LED option at that time. Today they are offered only with LEDs. Each of them had two R7s lamps with max. permitted power 160W. That means total of 4 x 160 = 640W nominal power for the entire living room. Even with such power the light intensity wasn't what we expected. The heat though...From time to time insects used to get trapped in the bulb fixture. Thanks to high temperature they got cremated quickly.. As a result of this an awful smell filled the room.
The intensity of each halogen lamp was decreasing over the time until it burned out. The average lifetime of a lamp was just a couple of months, meaning I had to replace them more often than I would like to.
LED is the wayOver the last few years various LED versions of R7s were introduced to market. I was so happy when I learned that, but after testing many of them I was disappointed and went back to halogen lamps. Why? The LED R7s are much thicker - the higher power, the bigger the diameter. I was limited to 20-25mm in diameter, that's what the light's lamp socket allowed. At that size the light intensity of the "COB bulb" was too weak. The second reason was the lifespan of these LED bulbs, they lasted only a few weeks, I even had one or two that blew on first try. Adding a financial factor, the price of LED R7s is much higher than halogen R7s, while their service life is much shorter. I'm not paying for that.
LED strips!I already had a bunch of LED strips in my home (stairs, fish tank, pond) and they were working for years so I was tempted with an idea to put them on these electricity eating monsters. But how? I wanted to preserve the lamp's aesthetic. My wife was not fond of the idea of meddling with it. Another question (or obstacle) was the placement of power supply for LED strips. It had to be quite powerful and hidden. But the space was limited, the hollow inside the light is only 25-30mm of space in height.
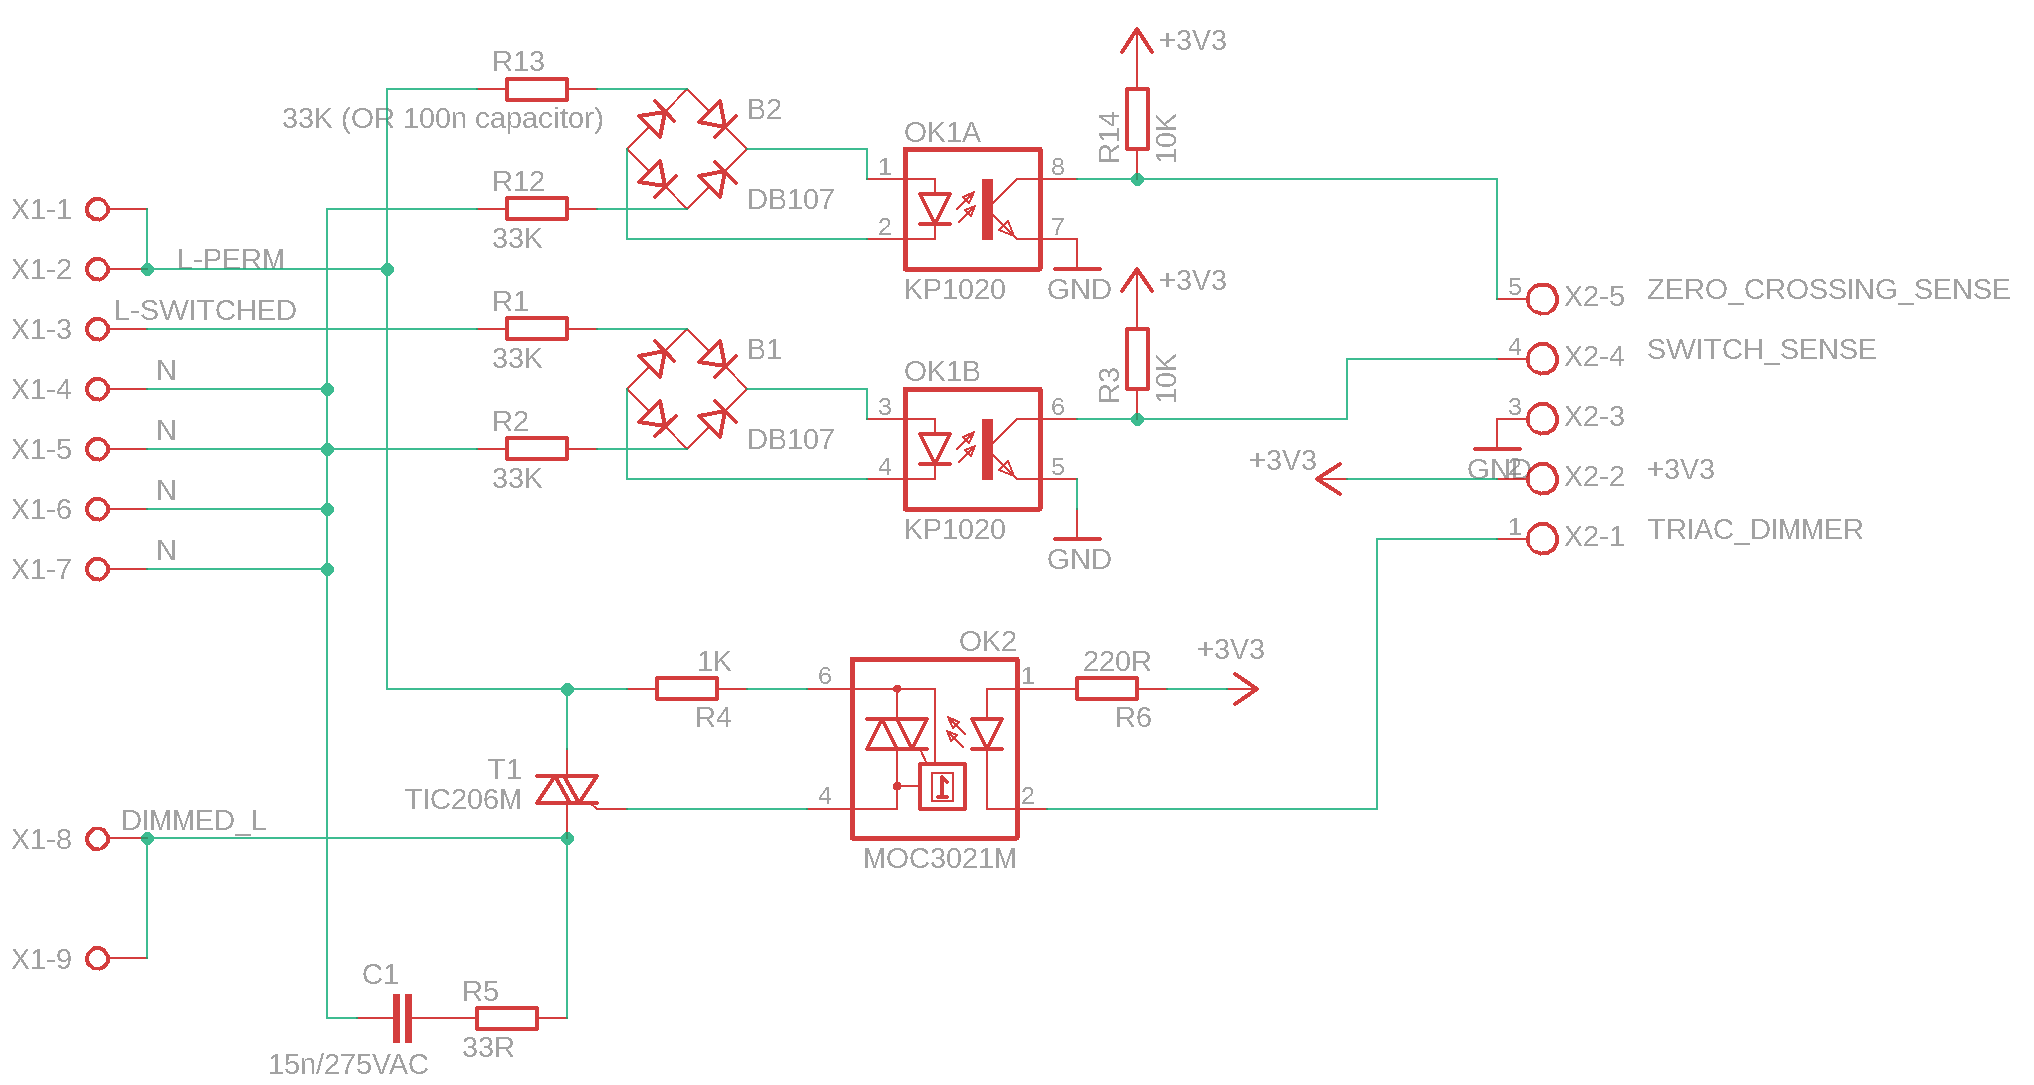
DimmingWhat kind of a LED light would that be without dimming, right? I already worked on a bunch of other projects driven by ATmega, ESP8266 so I was familiar with PWM regulation. But here we're talking about regulating up to 8A current. That's not a job for a regular power transistor. A MOSFET is perfect for such task.Mind you, at this phase of the project I was still considering to keep the halogen lamps in place, just adding the LED strip as a second source of light. So if I'm putting a micro controller into the light, let's use it also for controlling and dimming the halogen lamps. I already had a proven solution with a triac and opto-coupler.
First prototypeAfter experimenting on bread board I finally came to a working prototype.
Components:
- Controller: 4ch relay board with ESP8266
- PWM generator: Arduino Nano
- 12V DC LED dimmer: P-channel MOSFET IRF9Z34N
- 230V AC dimmer: Triac TIC206M
- Opto-coupler for driving the triac: MOC3021M
- Zero-crossing sensing: KP1020
- LED strip: SMD 2835, double row, 12V, 480 LED/m, 20W/m, neutral white (4000K), 5m (actual used length was approximately 4m)
- Power supply: 12V /100W
- IR receiver: TSOP4838
- Temperature sensor: DS18B20
- Custom made PCBs for MOSFET dimmer and 230V AC dimmer
- Code written in Arduino IDE, front-end control via HTTP web site on my home server (Linux + Apache + PHP + MySQL + JS)
Functions:
- Dimming LED strips - 12V DC
- Dimming halogen lamps R7s - 230V AC
- Control ON/OFF with existing wall switch
- Control with web site
- Control with IR remote control
- Delayed off when light turned off with wall switch
- Temperature measurement
- OTA
Constant power
Normally the light has power only when the wall switch is turned on. If we want to use a controller to turn on the light remotely, it has to have power all the time, even when the wall switch is off. But the wall switch has to remain operational. The cable between switch and the light has three wires: live (via wall switch), neutral and earth. I decided to use the earth wire to deliver constant live power to controller. I fully understand the risks it may pose and I'm aware it's against the code, but since this device is out of reach and the possibility someone would get hurt by touching it is very low, I decided to accept the risk. But I strongly advise anyone against doing the same stupid thing.
MOSFET heating
During the bread board experiments I found out that the chosen MOSFET is getting hot when fully switched on or during duty cycle values above 50%. So I split the LED strip into two segments and used two MOSFETs with heat sinks as big as the space allowed. Still not enough. The heat sinks were getting too hot. After assembly into the lamp's enclosed space, where there's no air flow, it would be a matter of time when they would burn. I made use of one of the relays on the board to bypass the MOSFET when fully switched on. So it was necessary to use the dimmer either at 100% or on values below 50% where the MOSFETs kept the temperature below self burning level.
Today I know I just chose the wrong MOSFET with too high RDS ON.
Flickering
The PWM outputs of ESP8266 are software emulated, flickering occurs. That would be annoying. Solution: add a small cheap Arduino Nano with hardware PWM outputs. Communication from ESP8266 to Nano is via serial port. This allowed stable PWM signal and nice, smooth transitions between dimming levels. But no OTA for any updates to code in Nano.
Halogen lamps dimming
As I found out from some articles, dimming the halogen lamps may shorten their lifespan. The reason is lower temperature of the bulb when on lowered voltage, which may cause to stop the "halogen cycle", which regenerates the tungsten by evaporating from the glass. Well, the lifespan of my R7s seemed to be short enough even without this, so....no halogen dimming.
IR receiver
I wanted to have the option to control the lamp with my universal remote control. It was working while the light was off. Once turned on, the IR receiver didn't work anymore. My guess is it was caused by the placement of the receiver and the light interference from the LED strips.
Unstable operation, frequent restarts
I wrote the code for the ESP8266 in Arduino IDE. While everything works as it should, once or twice a day it restarts, reason unknown. It causes the light to go off, which is annoying. While the light is off, it runs days or weeks without restart. But when the light is on, this problem occurs from time to time.
Color temperature
The "Neutral White" color of the LED strip seemed too cold for us. I replaced it with same kind but "Warm White" 3200K strip.
LED strip attachment to light fixture
I attached the LED strip to 16 L-shaped brackets. Even if the shape of the strip would be a perfect circle at the time of installation (it wasn't), thanks to heat and gravity it deformed a bit during the time and it started to look not so nice. In newer version I used a flat aluminium profile to stick the strip to it.
The first version was installed only in of the two lights and was used for almost 2 years.
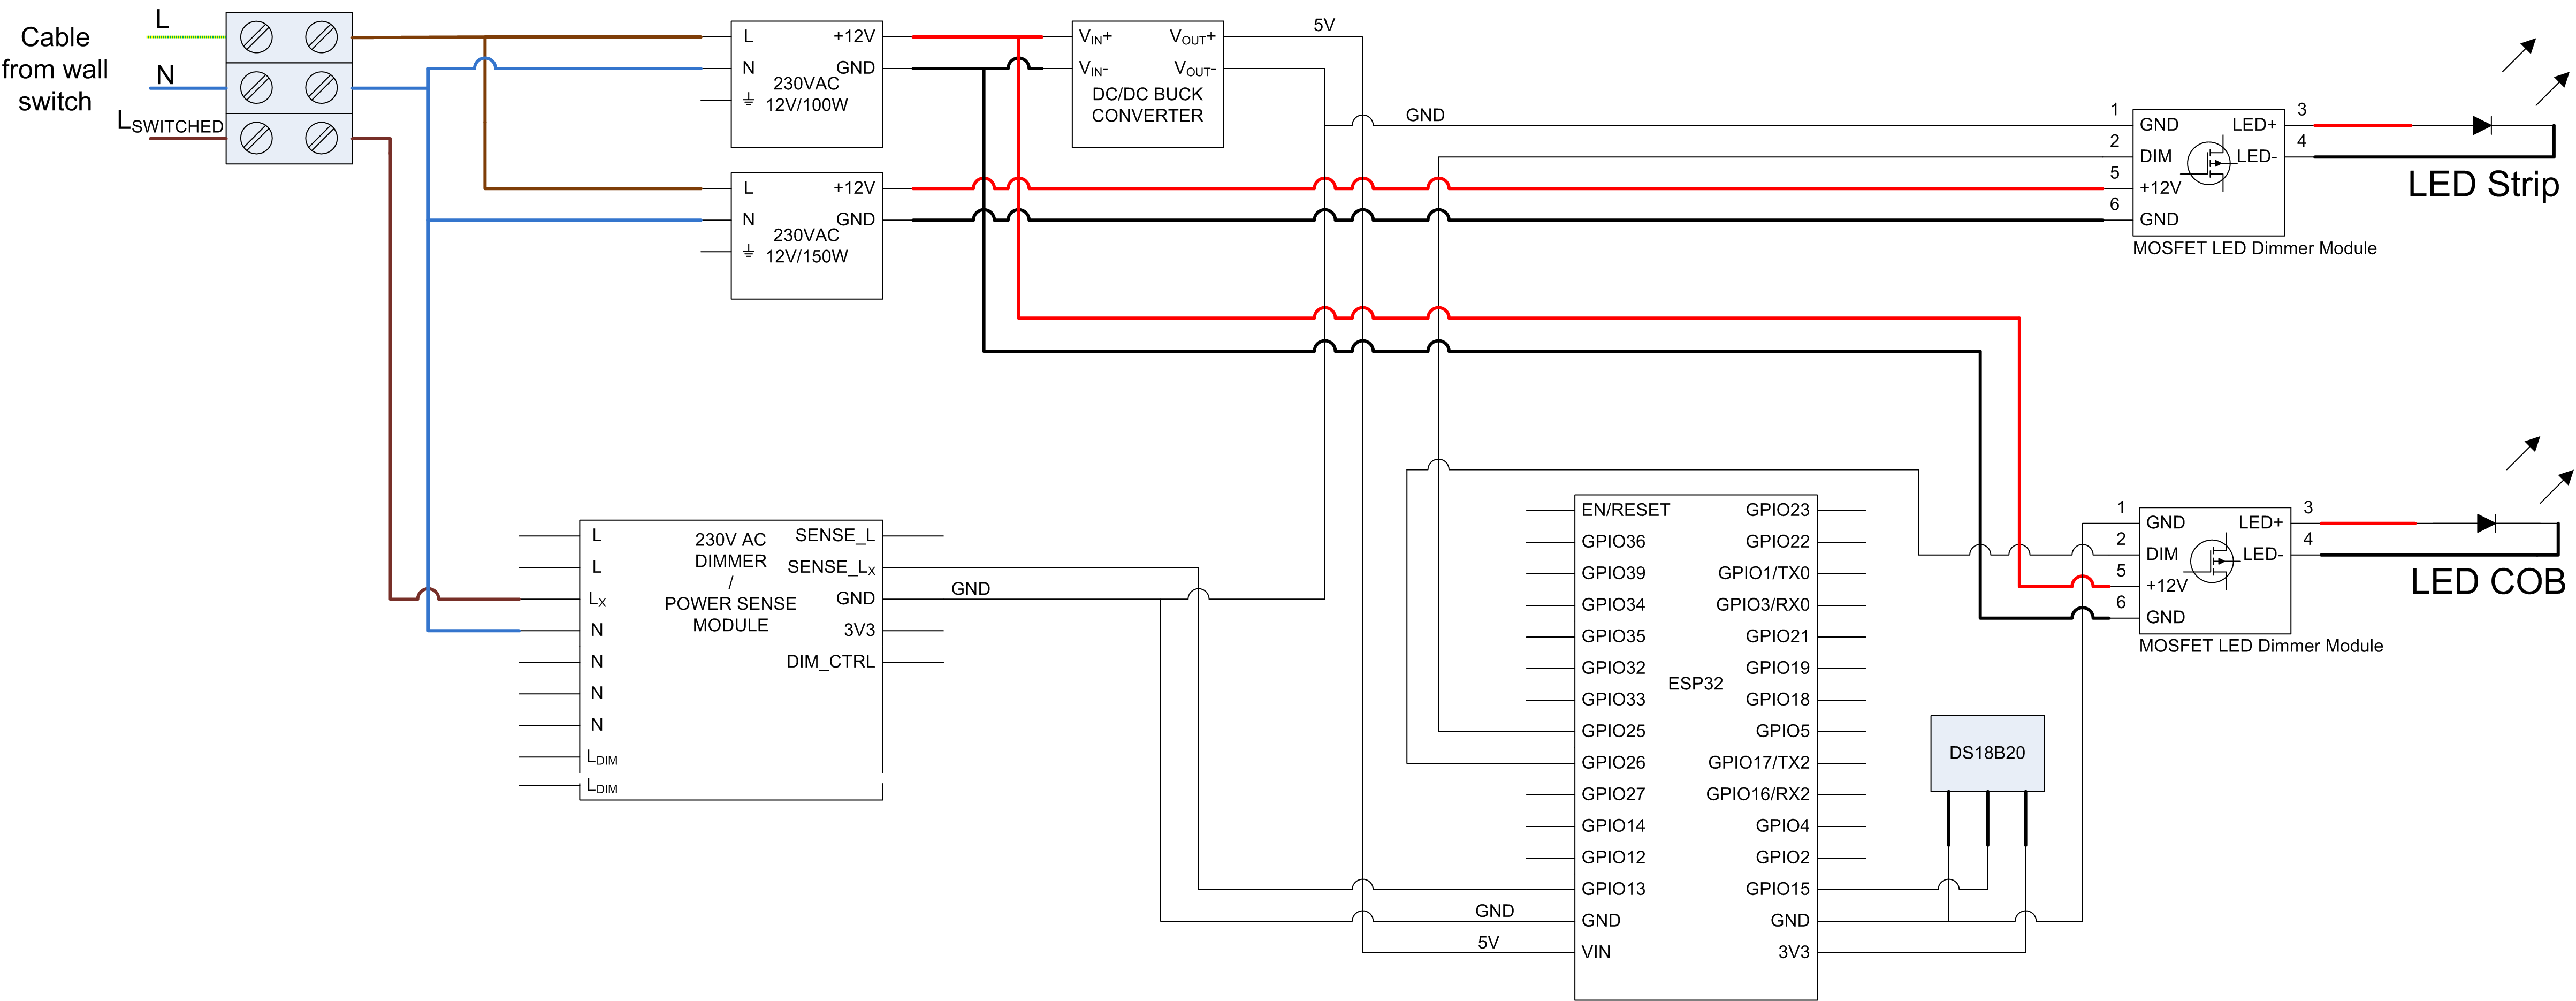
While the first version was in use I became familiar with Home Assistant and ESPhome. I made a few projects with ESP8266 and ESPhome, mostly relay boards controlling various devices (main entrance gate, garage door, ventilation fan...) and/or monitoring temperatures and humidity. I also worked with ESP32 which has hardware PWM outputs and I quickly realized that this would be a perfect way to control the LEDs in my lamps. Plus I discovered a LED COB lights that are offered in many sizes and shapes, and a 94x50mm rectangle with 15W seemed to be a perfect fit to replace the R7s. I even managed to find a more suitable MOSFET - IRF4905 with much lower ON resistance (20mΩ) and it stays perfectly cool even with a small heat sink! Yay!
Components:
- Controller: ESP32 WROOM DevKit 30-pin
- 12V DC dimmer: P-channel MOSFET IRF4905
- Wall switch AC power sensing: KP1020
- LED strip: SMD 2835, double row, 12V, 480 LED/m, 20W/m, Warm White (3200K), 5m (actual used length was approximately 4m)
- LED COB: 2pcs 94x50mm / 15W Warm White
- Power supply: 12V /100W (for COBs) and 12V / 150W (for strips)
- Temperature sensor: DS18B20
- Custom made PCBs for MOSFET dimmer and 230V AC dimmer (only AC power sensing part is used)
- Code: ESPhome
Functions:
- Dimming LED strips - 12V DC
- Dimming LED COBs - 12V DC
- Effects - Strobe
- Control ON/OFF with existing wall switch
- Control with Home Assistant web site
- Control with Home Assistant Companion App
- Delayed off when light turned off with wall switch
- Strobe effect
- Temperature measurement
- Energy consumption measurement
- OTA (through ESPhome dashboard)
More about energy consumption metering:
There is no current metering device used in this project, but instead the actual power consumption is calculated from the dimmer slider value (0-100%), in similar way as the Powercalc HACS integration does. Since the value of current drawn is not linear with dimmer value, the formula is adjusted by actual measured values so the results are very close to real values. I measured the power draw in steps of 5% for both LED strips and COBs and wrote the values into a table, and from that table I wrote two functions that take the dimmer value as an argument and return the power in Watts (one function is for LED strip and the other for COBs).
ConclusionAt the time of writing, the new version 2.0 is running for 2 months now. Both of the lights were converted. No flickering, ESPhome works flawleslly, power consumption is less than 30% at full power (92W compared to 2x160W halogen lamps), while the light intensity is significantly stronger, wow! Most of the time we don't even need such strong light, so the power-on values are set to 60-70%. That allows even more energy saving.
The aluminium profile holds its shape nicely. Overall, I'm very satisfied with the result!


Comments