


Hardware components | ||||||
 |
| × | 1 | |||
Software apps and online services | ||||||
 |
| |||||
 |
| |||||
Do you want play board game? You can't find a dice? Now it is not a problem. You can use Invisible Dice Alexa Skill!
In tutorial I will show how to build own Amazon Alexa Custom Skill. Step by step I will explain how to create: Voice User Interface, Skill Code in Javascript and Lambda Function. I will show how to connect Voice User Interface with Skill Code and how to test skill functionality. Finally I will demonstrate how to publish and how to use Invisible Dice Skill. Lets start.
Voice User InterfaceVoice User Interface We will create in Amazon Developer Portal.
1. Go to the Amazon Developer Portal developer.amazon.com and in the right corner of the screen choose "Developer Console" (figure 1).
2. Once you have signed in, click the Alexa button (figure 2).
3. In next step choose the "Get Started" button for the Alexa Skills Kit (figure 3).
4. Select "Add A New Skill" (figure 4).
5. Fill out the Skill Information screen (figure 5).
In my case I chose Skill type: "Custom Interaction Model", I set Language "English U.S.", put skill name and invocation name as "Invisible Dice" and save a setting. After that I clicked "Next" button and moved to the Interaction Model.
6. Click on the Launch Skill Builder (Beta) button (figure 6) .
7. In intents section click on the "Add+" button (figure 7).
8. Set a Intent name and push button "Create Intent" (figure 8).
9. Next we will create and configure Slot used by Intent (it is not necessary but it is very useful option so I will show how to do it).
- (create slot ) Click on the created Intent "ThrowADiceIntent" set slot name "Action" and push button "Add" (picture 9a).
- (create slot type ) Choose tab Slot Types click "Add+" button write slot type name "LIST_OF_ACTIONS" and click button "Create Slot Type" (figure 9b).
- (set slot type values) Click on the slot type name "LIST_OF_ACTIONS" and in the in the "Slot Values" field put values. In my case I created 3 action: throw a dice, give me a result, roll a dice (figure 9c).
- (connect slot with slot type) Select Itntent "ThrowADiceIntent" and choose slot "Action". Next choose slot type "LIST_OF_ACTIONS" (figure 9d).
10. Select created Intent and set Sample Utterances (figure 10).
During creating utterance list I used defined slot "Action".
Full list of sample utterances for "ThrowADiceIntent" is available in comment to the Invisible Dice Skill code. Additionally in attachment I share file "Intent Schema" with full intents structure (I added utterance for intent ThrowADice and for predefined intents: Cancel and Stop).
11. Next click on the "Save Model" and "Build Model" buttons (figure 11)
12. If interaction model builds successfully your Voice User Interface is ready. Finally click on Configuration button to back to skill builder. (figure 12)
We have ready Voice User Interface for our Invisible Dice Skill. Now we must code functionality. We will write software in JavaScript and we will use framework Alexa Skills Kit SDK.
1. Open nodejs.org page download and install nodejs environment .
2. Create on the PC hard disc new folder (in my case d:\InvisibleDice).
3. Open "Node.js command prompt" go to the created folder and using npm download Alexa SDK package (figure 13)
4. Open atom.io page download and install Atom JavaScript editor.
5. Run Atom editor. Open created folder (File-> Open Folder). Create new file index.js (File -> New File). Save file in folder (File -> Save).
6. Write a code. You should include Alexa SDK framework. Add code for Intents. Register handlers and run framework. Empty template is shown on figure 14.
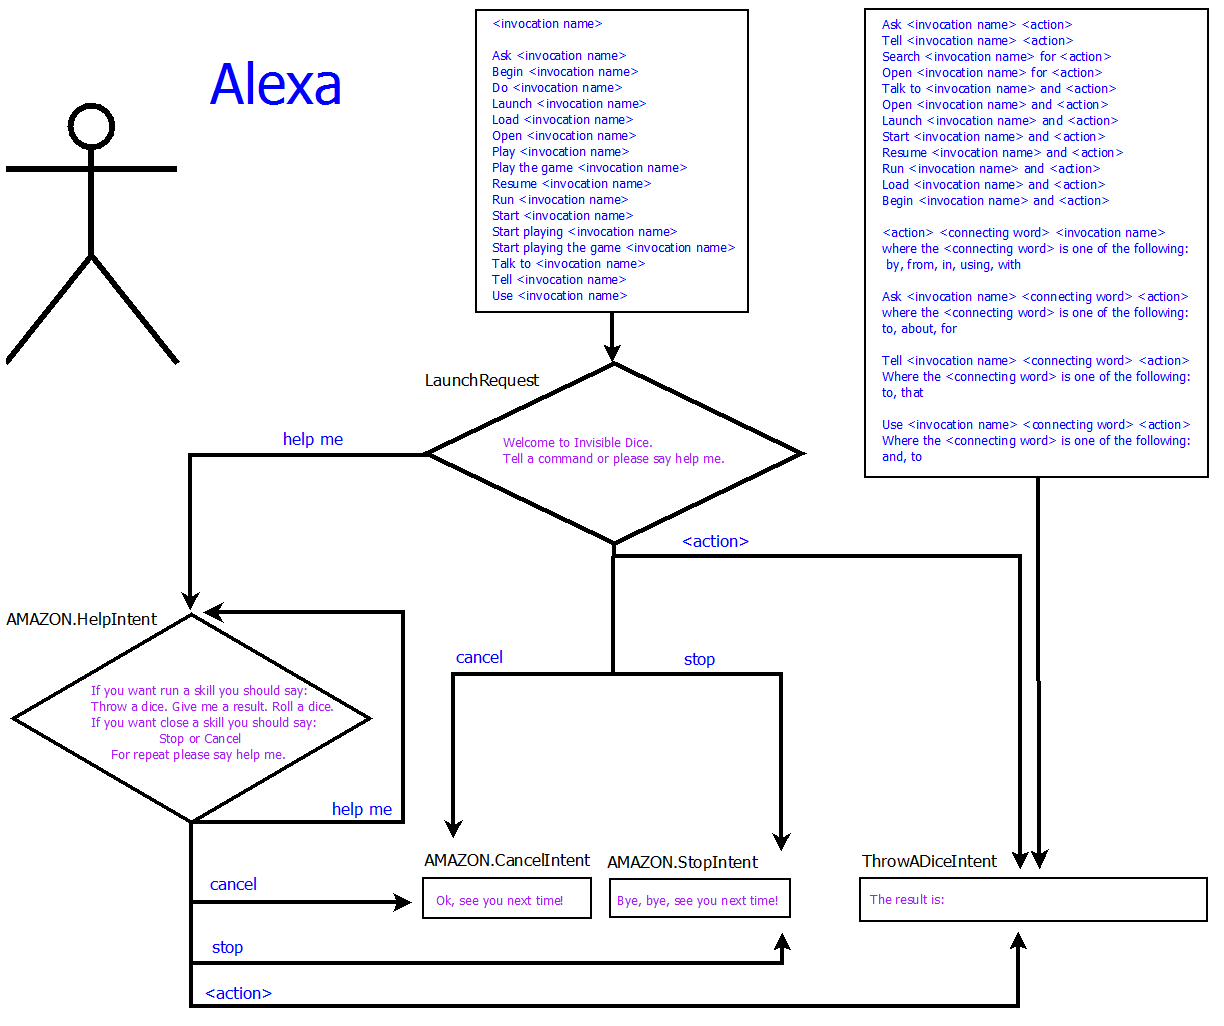
In my case I added code for intences: Launch, Help, Stop, Cancel and ThrowADice. Result of throw I get from random math function. Ready JavaScript code for Invisible Dice skill in available in code section. Diagram of work is shown on the figure 15.
7. Add file with skill code index.js and folder with Alexa SDK framework ("node modules" folder) into ZIP archive (folder + file not folder with them!)
Lambda FunctionWe built the Voice User Interface (VUI) and we wrote code for our Alexa skill. Now we should make service to run our code. We can write own web service or use Lambda function from Amazon Web Services Platform. I will show how to use solution from Amazon.
1. Open aws.amazon.com and sign in to the Management Console (figure 16).
If you don't already have an account, you will need to create one!
2. Click Services and from Compute section choose Lambda (figure 17).
3. Select your AWS region (figure 18).
AWS Lambda only works with the Alexa Skills Kit in two regions: US East (N. Virginia) and EU (Ireland). Make sure you choose the region closest to your customers. In my case I live in Europe so I chose EU (Ireland).
4. After that choose "Create a function" button (figure 19).
5. Choose "Author from scratch" button (figure 20).
We will be create own function and we don't need predefined blueprints.
6. Configure your function. Set name, choose one of existing role lambda_basic_execution and push button "Create function" (figure 21).
After that lambda function is created. We have available 3 tabs: Configuration, Triggers and Monitoring (figure 22).
7. Open Configuration tab. Select code entry type on "Upload a ZIP file" and upload created in previous chapter ZIP file with SDK and code ( figure 23 ).
8. Open Triggers tab. From the available options select "Alexa Skills Kit" trigger and push Submit button ( figure 24 ).
9. Save function and copy ARN ( Amazon Resource Name ) value ( figure 25 ).
Our function is ready. We can logout from AWS Platform.
Connect VUI to CodeWe have created Voice User Interface and code executed by Lambda function on the AWS Platform. Now we will connect those two pieces together.
1. Go back to the Amazon Developer Portal developer.amazon.com . If you close web browser then repeat steps from figures 1, 2 and 3 and select your skill from the list.
2. Open the "Configuration" tab and start configure connection ( figure 26 ).
3. Select the "AWS Lambda ARN" option for your endpoint ( figure 27 ).
4. Choose your geographical region ( In my case I chose Europe ) ( figure 28 ).
5. Paste Lambda function ARN value ( figure 29 ).
6. Leave "Account Linking" and permission options as default ( figure 30 ).
7. Save settings and push next button ( figure 31 ).
Finally we have Voice User Interface connected with Lambda Function.
TestingOur skill is almost ready. Now we should start testing skill functionality.
1. Go back to the Amazon Developer Portal developer.amazon.com . If you close web browser then repeat steps from figures 1, 2 and 3 and select your skill from the list.
2. Open the "Test" tab on the left side ( figure 32 ).
3. In service simulator set defined samples utterance and verify skill response. You should test all intents ( figure 33 ).
If skill working proprtly then you can finish tests and go to the publication. In other case you should corect code and upload again to the Lambda function or corect you voice interface. It depends on how kind of errors you have.
By the way, for testing your skill functionality you can also use echosim.io browser-based Alexa simulator and tools from AWS Lambda function,
CertificationOur skill is ready. Now we can send skill into certification and publication. In first step we must set publish information about our skill.
1. Open the "Publishing Information" tab ( figure 34 ).
2. Complete the Global Fields data ( figure 35 ).
3. Write skill description ( figure 36 ).
4. Write example phrases with user can tell to your skill ( figure 37).
5. Put list of keywords used for searching your skill ( figure 38).
6. Create and upload skill icons ( figure 39). You need two sizes of your icon: 108x108px and 512x512px. For make you can use for example Gimp editor.
7. Save settings and push next button ( figure 40).
We are move to the last tab "Privacy & Compliance" ( figure 41).
8. In last tab you should answer each of the Global Fields questions. Save settings and submit skill for verification (figure 42).
Next we receive a confirmation of beginning certification process (figure 43).
Certification can take several days to complete. Until decision we can't edit skill but in ever moment we can withdraw skill from certification. Feedback from certification process we receive by email.
In my case I recived message about positive certification and publication Invisible Dice Skill in time shorter than one day. If you skill will have issues you receive list of tips. You should correct all issues and send skill to publication again. Good luck with your certification process.
ExecutionOur skill has been published and is available to all devices with Alexa! In our case (owner) the skill was automatically added to my alexa.amazon.com account.
If you want to use my skills, you should add it to your Alexa account. To do it, run your the Amazon Alexa web configurator (alexa.amazon.com), select the Skills tab, find the Invisible Dice and approve adding skills to the account (figure 44).
Now you can start using skills (see diagram on the figure 15) and play board games without using the dice. Have fun!
If you don't have a device with Alexa (for example Echo Dot like me), you can start working with Skill (own or my) using the Echosim simulator.
To do it, open the echosim.io website and log in to the application using your Amazon account password. Then press the microphone button and speak to Alexa voice assistant (for example: Alexa, Open Invisible Dice) (figure 45). You can test skill functionality and check how it works in reality!
We made our first very easy skill for Alexa voice assistant. Soon I will publish second part of the tutorial. There I will show how to develop the functionality of the Skill. I will show how to add sound effects and many more functionalities.
See you soon.
More news & projects: facebook.com/Eterneco/ & hackster.io/Lukasz/projects


Comments
Please log in or sign up to comment.