

Hardware components | ||||||
 |
| × | 1 | |||
Software apps and online services | ||||||
 |
| |||||
 |
| |||||
 |
| |||||
Second part of Amazon Alexa Skills Building Tutorial
Before you start reading this tutorial you should read previous part of the article with is available here: https://www.hackster.io/Lukasz/invisible-dice-c24ec3
In this part I will show how to add audio files into skill and how to display images in configurator application (web or mobile).
- Before throw our skill will be play sound of throwing dice.
- After throw skill will be show image with result of throw.
In project Invisible Dice Plus we will use interface from Invisible Dice.
1. Go to the Amazon Developer Portal http://developer.amazon.com and create new Custom Skill. Make the same steps as described in first part of the tutorial (figures 1,2,3,4,5).
2. Launch "Skill Builder" and choose "Code editor". Import file with configuration (file IntentSchema.json available in attachement) and apply settings (figure 1).
3. Save and build created VUI for Invisible Dice Plus Skill (figure 2).
In project we will be use code from first part of the tutorial.
- Create new project folder (in our case it is "Invisible Dice Plus" folder)
- Copy from Invisible Dice project file index.js (code) and folder node_modules (framework Alexa SkillsKit SDK).
- Add file with skill code index.js and folder with Alexa SDK framework ("node modules" folder) into ZIP archive (folder + file not folder with them!)
In first part we used Atom code editor. Now we will be use online editor builded in Lambda Function. It is new and very useful functionality.
Image on the Home CardCreating Custom Skills we have a opportunity to show figures on skill home page (web configurator http://alexa.amazon.com and mobile application). We can define card title, include image and make a description (figure 3).
Figures must be in one of formats: JPG, PNG. Every image must be prepare in small size: 720x480 pixels and large size: 1200x800 pixels.
- Using GIMP software http://gimp.org or other create images with you want show on the Home Card (I prepared images with result of throw).
To display images on home card in code we should use function emit() with parameter tellWithCard or askWithCard. How to use this function I will show later.
Audio files in a SkillAudio files we can play using embedded audio player or using SSML mechanism (Speech SynthesisMarkup Language). Bigger possibilities gives embedded audio player (functions: stop, start, pause, repeat, etc.) but simpler in use is SSML mechanism. In Invisible Dice Plus Skill we will use SSML mechanism.
Generally mechanism SSML converts text to speech but is possible to play audio files. For play audio files we should use "audio tag". For example: ”<audio src =”https://filesource/file.mp3” />” and we should include url into audio file. How to use it I will show later.
The audio files used by SSML must have parameters described below:
- Must be in MP3 format (MPEG 2 codec).
- The audio file cannot be longer than ninety (90) seconds.
- The bit rate must be 48 kbps.
- The sample rate must be 16000 Hz.
For create audio file in correct format we can use free software Audacity.
- Go to Audacity software home page http://audacityteam.org.
- Download and install software.
- Open http://lame.buanzo.org/#lamewindl page and download zip archive with MPEG-2 codec.
- Open archive and copy codec file lame_enc.dll into Audacity installation folder.
- Launch Audacity software.
- Open audio file with you want prepare (File -> Open).
- In left corner set sample rate frequency equal 16000 Hz (figure 4).
- Export file into MP3 format (File -> Export -> Export as MP3).
- Set format option as Custom, bit rate 48 bps and save file (figure 5).
In my case I downloaded audio file sample from free database and converted it for format acceptable by SSML mechanism. In created audio file throw.mp3 user can hear voice of throwing dice.
Amazon S3The images and audio files are loaded from the provided URL at runtime. The files you provide must be hosted on an HTTPS endpoint that meets the following requirements:
- Endpoint provides an SSL certificate signed by an Amazon-approved certificate authority.
- The endpoint must allow cross-origin resource sharing (CORS) for the images.
In our case we will use Amazon Simple Storage Service (Amazon S3) from Amazon AWS platform.
- Go to the AWS aws.amazon.com and sign in.
- Open Services tab and choose S3 (figure 6).
- Select create bucket function (figure 7).
- Put bucket/storage name. Define geographic region (in our case EU - Ireland). Confirm settings - push create button (figure 8).
- Open created bucket/storage (figure 9).
Created bucket/storage is empty. In configuration panel you can import files (audio/image) and you can set permissions (figure 10).
- Push upload button (figure 10). Include files (audio and images) and using button upload apply files transfer (figure 11).
Imported files are not public. Now you must change files permissions.
- Open bucket and select all imported files. In menu "More" choose option "Make public" (figure 12).
Next we must configure CORS (Cross-origin resource sharing) policy.
- Open "Permissions" tab and choose "CORS configuration" (figure 13).
- Paste code shown below.
<?xml version="1.0" encoding="UTF-8"?>
<CORSConfiguration xmlns="http://s3.amazonaws.com/doc/2006-03-01/">
   <CORSRule>
       <AllowedOrigin>http://ask-ifr-download.s3.amazonaws.com</AllowedOrigin>
       <AllowedMethod>GET</AllowedMethod>
   </CORSRule>
</CORSConfiguration>
- Open created bucket and for every uploaded file select a file, choose overview tab and copy file URL (figure 14).
We crated new custom skill "Invisible Dice Plus". We prepared audio file and images supported by Alexa. All files were uploaded on the Amazon S3 service. Now we will start creating and configuration Lambda Function. The procedure is the same like described in first part of the tutorial, but working of creator were modified. So we will show one more time how to use creator after modification.
Being logged on the AWS portal we will start creating new Lambda Function.
1. Switch from Amazon S3 to Lambda Function service (Services -> Lambda).
2. Choose create a function option.
3. Select option "Autor from Scratch". Set function name (in our case InvisibleDicePlus). Choose defined in system role lambda_basic_execution. Confirm the function creation (figure 15).
Lambda function were created a and configurator opened control panel. We have active two tabs: Configuration and Monitoring. As default is set Configuration tab. Using function from this tab we can set function trigger and start work with function code (figure 16).
4. Open "Function code" section. From "Code entry type" list choose "Upload a .ZIP file". Set button "upload" and include .ZIP archive with skill code and Alexa SDK framework (figure 17).
5. From "Function code" section go to the trigger section and choose trigger. Select "Alexa Skills Kit" and add trigger (figure 18).
6. Finally save function settings and copy ANR number (figure 19).
Our function has the same code as function from first part of the tutorial. Now using online editor we will modify software.
7. Launch function code editor (Services -> Lambda -> Functions -> InvisibleDicePlus) and choose option "Edit code inline" (figure 20)
In code we should add audio file and images URL's. In sectin ThrowADiceIntent we should code SSML mechanism (play audio file) and we should configure emit function (show image in configurator home page). Function code after modification is available below.
var Alexa = require('alexa-sdk');
// Used when a user asks for help.
const helpMessage = "If you want run a skill you should say: Throw a dice. Give me a result. Roll a dice. " +
"If you want close a skill you should say: Stop or Cancel. " +
"For repeat please say help me.";
// Used when a user opens skill.
const welcomeMessage = "Welcome to Invisible Dice Plus. " +
"Tell a command or please say help me.";
// Used when a user says cancel.
const cancelMessage = "Ok, see you next time!";
// Used when a user says stop.
const stopMessage = "Bye, bye, see you next time!";
// Used to randomise numbers
const t_numbers = [
"one",
"two",
"three",
"four",
"five",
"six"];
// Used to show images
const t_images = [
{ imageSmall: "https://s3-eu-west-1.amazonaws.com/invisiblediceplus/1-small.png",
imageLarge: "https://s3-eu-west-1.amazonaws.com/invisiblediceplus/1-large.png" },
{ imageSmall: "https://s3-eu-west-1.amazonaws.com/invisiblediceplus/2-small.png",
imageLarge: "https://s3-eu-west-1.amazonaws.com/invisiblediceplus/2-large.png" },
{ imageSmall: "https://s3-eu-west-1.amazonaws.com/invisiblediceplus/3-small.png",
imageLarge: "https://s3-eu-west-1.amazonaws.com/invisiblediceplus/3-large.png" },
{ imageSmall: "https://s3-eu-west-1.amazonaws.com/invisiblediceplus/4-small.png",
imageLarge: "https://s3-eu-west-1.amazonaws.com/invisiblediceplus/4-large.png" },
{ imageSmall: "https://s3-eu-west-1.amazonaws.com/invisiblediceplus/5-small.png",
imageLarge: "https://s3-eu-west-1.amazonaws.com/invisiblediceplus/5-large.png" },
{ imageSmall: "https://s3-eu-west-1.amazonaws.com/invisiblediceplus/6-small.png",
imageLarge: "https://s3-eu-west-1.amazonaws.com/invisiblediceplus/6-large.png" },
];
// Used to play audio
const qMark = "\"";
const sAudio = "https://s3.eu-west-1.amazonaws.com/invisiblediceplus/throw.mp3";
const audioSource = qMark + sAudio + qMark;
// Attaching handlers
// Here we have added the following handlers:
// HelpIntent: envoked when a user asks for help.
// StopIntent/CancelIntent: envoked when a user asks to end the skill.
// ThrowADiceIntent: envoked when a user ask about number.
const handlers = {
/*
Launch Request ( no intent )
<invocation name>
Ask <invocation name>
Begin <invocation name>
Do <invocation name>
Launch <invocation name>
Load <invocation name>
Open <invocation name>
Play <invocation name>
Play the game <invocation name>
Resume <invocation name>
Run <invocation name>
Start <invocation name>
Start playing <invocation name>
Start playing the game <invocation name>
Talk to <invocation name>
Tell <invocation name>
Use <invocation name>
*/
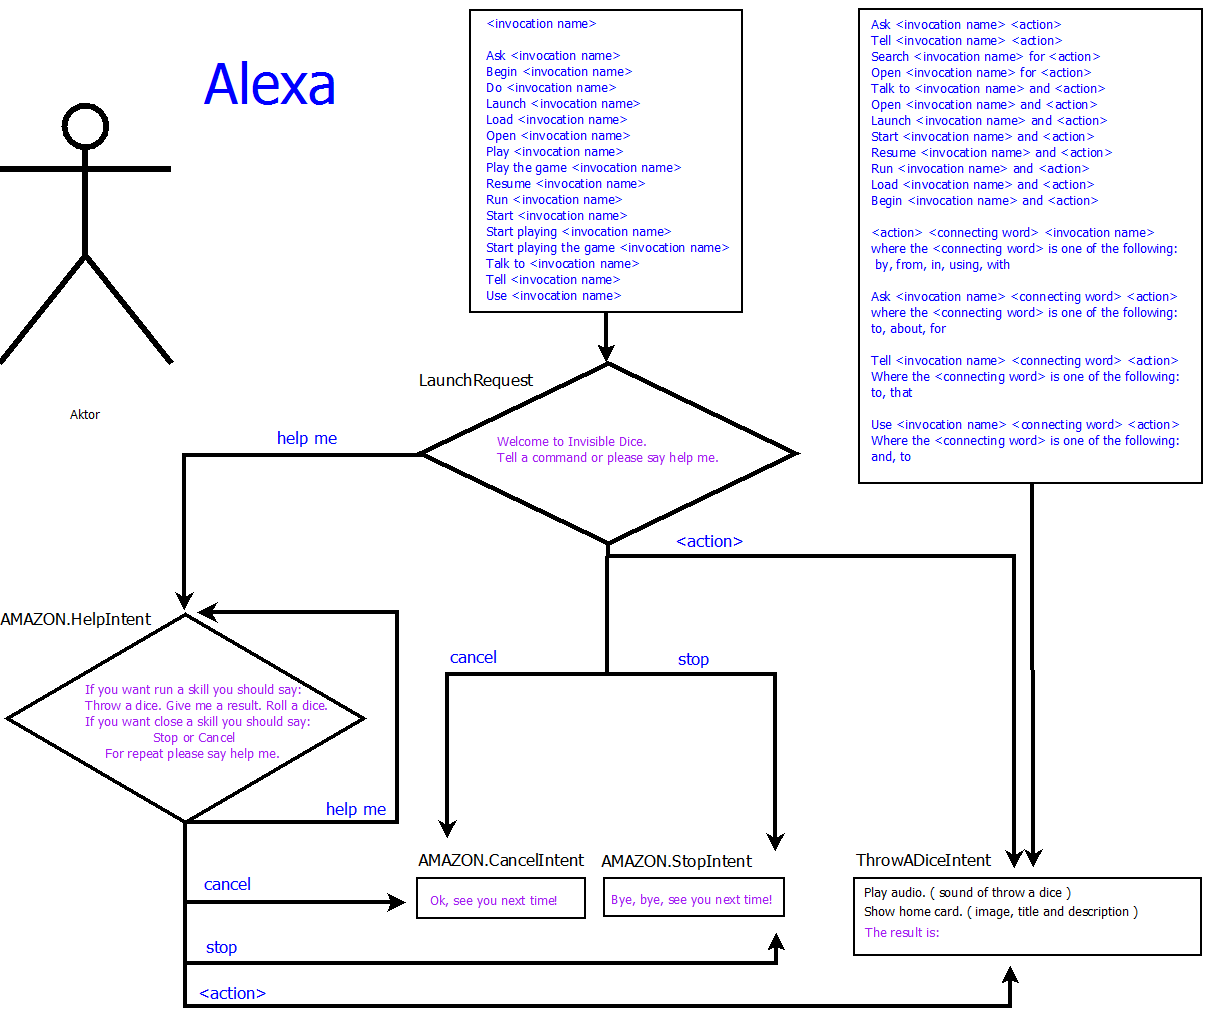
'LaunchRequest': function () {
this.emit(':ask', welcomeMessage, welcomeMessage);
},
/*
<some action> <connecting word> <invocation name>
where the <connecting word> is one of the following: by, from, in, using, with
Ask <invocation name> <connecting word> <some action>
where the <connecting word> is one of the following: to, about, for
Tell <invocation name> <connecting word> <some action>
Where the <connecting word> is one of the following: to, that
Use <invocation name> <connecting word> <some action>
Where the <connecting word> is one of the following: and, to
Ask <invocation name> <some action>
Tell <invocation name> <some action>
Search <invocation name> for <some action>
Open <invocation name> for <some action>
Talk to <invocation name> and <some action>
Open <invocation name> and <some action>
Launch <invocation name> and <some action>
Start <invocation name> and <some action>
Resume <invocation name> and <some action>
Run <invocation name> and <some action>
Load <invocation name> and <some action>
Begin <invocation name> and <some action>
*/
'ThrowADiceIntent': function () {
var number = Math.floor(Math.random() * t_numbers.length);
var sAudio ="<audio src=" + audioSource + " />";
var sOutput = sAudio + "The result is:" + " "+ t_numbers[number];
var cardTitle = "Result of the throw";
var cardDescription = "Thanks for using.\n" + "The result is: " + t_numbers[number];
var imageObj = {
smallImageUrl: t_images[number].imageSmall,
largeImageUrl: t_images[number].imageLarge
};
this.emit(':tellWithCard', sOutput,cardTitle,cardDescription,imageObj);
},
'AMAZON.HelpIntent': function () {
this.emit(':ask',helpMessage, helpMessage);
},
'AMAZON.StopIntent': function () {
this.emit(':tell', stopMessage, stopMessage);
},
'AMAZON.CancelIntent': function () {
this.emit(':tell', cancelMessage, cancelMessage);
}
}
exports.handler = function (event, context, callback) {
var alexa = Alexa.handler(event, context);
alexa.registerHandlers(handlers);
alexa.execute();
};
Now before throw our skill will play sound of throwing dice. After throw skill will show image with result of the throw. Diagram of work Invisible Dice Plus skill is shown on the figure 21.
We have VUI and Lambda Function code. Now we must connect both elements.
- Open developer portal http://developer.amazon.com.
- Select Invisible Dice Plus Skill and choose edit function.
- Open Configuration tab.
- Insert data in the same way as in the first part of the tutorial (look on figures 27, 28, 29, 30, 31 from first part).
- Set ANR code for created Invisible Dice Plus Skill (figure 14).
We didn't change VUI but we should test it. In this case we should open Test tab in developer portal and we should check all intents works (look on figure 25 from first part).
For test new functionalities (play audio, display images) you can use device with Alexa (for example Echo Dot like me) or if you don't have any you can use Echosim simulator. Using echo dot is trivial so I will show how to use simulator.
- Launch Echosim simulator http://echosim.io
- Tell a throw a dice command (for example „Alexa, Open invisible dice plus and throw a dice”). How to work with Echosim simulator I showed in first part of the tutorial (look on figure 33 from first part).
- Wait for response. If you heard included audio file (in my case it is sound of throwing dice) then that means that everything works fine.
Image with result of throw should be show on the configurator home page (web or mobile). You should check if it works correctly. How to do it in alexa amazon web configurator I show below.
- Open Amazon Alexa web configurator http://alexa.amazon.com
- From available options select Home tab.
- Look on screen. If you see defined image (in my case it is dice with result of throw) then that means that everything works fine (figure 22).
Invisible dice plus works properly. We can start publication.
PublicationInvisible Dice Plus Skill is ready. Now we must send skill into certification and publication. In this case we should open developer portal and make the same steps as described in first part of the tutorial (look on figures 35, 36, 37, 38, 39, 40 - for publishing settings and look on figures 41, 42, 43 for privacy & compliance settings).
Of course we must change project description and upload new project icons.
ExecutionOur skill has been published and is available to all devices with Alexa! In our case (owner) the skill was automatically added to my alexa.amazon.com account.
If you want to use my skills, you should add it to your Alexa account. To do it, run your the Amazon Alexa web configurator (alexa.amazon.com), select the Skills tab, find the Invisible Dice Plus and approve adding skills to the account (look on figure 44 from first part).
SummaryIn tutorials Invisible Dice and Invisible Dice Plus I shown how to make simple Amazon Alexa Custom Skill and how to add extra features to them (play audio and display image in configurator home page).
In next tutorial I will show how to make simple game.
See you soon.
More news & projects: facebook.com/Eterneco/ & hackster.io/Lukasz/projects


Comments
Please log in or sign up to comment.