Imagine You are working on a project late on a Friday evening and suddenly your mouse stops working… You can not scroll, and the right-side button won’t respond to your clicks… At the same time, you have a project design that has got to get finished… and the shops are all closed already…
These were the circumstances that led to the birth of “The Emergency Mouse” – A project born out of necessity. How did I solve my problem?Having access to a lot of electronic modules saved the day. As a maker, I always have various modules and gadgets lying around, and on this unfortunate evening, I remember that the RP2040 has USB HID support. Combine that with a simple Analog Joystick module, a rotary encoder and some push buttons, add about 30 minutes worth of browsing the internet, struggling along with a broken mouse – we have to give the old one credit, it had a very long and hard life, and I finally found some example code that did not just jiggle the mouse pointer or do something equally silly…
The only problem with all of that was that the code was for CircuitPython… I generally dislike using Python on a Microcontroller, as I believe it is better suited for the computer, but, I am warming up to the idea… slowly…
The initial fix – a mess of wires on a breadboardI quickly grabbed a RaspBerry Pi Pico out of a box, plugged it into a breadboard, loaded Circuitpyth and fired up the example code I got on the internet… While promising, It did not exactly do what I wanted… so a few minutes later, after some coding, I had a moving pointer, controlled by the small thumb joystick module, and with the center button as a “right button”… So far so good… I can work more easily, but still did not have scrolling… so lets hit the datasheets and documentation on the Adafruit Website (not sponsored) and add a rotary encoder… works well, add more buttons, etc etc… Eventually it was all done, and about 1 hour has passed, but we were left with a huge ugly mess on a breadboard, and a lot of unused GPIO pins.. So this Pico must go… it can be used for something more useful later… Then my eye fell on a SEEED Studio XIAO RP2040 module, almost begging to be used… This is smaller, more compact… lets try that …
After changing to the XIAO RP2040, things went very quick…
I added two buttons for scrolling up and down, simulating a mouse wheel,but kept the encoder… which, while VERY awkward to use at this stage, definitely had potential in the long run… I also added another button to take over the function of a right button, while the center button on the joystick became left…
Disaster averted, with only about 2 hours wasted, I returned to my project and managed to get it finished using the “improvised-mouse-on-the-breadboard” contraption…That night, while lying in bed, trying to get to fall asleep, the possibilities of this “contraption-on-the-breadboard” would not let me go… I am fairly old-school, and during the late 80’s and early 90’s owned quite a few “roller-ball” mouse devices… these later became trackballs, and being excessively overpriced, was promptly removed from my environment – the old ones did not last very long, and the new ones were, as I said, overly expensive… I did however never forget the ease of use that first “rollerball mouse” gave me all that years ago, using only my thumb to move it around etc etc…
This idea would have to be investigated, and turned into a PCB… with that, I finally drifted off to sleep…
The PCB designThe next morning came, and due to reasons unknown, as well as being lazy, I decided not to leave the house, and go buy a new mouse. lets try online… No, they are crazy – I am not paying that for a mouse!
All the time using the “contraption-on-the-breadboard”. So this thing started growing on me… lets design a PCB
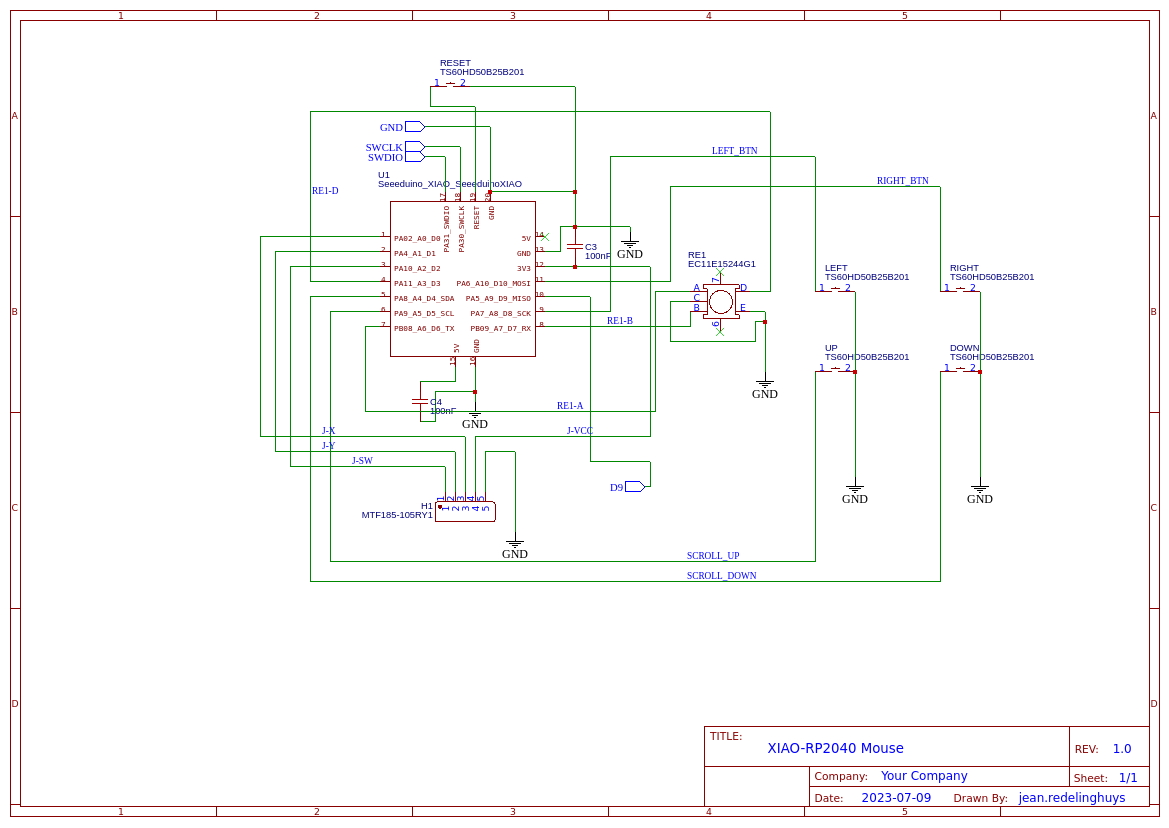
After a few hours spent on deciding on optimal layout, I came up with this… It was still a bit unrefined, but definitely had potential… It lacked a dedicated center button, and those momentary push-buttons requires a lot of force to use… but as a prototype, why not… Let’s get this manufactured.For this build, since I used a SEEED Studio module, I decided to send it to SEEED for manufacturing… no need to get components from various places, as they should have all in stock…
Seeed Studio’s Fusion service seamlessly marries convenience with full-feature capabilities in one simple platform. Whether you are prototyping or looking for a mass production partner or based on open source product customization requirements and other design manufacturing services, Seeed Studio Fusion service is catered to your needs starting with a simple online platform. https://www.seeedstudio.com/fusion.html
The PCB arrives from the factoryDuring the entire time that it took for the PCB to be manufactured and assembled, I was still using this “homemade mouse” – I started calling it a mouse now… and it was still on the breadboard… I never did bother to buy a new mouse, yet..
The PCB Arrived today, and apart from a few small soldering issues, looked great… I still had to do a bit of assembly on my own, as there was an issue with the components I wanted being out of stock.. I have plenty in stock of my own, so opted to do manual assembly…
The completed PCB now only needed a joystick, and some firmware…
After adding a few button caps, and mounting everything to a piece of acrylic plate, I had a working prototype…
The FirmwareAs mentioned above, the device runs on CircuitPyton. As Such, there are quite a lot of “examples” on the internet, showing you how to do many USB HID “mouse” like things, but generally being completely useless… I have thus spent quite a lot of time up to now, writing and refining my own version of the firmware, that is actually useful and does actually work.It has the following features:X-Y axis control of the mouse pointer via a thumb joystick, with a left click function on the center joystick button, as well as a dedicated “left” button.A dedicated “right” buttonA “virtual center” button made up of simultaneously pressing left and right
Up and down scrolling either using the rotary encoder as a “mouse wheel” or via dedicated up and down pushbuttons.A dedicated Reset button – this is necessary, as I can not seem to get the device to initialise correctly at computer bootup.Various software functions, like changing the pointer acceleration by pressing the center button on the rotary encoderand most importantly, hiding the Circuitpyton drive, only showing it when I actually need access to the code in this device… Various statuses are indicated using the NeoPixel on the XIAO, making it easy to see in what state the device is operating.As such, I shall NOT be releasing the firmware at this moment, as it is still far from being perfect. It works, but it can be way better…
Since its “birth” late on a Friday night, about 3 weeks ago, I have been using this device, in its various forms as my primary pointer device. It is growing on me more every day, and it is quite comfortable to use – If we ignore the fact that it is not in a suitable enclosure and that I am still making small changes to the firmware from time to time.I am already planning the next revision, in which I shall replace the momentary push-buttons with proper microswitches, as well as try my hand at designing a proper enclosure.If you are a 3D printing expert and want to collaborate with me on this, let’s talk…


_LWNORVejBN.png?auto=compress%2Cformat&w=48&h=48&fit=fill&bg=ffffff)


Comments
Please log in or sign up to comment.