In this planned to be a short post, I will quickly take a look at a scaled-down version of the ESP-12E I2C Base Board. This one in particular has only two slots, without the dedicated ESP-Card slot.
The main reason for this PCB is that the original version was designed for easy prototyping and projects where enclosure space will not be an issue. This is especially true in the case of the actual project that this will be used in, as there are quite a lot of other, very bulky components, that all need to be fitted into a relatively small enclosure.
ATMega328 I2C Base BoardIn this planned to be a short post, I will quickly take a look at a scaled-down version of the ESP-12E I2C Base Board. This one in particular has only two slots, without the dedicated ESP-Card slot.The main reason for this PCB is that the original version was designed for easy prototyping and projects where enclosure space will not be an issue. This is especially true in the case of the actual project that this will be used in, as there are quite a lot of other, very bulky components, that all need to be fitted into a relatively small enclosure.
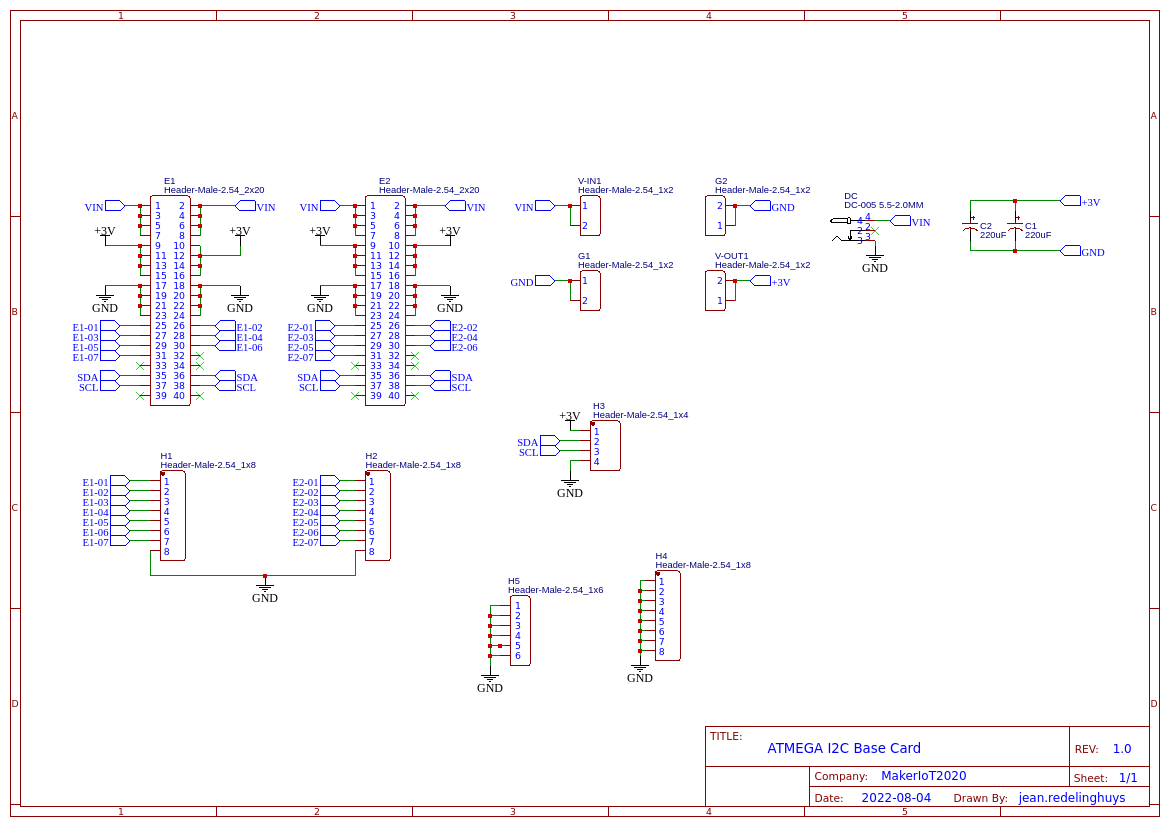
What is on the Board?The board contains two 2×20 Pin Male Header slots, providing 12v, 3v, Ground and access to the I2C bus, as well as additional GPIO’s as provided by the module plugged into the slot. I have also decided to provide breakout access to these IO’s on the actual PCB. This is a feature that was not yet implemented on the original prototype. Additional Ground connections, as well as an I2C expansion port, used to interconnect to other Base Card modules were also added. It is also important to note that the I2C bus is powered by 3v. Interface modules should take this into consideration ( mine does ). Power is provided by an MP1584 Buck converter module.
I called it ATMega I2C Base Module due to the fact that I plan to design a custom ATmega328P prototype card specifically for this unit, with all possible IOs broken out to header pins. I found that this style of prototyping suits my development cycle quite well, as I really dislike using breadboards and wires.
As I try to reuse a certain PCB or design it to be as general purpose as possible, having access to ready-made modules that can be slotted into a base and programmed, really saves a lot of time.
SchematicSchematic_Atmega-Card-Base_2022-08-25Download
ManufacturingOver the past eight years, PCBWay has continuously upgraded their MANUFACTURING plants and equipment to meet higher quality requirements, and now THEY also provide OEM services to build your products from ideas to mass production and access to the market.
The PCB for this project has been manufactured at PCBWay.Please consider supporting them if you would like your own copy of this PCB, or if you have any PCB of your own that you need to have manufactured.
If you would like to have PCBWAY manufacture one of your own, designs, or even this particular PCB, you need to do the following…1) Click on this link2) Create an account if you have not already got one of your own.If you use the link above, you will also instantly receive a $5 USD coupon, which you can use on your first or any other order later. (Disclaimer: I will earn a small referral fee from PCBWay. This referral fee will not affect the cost of your order, nor will you pay any part thereof.)3) Once you have gone to their website, and created an account, or login with your existing account,
4) Click on PCB Instant Quote
5) If you do not have any very special requirements for your PCB, click on Quick-order PCB
6) Click on Add Gerber File, and select your Gerber file(s) from your computer. Most of your PCB details will now be automatically selected, leaving you to only select the solder mask and silk-screen colour, as well as to remove the order number or not. You can of course fine-tune everything exactly as you want as well.
7) You can also select whether you want an SMD stencil, or have the board assembled after manufacturing. Please note that the assembly service, as well as the cost of your components, ARE NOT included in the initial quoted price. ( The quote will update depending on what options you select ).
8) When you are happy with the options that you have selected, you can click on the Save to Cart Button. From here on, you can go to the top of the screen, click on Cart, make any payment(s) or use any coupons that you have in your account.Then just sit back and wait for your new PCB to be delivered to your door via the shipping company that you have selected during checkout.


Comments