“I am the fire that burns against the cold, the light that brings the dawn, the horn that wakes the sleepers, the shied that guards the realms of men.”
——Oath of Night's Watch
I always admire the name of “A Song of Ice and Fire”, which shows the philosophy of conflict, the beauty of nature as well as the optimism life attitude when facing adversity.
It is the warmest scene that I can think of when I think of a warm family to spend the winter happily around the fireplace. However, due to the limited space, not every family can have a big warm fireplace. If so, why not make one by yourself?
Inspiring by the meaningful name of “A Song of Ice and Fire”, I made a mini fireplace that combines these two opposing elements in nature, hoping to pass the warmth and hope in this winter. If you would also like to have a fireplace in your house, or especially you are a fan of Game of Thrones, follow me to make one delight your winter and life.
Seeeduino XIAO is the smallest Arduino compatible board in Seeeduino Family. It is an Arduino microcontroller that is embedded with the SAMD21 microchip. The interfaces of Seeeduino XIAO is rich enough in such a tiny Dev. Board as well.
Grove Shield for Seeeduino XIAO is a plug-and-play Grove extension board for Seeeduino XIAO.
Step 1: Design the Shell of the FireplaceI use AutoCAD to design a 320*90*195mm acrylic shell for the fireplace, which size I think would be more suitable for the size of the components. You could design other sizes and appearances for the fireplace by simply modify the.dxf document I attached. Just be aware of the size of each component you have replaced.
Step 2: Acrylic Laser CuttingChoose the color you like and cut the parts of the shell. Just note that my fabrication drawing was based on the 5mm thick acrylic plate and do not use other plates of thickness.
Step 3: Assembly Acrylic PartsAssembly the acrylic parts with the special glue for acrylic. This procedure takes a lot of patience and just note that the glue curing time needs 30seconds and not to loosen the two parts you are gluing together before that.
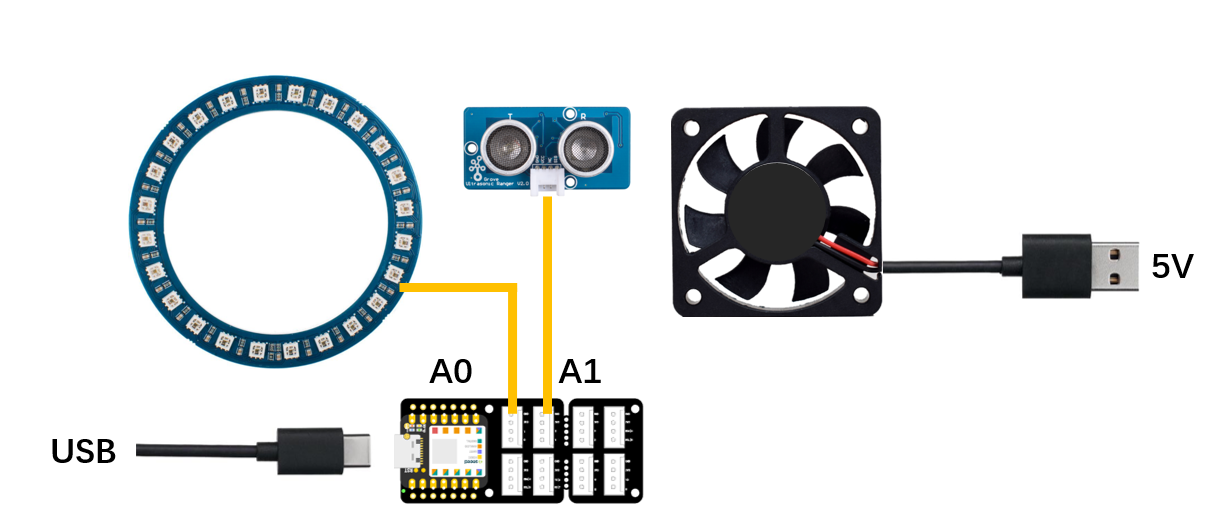
Step 4: Connect the USB Fan and Grove – RGB LED RingIt is easy to connect the USB Fan and Grove – RGB LED Ring with Hot Melt Glue. You should make the Fan under the LED Ring, and it is better to make both wires on the same side.
The parts of the holder for the USB Fan and LED Ring
Use the left acrylic parts after finishing the shell of the fireplace to make the holder for the USB Fan and LED Ring. Put the USB Fan and LED Ring combination on the holder
The parts of the holder for the USB Fan and LED Ring
With the shell assembling and the holder, the appearance of the fireplace is almost finished.
Cut a piece of tissue into many different shapes of triangle, and stick them up one by one piece with scotch tape to the acrylic part as shown on the picture. Put this part on the top of the LED Ring.
Choose any photos you like and make it your unique fireplace. Print and stick up the decoration. Last but not least, put on the “ice” to the level of the bottom of the “flame”. If you don't have acrylic fake ice rock as mentioned, try to use rock andy, hahahaha!
I guess you cannot wait to show off your great work to your families and friends already! Run and go shooting some great pictures and videos now!
You are very welcomed to also share your unique work with us. Should you have any further questions about this project, or want to share your work with me, feel free to drop an email to wym627@qq.com. I am Makerming from Shenzhen, China.
Finally, thanks for reading, your comments are the biggest support for my work.


Comments
Please log in or sign up to comment.