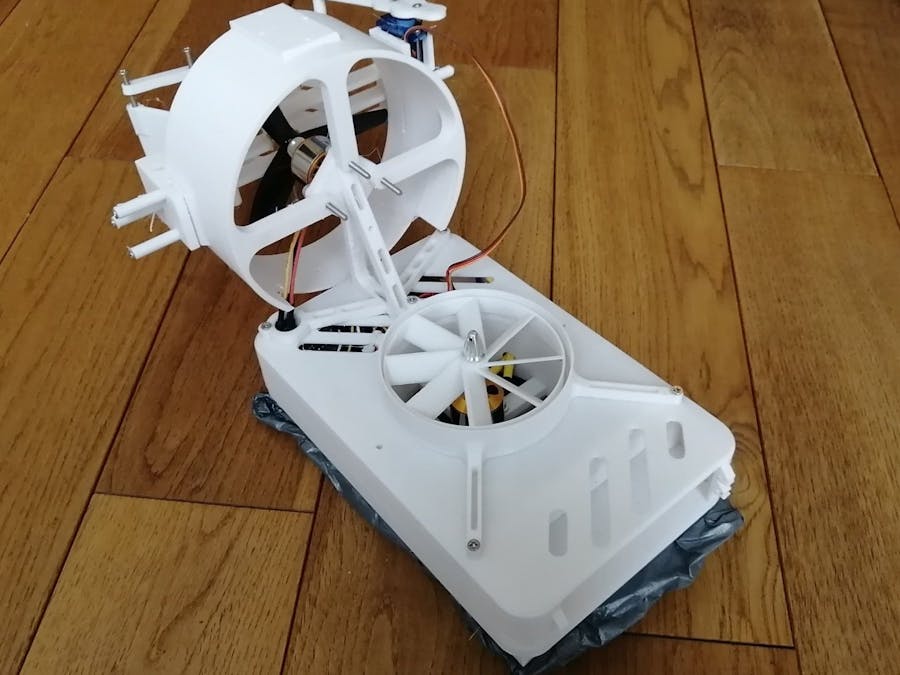
I've recently made a detailled project about "How to create a Hovercraft". This device was functional, but pretty heavy and huge.
The hovercraft presented on this project is way more lighter. He's also more convenient : 3D models are adapted to a regular use, for examply by having a special place for battery storage, or by using one battery (while the other needed a 9V battery for microcontroller' power and a LiPo for brushless motors).
Anyway, if you want any details on how to build the first hovercraft, check up : How to Make a Hovercraft - Hackster.io
ComponentsComponents are still the same :
- Arduino nano
- LiPo battery
- 2 brushless motors + ESCs (lifting and thrust)
- Wires
- Servo motor (for direction)
Connections are similar than those in the previous project :
That's the same case for the code :
#include "I2Cdev.h"
#include "MPU6050.h"
#include "math.h"
#include <Servo.h>
#include <SPI.h>
#include <nRF24L01.h>
#include <RF24.h>

#define CE_PIN   3
#define CSN_PIN 4

Servo speedh;
Servo highh;
Servo directionh;

float pwmspeed = 51;
float pwmhigh = 51;
float pwmdirection = 90;

RF24 radio(CE_PIN, CSN_PIN);

const uint64_t adresse = 0xE8E8F0F0E1LL;

int data[5];

void setup(){
  Wire.begin();
  Serial.begin(9600);
  radio.begin();
  radio.openReadingPipe(1,adresse);
  radio.startListening();

  speedh.attach(5);
  directionh.attach(6);
  highh.attach(9);
}


void loop() {

if (radio.available()){

radio.read(data, sizeof(data));
speedh.write(pwmspeed);
directionh.write(pwmdirection);
highh.write(pwmhigh);


pwmdirection = map(data[3], 0, 1080, 130, 50);

if(pwmspeed>50 && pwmspeed<170){
if(data[1]>600){
  pwmspeed = pwmspeed + 0.5;
}
else if(data[1]<400){
  pwmspeed = pwmspeed - 0.5;
}
}
else if(pwmspeed>=170){
  pwmspeed = 169;
}
else if(pwmspeed==50){
  pwmspeed = 51;
}


if(pwmhigh>50 && pwmhigh<170){
if(data[0]>600){
  pwmhigh = pwmhigh + 0.5;
}
else if(data[0]<400){
  pwmhigh = pwmhigh - 0.5;
}
}
else if(pwmhigh>=170){
  pwmhigh = 169;
}
else if(pwmhigh==50){
  pwmhigh = 51;
}
Serial.println(pwmhigh);
  }

delay(25);
}Before assembling :
- Prepare a lot of M.3x20 screws
- Connect all components between them as shown previously
- Insert the code onto the Arduino nano (remember that you will not be able to change this code after assembling without dissambling the whole structure)
- Print all 3D parts published below
Then :
- Fix the
Thrust Motor SupportandAir Tube Extenderto theMicrocontroller Support.It both use a same hole : fix them as show on screen n°3.
- Screw up the
Thrust Propeller Chamberand theThrust Motor Support
- Fix the thrust brushless motor on holes of
Thrust Motor Support - Fix the
Direction Plateto theThrust Propeller Chamber.Then fixDirection Plate (Middle),Direction Plate (sides),Direction Transmittion StickandServo Direction Attachtogether as shown on screens. Once those parts are set, take a moment to fix the servo motor at the dedicated place, a kind of embedding (on right of screen n°1)
- Put the circuit that you've previously done on the
Microcontroller Support(arduino extender on back and LiPo adaptaders on front of it, ESCs are on both sides). You would surely need to squish it a little bit, but with a great positionning, it might not affect connections - Screw up the brushless lifting motor to the
General Support(you can even fix thePropeller for liftingpart on it, a dedicated propeller) - Finally, attach
Microcontroller SupporttoGeneral Supportthrough side holes
- Your hovercraft is finished :D ! More informations about creating and fixing the skirt to the hovercraft on my previous project !
I opened a Tipeee to gather some funds for projects, I'll post informations and news about incoming devices.
A big thank to people who'll support me on Tipeee ;D


Comments
Please log in or sign up to comment.