In this project, we are going to control a four-wheeled robot based on the Raspberry Pi Pico W microcontroller using the PlayStation 5 Controller. Also, this robot has the ability to record video and we can view the image of the front of the robot online through the browser.
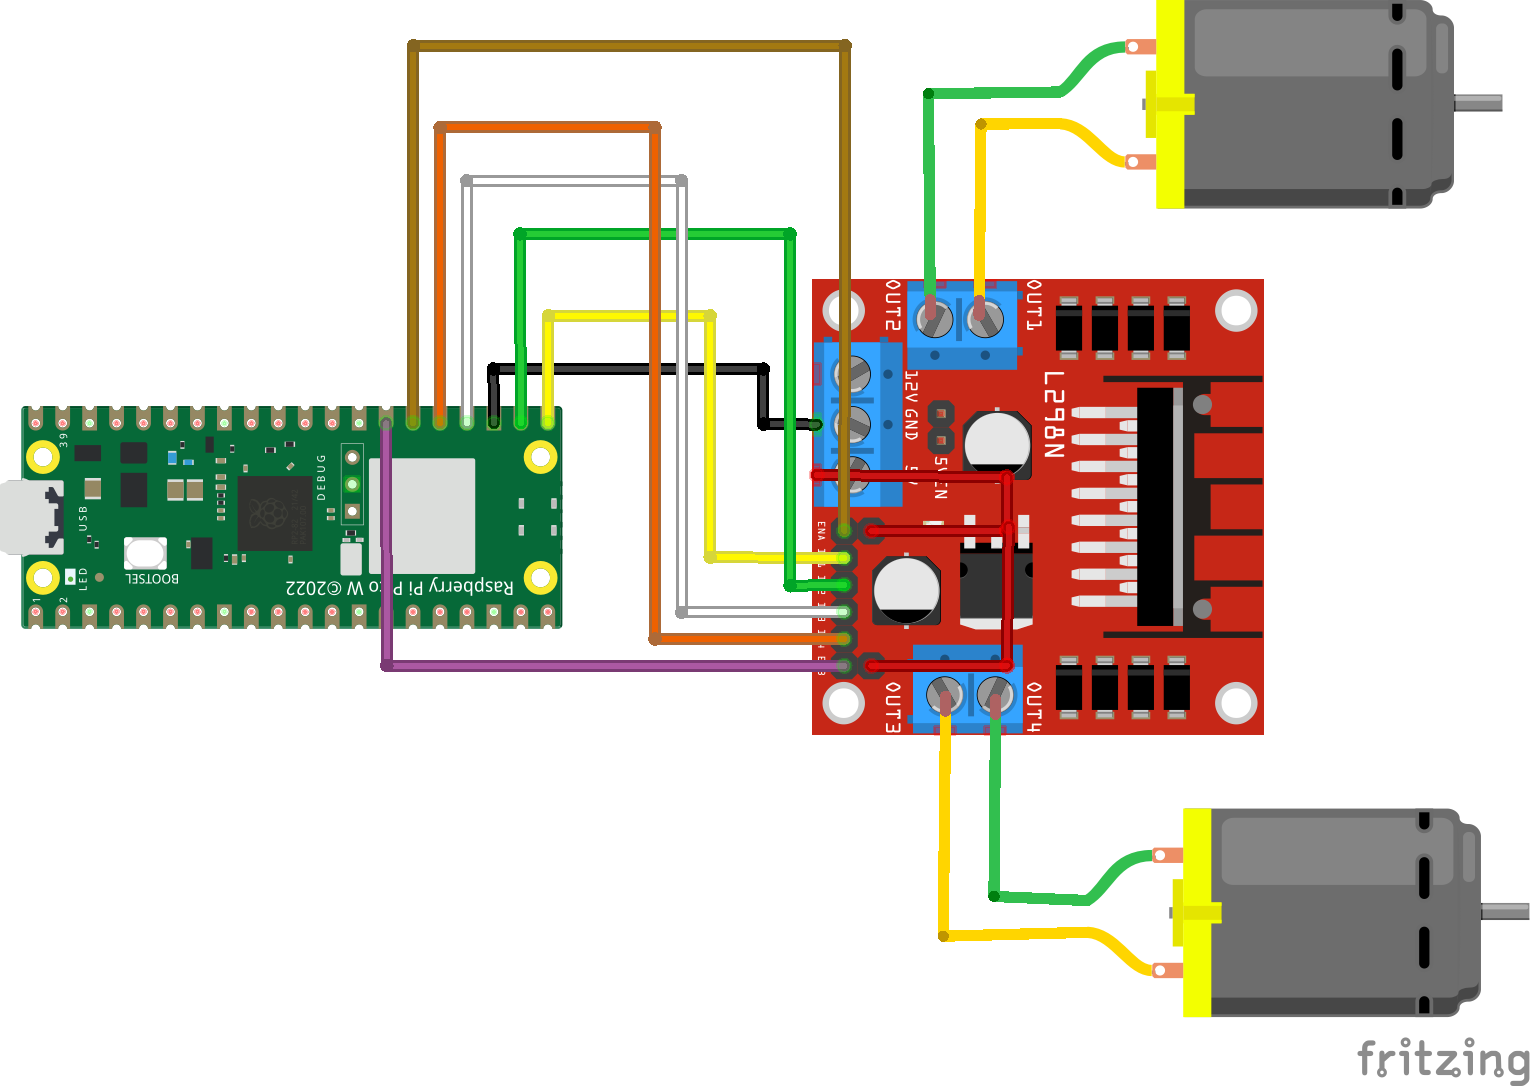
At the beginning, we talk about the hardware. The hardware and electronic circuit of our robot does not have any special points and we can easily understand the wiring and connections of the robot chassis motors to the Raspberry Pi Pico driver module and microcontroller easily from the Micro Python code.
Also, I placed an Android smartphone in front of the robot. I used this mobile as an IP camera. In order to be able to use an Android mobile phone as a IP camera, we need to install the DroidCam application on the Android phone. After you install this program, it will give you an IP address after running it on your mobile phone. If you enter this address in your browser, you can easily view the mobile image in front of the robot online. As you can see in the image below, we can see the front view of the robot through the browser.
I said before that the circuit of the robot is simple and we can understand the wiring method from the code we have uploaded on the Raspberry Pi Pico W. Below is a micropython program running on a Raspberry Pi Pico W.
import socket
import network
from time import sleep
from machine import Pin as pin
ssid = 'Mrsh77'
password = '1m77n2299215r77#'
in1 = pin(16,pin.OUT)
in2 = pin(17,pin.OUT)
in3 = pin(18,pin.OUT)
in4 = pin(19,pin.OUT)
ENA = pin(20,pin.OUT)
ENB = pin(21,pin.OUT)
ENA.value(1)
ENB.value(1)
#This Function moves the Robot forward
def forward():
in1.value(1)
in2.value(0)
in3.value(1)
in4.value(0)
#This Function moves the Robot backward
def backward():
in1.value(0)
in2.value(1)
in3.value(0)
in4.value(1)
#This Function moves the Robot right
def right():
in1.value(1)
in2.value(0)
in3.value(0)
in4.value(0)
#This Function moves the Robot left
def left():
in1.value(0)
in2.value(0)
in3.value(1)
in4.value(0)
#This Function stops the Robot
def stopfcn():
in1.value(0)
in2.value(0)
in3.value(0)
in4.value(0)
def connect():
#Connect to WLAN
wlan = network.WLAN(network.STA_IF)
wlan.active(True)
wlan.connect(ssid, password)
while wlan.isconnected() == False:
print('Waiting for connection...')
sleep(1)
ip = wlan.ifconfig()[0]
print(f'Connected on {ip}')
return ip
def open_socket(ip):
address = (ip,80)
connection = socket.socket()
connection.bind(address)
connection.listen(1)
#print(connection)
return connection
try:
ip = connect()
connection = open_socket(ip)
while True:
# Accept a connection from a client
client, addr = connection.accept()
print(f'Connected to {addr}')
while True:
# Receive data from the client
data = client.recv(1024)
if data:
# Print the data to the console
#print(data)
if data == b'forward':
forward()
elif data == b'back':
backward()
elif data == b'right':
right()
elif data == b'left':
left()
elif data == b'stop':
stopfcn()
except KeyboardInterrupt:
# Close the server socket
connection.close()
This code receives control commands through the socket programming and on the network and Wi-Fi. This code receives control commands from a Python app running on Windows. For example, if the string forward is received by Raspberry Pi Pico W, the forward function is executed. This function sets the raspberry pi pico W and driver pins to zero and one as the robot moves forward. Or if Raspberry Pi Pico receives the stop string, the robot will not move. This is a simple matter of hardware programming. We come to the discussion of Python programming and receiving PS5 Controller commands.
At the beginning, we need to install the pydualsense library in Windows. We do this very easily with the pip command.
pip install pydualsenseWith the help of this library, we can easily connect the PS5 Controller to Python and read the outputs of this controller using Python. But before that, we need to connect the PS5 Controller to Windows and our computer via Bluetooth. This work is very simple and you will learn this work with a simple search on the Internet. After establishing the connection between PS5 Controller and Python, we need to define our own control commands. For example, if I press the triangle button on the PS5 DualSense Controller, the forward command will be sent to Raspberry Pi Pico through the socket programming and the robot will move forward. If I press the circle button, the bot will receive the string right and move to the right. And if I don't press a button on the handle, the stop string will be sent to the Raspberry Pi Pico W microcontroller and the robot will stay still and not move. This work is made possible by the following Python script.
from pydualsense import pydualsense
import socket
from time import sleep
# Set up the client socket
client_socket = socket.socket(socket.AF_INET, socket.SOCK_STREAM)
client_socket.connect(('192.168.1.233', 80))  # Connect to the server
def button_pressed(cmd):
#print(f"{cmd} button pressed")
client_socket.sendall(cmd.encode('utf-8'))
def button_released(cmd):
#print(f"{cmd} button released")
client_socket.sendall(cmd.encode('utf-8'))
def main():
# Initialize the DualSense controller
ds = pydualsense()
ds.init()
# Set up event handlers for buttons
ds.cross_pressed += lambda state: button_pressed("back") if state else button_released("stop")
ds.circle_pressed += lambda state: button_pressed("right") if state else button_released("stop")
ds.square_pressed += lambda state: button_pressed("left") if state else button_released("stop")
ds.triangle_pressed += lambda state: button_pressed("forward") if state else button_released("stop")
try:
print("Press any button to see the output...")
while True:
pass # Keep the script running to listen for events
except KeyboardInterrupt:
pass
finally:
ds.close()  # Close the controller connection
if __name__ == "__main__":
main()
Finally, you can watch the video below to understand more details related to the project and the operation of the robot.


_3u05Tpwasz.png?auto=compress%2Cformat&w=40&h=40&fit=fillmax&bg=fff&dpr=2)
Comments
Please log in or sign up to comment.