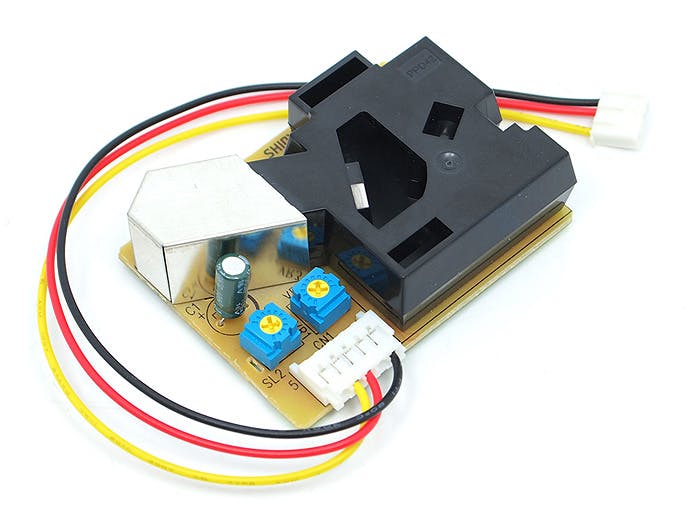
So, whilst thinking of a good demonstration for the Opensensors platform, we thought why not see how polluted our workplace is by hooking up a sensor to publish a continuous data stream to the Opensensors messaging broker. For this we need an easy to pick up and use sensor, we settled on the Shinyei PPD-42. We’ll use this in order to measure the number of potentially hazardous small particulates in the air, with an arduino connected to a linux PC (or Raspberry PI).
To run this mini-project you will need:
- Shinyei PPD-42
- Arduino UNO
- Computer with Linux installed (you can use a Raspberry PI)
We are basing this run-through on a project called DustDuino that uses the Shinyei PPD-42 sensor with an arduino and a wifi module. Check it out here. We used this project as our reference when setting up the sensor and writing the Arduino code.
Firstly we follow step 2 of the instructions for hooking up the sensor to the Arduino. Then we download the code from the projects github repository by opening the link for the code DustDuinoSerial.ino selecting raw and saving that page.
Opening this up in the arduino IDE, we now upload it to our Arduino UNO by connecting the Arduino and pressing upload.
You can check the data is coming in by using the Arduino IDE’s serial monitor.
We then need to figure out how to send the incoming serial message to the Opensensors message broker.
To do this we chose to write a Python script. We used the Mosquitto Python module. I’m going to assume that you already have Python installed, as it comes pre-packaged on most versions of Linux. If you don’t have it already, you’ll need to install pip to download and set up the Mosquitto python module. On Ubuntu or Debian this can be done with the following command:
sudo apt-get install python-pip
Once pip is installed we can install the Mosquitto python client module using the following command:
sudo pip install paho-mqtt
You can find out how to use the python module by having a read through the website which we’ve linked above.Writing and compiling python is really easy.
Hello Python WorldOpen up your favorite plaintext editor. Enter the line:
print “Hello World”
Save it as hi.py. Then in terminal, navigate to your document and enter the command:
python hi.py
You should see your “Hello World” response. It’s that easy.
Hello OpensensorsTo use the Mosquitto client python module we can run the following code to test out publishing. You’ll need to replace my username “Louis” (keeping the speech marks), and password with your details:
The mosquitto library we need to communicate with the Opensensors message broker:
import paho.mqtt.client as mqtt
Initialise the client option with our client ID of our device:
mqttc = mqtt.Client(client_id="939")
Set our username and password:
mqttc.username_pw_set("Louis", password="AbcDEFgH")
Connect to the Opensensors server:
mqttc.connect("mqtt.opensensors.io")
Publish a message to say hello:
mqttc.publish("/users/Louis/test2", payload="Hello Opensensors!", qos=0, retain=False)
Disconnect:
mqttc.disconnect();
Success, you should now have a functioning sensor :)
Next we need to get the serial working. To find out what your arduino serial port looks like we executed following command into terminal:
dmesg | grep tty
The output was something like this…
[    0.000000] console [tty0] enabled
[ 3522.192687] cdc_acm 7-1:1.0: ttyACM0: USB ACM device
The second line has details of our Ardiuno. The ttyACM0 is the device name and ‘/dev/ttyACM0’ is the serial port.
To open and read the serial port Python makes it really easy. You can run a little test to check whether it is working by using the following code:
For communication with the Arduino we need to use the serial library:
import serial
ser = serial.Serial(‘/dev/ttyACM0’) # open first serial port
while True:
print ser.readline()        # prints each line it reads from serial
Finally we just need to hack together the two pieces. Here is the code we used:
import serial
import paho.mqtt.client as mqtt
import time
mqttc = mqtt.Client(client_id="939")
mqttc.username_pw_set("Louis", password="AbcDEFgH")
mqttc.connect("mqtt.opensensors.io")
ser = serial.Serial('/dev/ttyACM0')  # open first serial port
while True:
message= ser.readline()
print message
mqttc.publish("/users/Louis/ODI/airquality", payload=message, qos=0, retain=False)
time.sleep(1);
Running this we were publishing our sensor data to Opensensors!
WE recommend adjusting the Arduino code to output the data in JSON format. This will make it easier to read and add functionality.
You can check out the topic producing Open Data we created here!


_ztBMuBhMHo.jpg?auto=compress%2Cformat&w=48&h=48&fit=fill&bg=ffffff)


Comments
Please log in or sign up to comment.