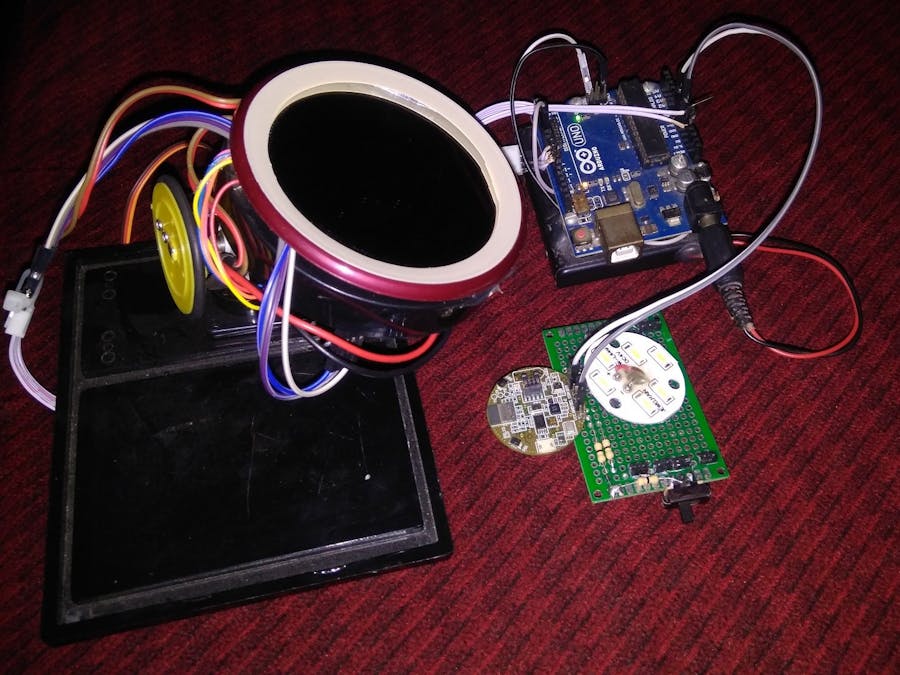
This project is a miniature prototype application for active sunlight harvesting with tracking mirror. This is not a replacement for solar panel and battery storage but it has its niche applications. For example: lighting up a greenhouse in Arctic regions or sending natural light to the center part of a large house that has no windows. I am using RSL10 Sense development board as hardware and Atmosphere IoT for development of firmware, mobile app and cloud dashboard. RSL10 is an ultra low power BLE microcontroller for sensor and IoT applications. The development board is equipped with all kinds of environment sensors for prototyping and testing different applications ideas.
The solution will have following features :-
- Replace artificial lighting with natural light improve indoor lighting
- Logging illuminance data on Cloud Storage
- Visualizing data on Cloud Dashboard
- Monitoring live illuminance data on BLE app
- Controlling LED Lamp from BLE app
The first demo shows how the mirror is trying to reflect sunlight near the RSL10-SENSE-DB-GEVK board. RSL10 uses the on-board Ambient Light Sensor NOA1305 to detect illuminance level.
The custom BLE app shown above can control external White LED lamp.
Here is another demo of the tracking mirror operation -
HardwareHere is a quick overview of all the hardware for this project:-
- RSL10-SENSE board : Low power BLE mcu + Environment sensors
- Jlink Debugger and Programmer : Flashing firmware + debugging
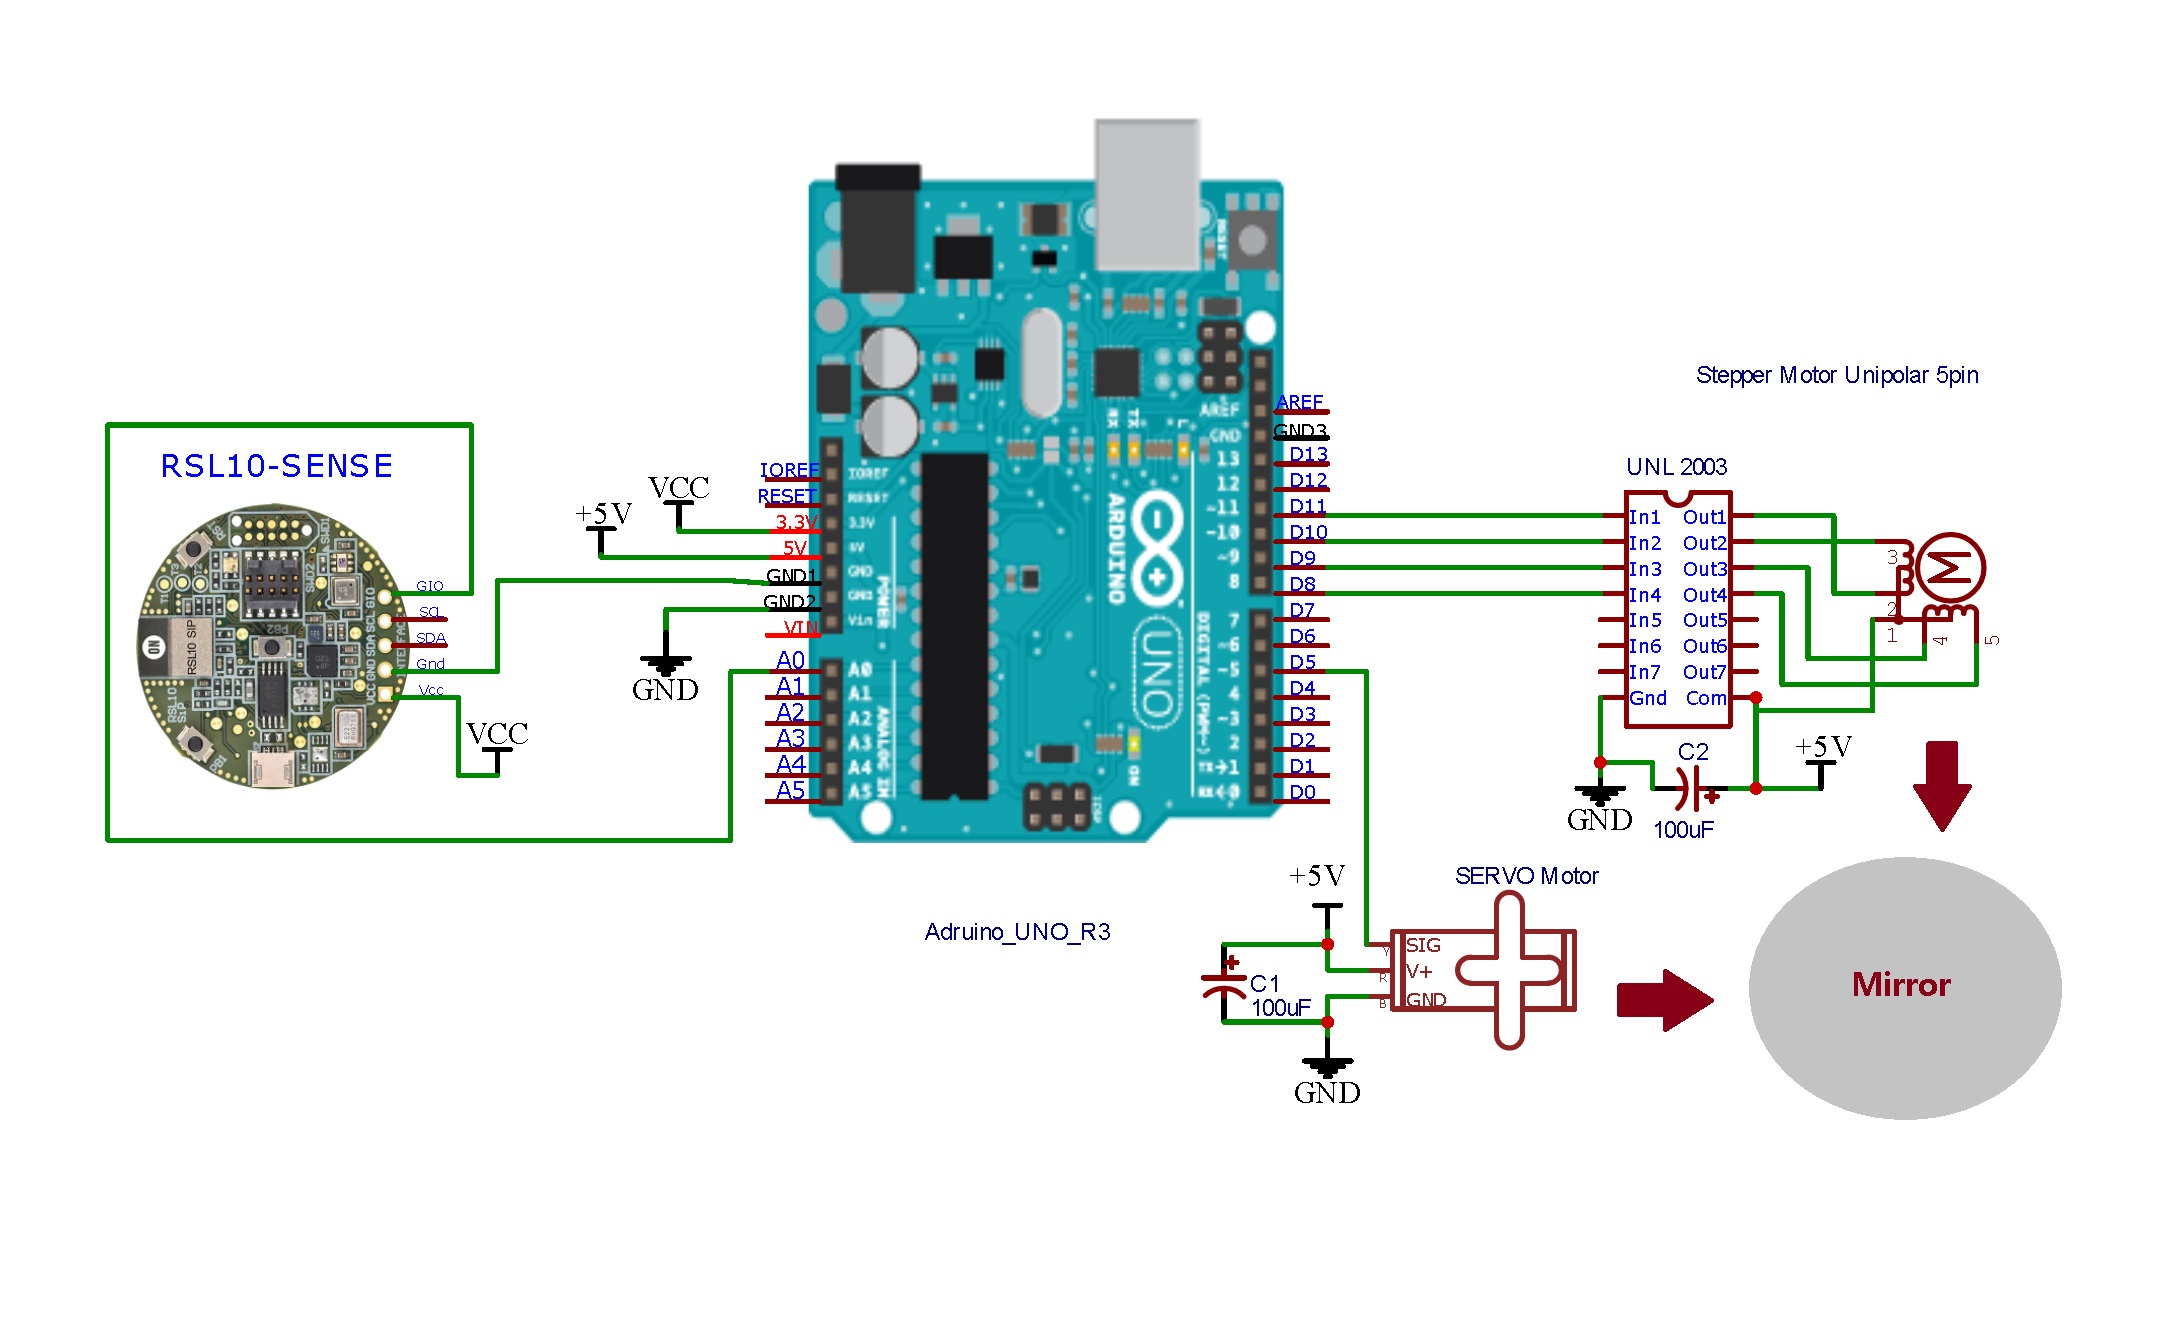
- Arduino Uno : Sidekick mcu for controlling stepper and servo motor
- UNL2003 : Stepper motor driver
- Mirror : Sunlight reflector
- Stepper Motor : Adjust mirror's polar angle
- Servo Motor : Adjust mirror's azimuth angle
- White LEDs : Lamp for controlling from BLE App
- Breadboard Holder Base : Mechanical support for tracking mirror
- Pan and Tilt mount : Mechanical support between still and moving parts
- AAA Battery : Powering RSL10-SENSE board and LED
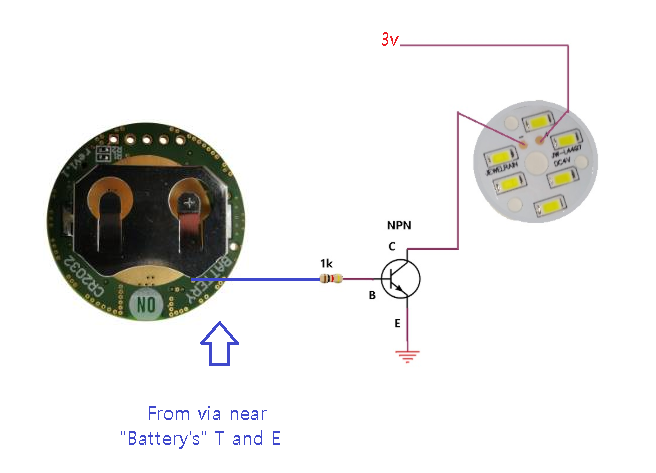
The CR2032 was running out during flashing/debugging. So I did some modifications like this to power the board from 2x AAA batteries. Also connected some bright White LEDs for controlling from BLE app.
The biggest problem was just 1 GPIO exposed, which connects to Arduino Uno for motors control. So, I did this via hack for another GPIO pin to drive the external LEDs.
A mirror is mounted with pan-tilt frame, 1 stepper motor, 1 servo motor on a breadboard holder plastic base. Self tapper screws and hot glue puts these together.
The firmware running on RSL10 mcu works like this:-
- Acquires sensor data over I2C bus from NOA1305 ALS at a regular interval.
- Compare the measured lux level with a threshold value, if the measured value is lower, turn on the on-board Red LED and drive GIO pin high
- The GIO pin is sensed by Arduino ADC A0, if this pin is high, Atmega328 on Arduino Uno will send driving signals to stepper and servo motors to adjust the mirror to reflect more light near RSL10-SENSE-DB-GEVK board.
- Once enough light gets reflected indoor and lux level rises above 50 lux, the Red LED turns off and GIO pin is made low by RSL10.
- The lux level live data is sent to the BLE app
- The app also acts as a gateway to send data to the cloud
- External White LED can be controlled from the app
- On board Green LED can be controlled by on board user button 1
-----------------------------------------------------------------------------------------------------------
Programming in Atmosphere IoTAtmosphere IoT is an all in one embedded firmware, mobile app and cloud storage & dashboard solution. RSL10 SENSE board is officially supported by Atmosphere IoT and browser based IDE (Atmosphere Studio) enables creation of IoT projects very easy.
Setup Configuration
Before programming the RSL10-SENSE board, following setup configuration must be completed :-
- Create an account for Atmosphere IoT Platform, which will allow user to access the Atmospheter Studio, an online based firmware, mobile app and cloud dashboard development IDE.
- Download and Install Atmosphere Agent on Windows/Linux computer, which acts as an intermediary between the host computer and the browser running Atmosphere Studio for flashing firmware.
- Download and Install Atmosphere IoT App on Android or iOS device. This app acts as an internet gateway for RSL10, also enables development and testing of mobile BLE app for the solution
- Download and Install JLink Software and Documentation Pack must be installed and placed in the system’s PATH to
C:\Program Files (x86)\SEGGER\JLink_V644g). Once this has been done, restarting the Atmosphere IoT Agent required if it’s already running for the setting to take effect. - Set Simple Add to PATH Instructions according to this tutorial. If this step is not done correctly, Atmosphere Agent will not be able to flash the RSL10 board with the help of SEGGER JLink debugger/programmer.
- JLink debugger is connected to the computer via USB and its ribbon cable is connected to the RSL10-SENSE board. Also the RSL10-SENSE board is powered on with CR2032 coin cell battery or through Vcc pin on 5 pin connector from other sources (2 AA/AAA battery).
- An Internet connection is maintained during the development of firmware, compiling and programming RSL10 board with cloud based Atmosphere Studio.
Pin Mapping
All the sensors are connected to RSL10 with I2C bus and few GPIO pins are connected to RGB LEDs, user buttons and an extra GPIO pin available for interfacing with external hardware.
The best part about developing a BLE/IoT solution for RSL10 with Atmosphere IoT is the ease of integration of complex parts like mobile app and cloud connectivity with little effort.
These are drag and drop c code block as visual icons called elements. Which only requires little configuration for doing things like reading sensors periodically or flipping a GPIO or sending sensor data over BLE to mobile app.
There are 3 tabs/parts to develop a complete solution, first part is the firmware part. Where sensor elements and interval (timer) elements can read sensor data. Data flows from one element to the next element, like one function passing a value to another function. One element can also trigger an action to the following element. BLE element connects the hardware to the mobile app and it can transfer both command and data back and forth between hardware and app.
Elements are dragged from the "Element Toolbox" to the development canvas by clicking on the white background.
Each element has its little configuration box called properties, which is accessible by clicking on each element. Most of the time default configuration works. The important part is to make sure the right data types like float, unsigned integer otherwise no data will go to app.
If you need to write your own c code, you can always use function element, use global variables to pass values and do what needs to be done.
Next tab is the BLE app development tab. Where the app layout, app inputs (buttons/sliders/dials) and outputs (label) etc can be configured. BLE element created from firmware tab will have an exact copy. This element will fetch data sent from hardware and pass it to the app and cloud with the help of other elements.
Sensor data sent from BLE app to cloud over Wifi or Cellular will be stored to the cloud storage if needed. This part is configured on the Cloud tab. Data stored to the cloud will be available for viewing for dashboard. If needed, data can be sent to other web services like AWS too. These things are configured here :-
- Details about everything can be found here : https://developer.atmosphereiot.com/
Once the setup is completed and the firmware is compiled, the RSL10-SENSE-GEVK is ready to be programmed/flashed.
- Save projects after all 3 tabs are configured
- Compile and see if there is any error
- Connect RSL10 board to PC's USB port with Segger JLink programmer
- Click the Program Firmware icon to flash the firmware
Note: Common mistakes like not powering the RSL10 board from Vcc/CR2032 battery or forgetting to run Atmosphere IoT Agent will cause upload failures.Restart RSL10 board & refresh browser after doing these !Programming the Sidekick mcu
The Arduino uno is programmed with Arduino IDE. The code is attached below in the code section is copied to Arduino IDE, appropriate board and serial port is selected, then code is compiled and uploaded.
Finally both the stepper motor and servo motor is connected according to the schematic attached in the schematic section.
Provisioning with BLE AppFollowing video shows how to configure the BLE app :-
Cloud DashboardSensor data from RSL10 board can be stored on Atmosphere Cloud storage. The Dashboard helps visualization of latest data and historical data in different configurable widgets like gauge/graph/glance/table etc.
- Data Glance : Shows latest sensor data sent from app in number
- Data Graph : Shows timestamp vs historical data points of a sensor
- Data Gauge : Shows latest data with an animated dial/gauge
Free developer accounts can store up to 10MB data. It may not sound much but 10 MB cloud storage equals to little more than 10000 individual data points. So, increasing data storage intervals to few minutes can provide few weeks worth of logging on the cloud. Sensor data can be downloaded or deleted to add new data.
BLE AppThis is how the BLE app looks like:-
Some images and logos to fill the app background, a light meter and a push button to control LED.
The app mainly does 3 things:
- Show live illuminance or lux level data sent from RSL10 board over BLE
- On/Off control of external White LED lamp with "Indoor Light" button
- Serves as a Gateway to send sensor data to Atmosphere Cloud
More details is added below about how the app is 'developed' and a video about how to use it !
Please note that, this app is not a standalone app or independent apk. It runs with in Atmosphere IoT's app. To make it a standalone app, one must purchase commercial IoT (White Label) plan from Atmosphere IoT.References & Resources
https://atmosphereiot.com/blog/on-rsl10-support/
Here is the official tutorial from Atmosphere IoT team :-
ConclusionThis project didn't end up exactly the way I wanted to build it. Having only one exposed GPIO pin on RSL10 board was a bummer, that's why I had to use another microcontroller to control the stepper-servo mirror reflector. My ideal version of solution will utilize 2 RSL10 boards, one will connect to the app and cloud, other will connect to the first one over BLE which will control the reflector mirror. This project is a low cost basic prototype only. Development of a real solution will need Cloud Coverage Sensor, GPS, RTC and Compass data for optimum tracking and reflection of sunlight.


_ztBMuBhMHo.jpg?auto=compress%2Cformat&w=48&h=48&fit=fill&bg=ffffff)


_3u05Tpwasz.png?auto=compress%2Cformat&w=40&h=40&fit=fillmax&bg=fff&dpr=2)
Comments
Please log in or sign up to comment.